Troubleshooting guide for Roku’s audio sync problem. Learn easy steps to fix Roku audio out of sync issues and enjoy seamless streaming once again.
Roku‘s popularity in streaming stems from its user-friendly interface and wide range of app options, making it easy for people to access their favorite shows and movies all in one place. Its seamless integration and affordability have made it one of the most popular streaming devices for many.
However, recently, I’ve noticed a problem with the sound matching up right. When I hit pause, the sound kind of lags behind and doesn’t catch up, which really messes up the fun of watching. After looking around, turns out lots of folks have this issue. So, I decided to put together this guide to help us all out.
Continue reading this article to find out the steps for troubleshooting audio sync problems on your Roku device.
How to Fix Audio Out of Sync on Roku (16 Methods)
Turn Off Volume Mode and Audio Leveling
Roku knows about the audio problem and even has an official fix. Just go to settings and turn off volume mode and audio leveling. This seems to be the most common fix for the audio sync glitch, as most users who had the problem found success with this step.
To fix this audio issue, follow these steps when you’re watching something or adjusting the sound for devices connected to your Roku TV and wireless speakers:
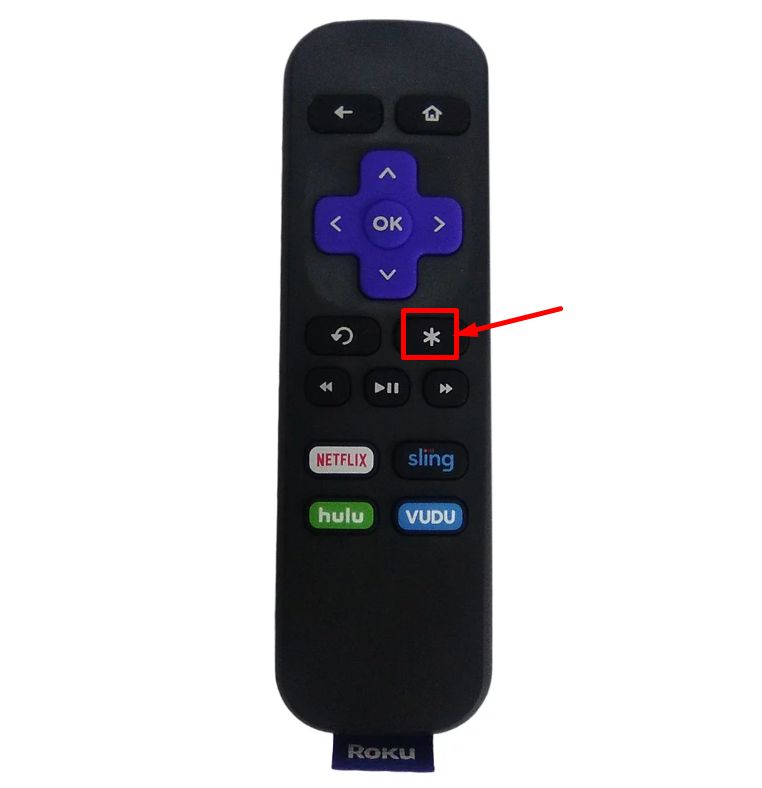
- On your Roku home screen, press the star (*) button on your remote.

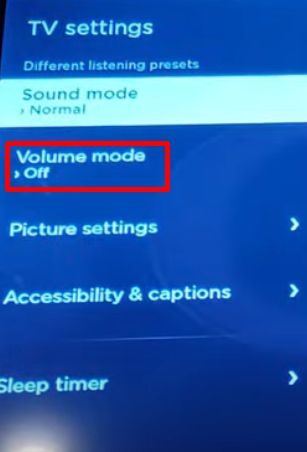
- Next, head into the Volume Mode setting from the menu that pops up.

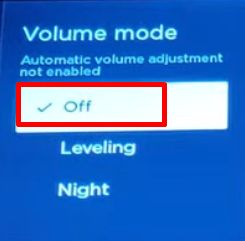
- If it’s turned on, switch off Volume Mode by scrolling right.

- Similarly, if Audio Leveling is on, turn it off by scrolling right.
- Try this out – it should sort your audio sync issue on your Roku.
Reboot the TV but not the Roku
If you’re still dealing with the frustration of audio being out of sync on your Roku, here’s a simple solution that could make things right. Before you dive into complex troubleshooting, try this simple fix: reboot your TV, without touching your Roku device.
Often, audio sync issues can be resolved with a simple reboot. However, in this case, put your attention on your TV, not the Roku. Turn off your TV completely and unplug it from the power source. Wait for about 10-15 seconds, then plug it back in and power it on. This can clear any temporary glitches that might be causing the audio lag.
After the TV has restarted, play some content on your Roku to check whether it resolved the audio sync issues on Roku. This simple method helped many Roku users.
Check the Auto Sync Setting of the TV
Some TVs come with an “auto sync” feature hidden in audio settings that may be helpful in resolving audio delay on Roku. If your tv has that setting, you can reverse it from which position it is currently positioned – sometimes that’s all you need to fix the sync issue.
Check your TV’s audio settings for “auto sync.” You can sometimes fix audio and video sync problems by turning it on or turning it off.
While you’re in TV settings, see your default sound output type. If you use extras such as soundbars or set-top boxes with your Roku, this is essential.
If the TV’s default sound output is causing sync issues, switch it up. Try changing settings and see if things improve.
Change Audio Format
I’ve noticed a consistent issue with Rokus audio going out of sync when it has to change sound formats for your device. To fix this, try picking an audio format that your device doesn’t need to convert.
- Figure out the sound format that’s causing the trouble.
- Find an audio format that your device can handle without converting.
- Go to Roku settings and adjust the audio output format to match your device.
- Now, you can try it out by playing something and seeing if the audio syncs up.
By sticking to compatible audio formats, you can probably avoid those annoying sync issues on Roku.
Clear Roku TV Cache
If you’re facing a problem with your Roku TV where the sound and picture don’t match up, you can fix it by clearing the TV’s cache. This might sound complicated, but it’s actually pretty easy. All you need is the remote control that came with your Roku TV (not a different remote or universal remote).
Here’s what you need to do:
- Make sure you have the Roku TV remote with you. If you’re using a different remote, this won’t work.
Here’s how to clear the Roku TV cache using a remote.
- Go to the Home section.
- Press the ‘Home‘ button on your TV remote five times.
- Then, press the ‘Up arrow‘ ⬆️ button on your remote one time.
- After that, press the ‘Rewind‘ ⏪ button two times.
- Finally, press the ‘Fast forward‘ ⏩ button two times.
Please note: Clearing the Roku cache isn’t like resetting your TV, where you’d lose your settings and channels. In simple terms, you won’t lose anything by doing this.
Change the Sound Setting to Stereo
To solve a problem with Roku audio not matching up, you can switch the audio mode on your Roku TV settings to Stereo.
You can do this by following these steps:
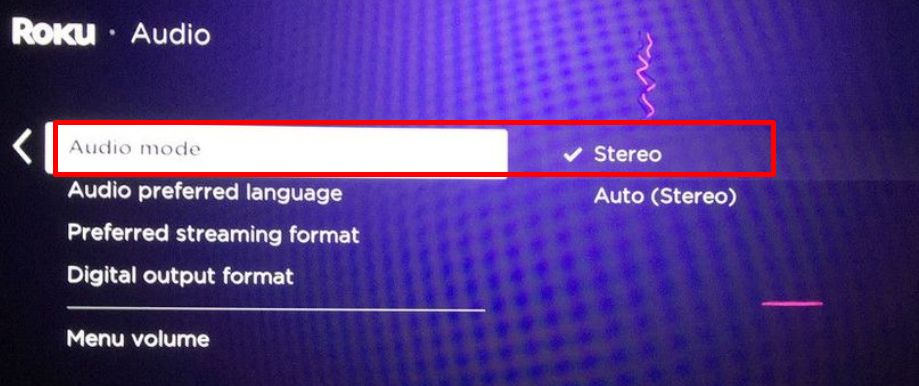
- Navigate to the Settings on your Roku
- Then, select Audio.
- Choose Audio mode and change it to ‘Stereo‘.

- In the Audio settings, select HDMI. Then, switch from ‘Autodetect‘ to ‘Stereo PCM‘.
Use the TV’s Built-in Speakers
Sometimes, the audio and video not syncing up occurs even with your TV’s speakers.
However, if you’ve set up an external sound system like a Soundbar or Surround sound incorrectly, then you may be experiencing a problem.
If that’s the case, you should unplug the external sound system and use your TV’s built-in speakers for the sound.
If you can resolve the audio sync problem using the internal speakers, then the problem is likely with the external sound setup. It might be defective or configured wrongly.
On the flip side, if the problem persists even with the internal speakers, then the issue might be with your Roku device. In this situation, you might be able to solve it by following other methods mentioned in this article.
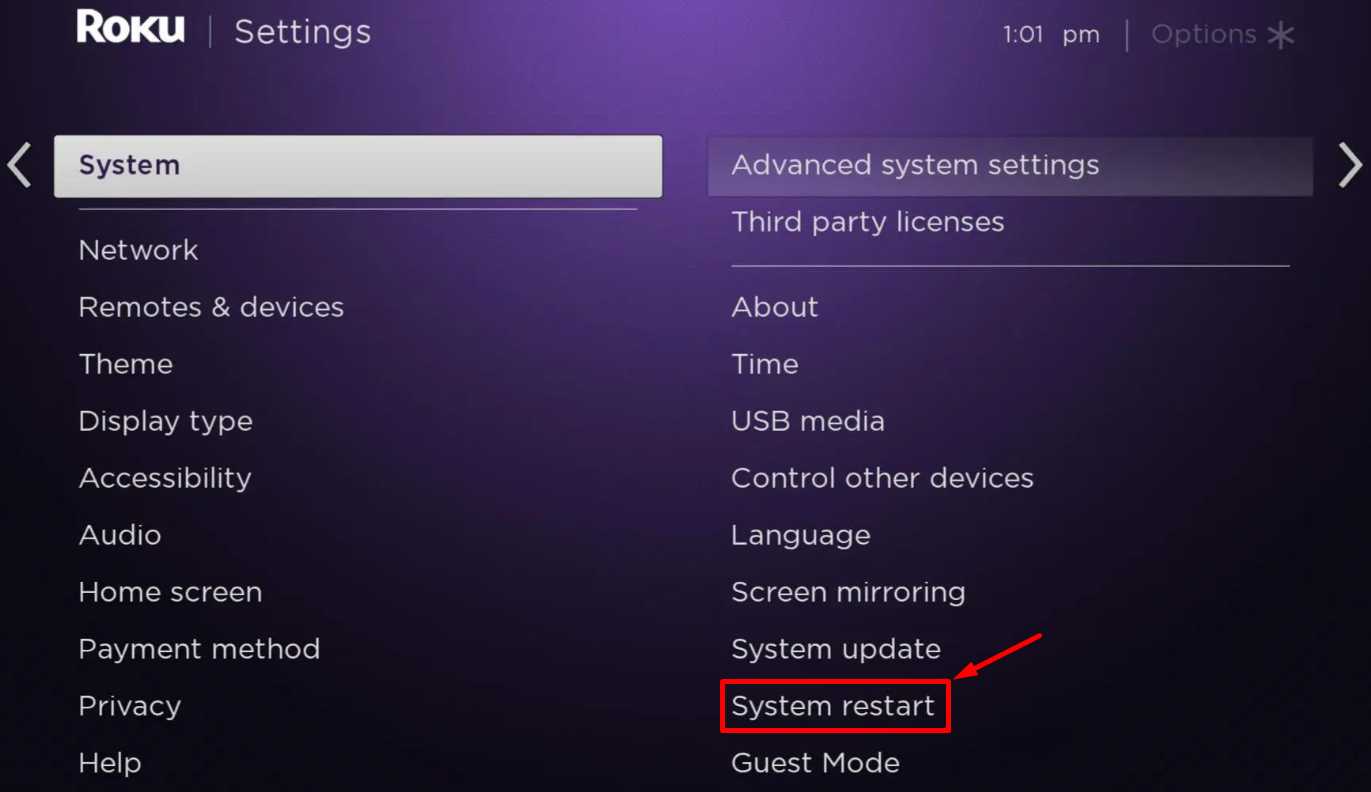
System Restart Roku
Sometimes, when things aren’t working right on your TV or streaming devices like Roku, giving them a restart can actually fix the problem. This applies to audio sync issues on Roku too, according to users who have encountered the same issue.
You can do the system restart on by following these steps:
- Press the Home button on your Roku remote.
- Then scroll down and select Settings.
- Choose System.
- Then select System restart.

- At last, click on Restart.
- After your device restarts, see if the audio sync issue has been sorted out. If not, let’s move on to the next trick.
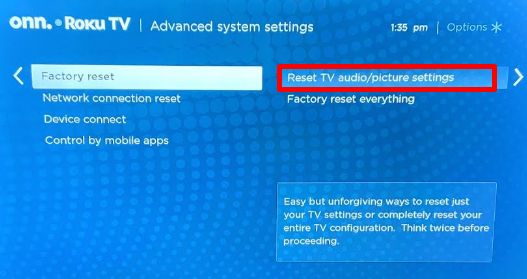
Try Resetting Audio Settings
If the audio on your Roku is out of sync with the picture, it could be due to misconfigured audio settings. Resetting these settings to the default can help.
Here’s a quick reminder: this isn’t a complete Roku device reset; it’s just about the audio settings.
Here’s how to reset Roku audio settings and fix the sync problem:
- Go to Settings > System > Advanced System Settings.
- Select Factory Reset
- Now, you have to select Reset TV audio/picture settings.

- Finally, press the Play/Pause button three times. This will reset your Roku TV’s audio settings to the way they were when you got it.
- You’ll see a message confirming that all the audio settings are back to their default state.
Ensure that Roku Hardware is Not damaged
 It is crucial to determine if the issue lies with Roku or something else. Audio out-of-sync is a common issue with audio and video devices and can have various causes.
Roku’s audio and video can fall out of sync due to hardware problems. This applies to all Roku versions, including external streaming devices and built-in smart TVs.
Check your Roku for physical damage or dents, including input ports. If there are any openings, dust might settle in, causing problems.
For any unexpected holes or port issues, contact Roku for repairs. If internal damage is suspected, an authorized Roku service center can help resolve fixable issues and clean the internals, eliminating dust.
Check Cables and Connections
 Ensuring the use of authentic and undamaged cables with Roku is crucial to prevent audio out-of-sync issues. Genuine cables maintain signal integrity, reducing the risk of disruptions that can lead to audio and video synchronization problems.
Damaged cables, on the other hand, may result in signal loss or interference, increasing the possibility of audio sync problems.
By choosing quality and properly functioning cables, users can significantly enhance their Roku experience by minimizing the potential causes of audio sync problems.
So, you should inspect HDMI and power cables that are connected to your Roku for damage. In case of need, swap them, making sure they meet the specifications.
If they are damaged or non-functional, make sure you buy reputable replacement cables from authorized sellers. It is important to ensure that cables fit snugly into input ports, with no wiggling.
Power Cycle Roku
 If the above solutions don’t do the trick, there’s a chance a temporary glitch or problem has found its way in.
The most effective approach to overcome this issue is to perform a power cycle. Here is how to do it.
- On your Roku’s home screen, go to “Settings“
- Then select “System.”
- After that, choose “System Restart.”
- Confirm, and your Roku will turn off.
- Now, disconnect the power cord from the Roku and the outlet.
- Wait for about 10-15 seconds.
- Reconnect the power cord to the Roku and the outlet.
- Give it a moment, then use the remote to turn your Roku back on.
Power Cycle Roku Remote
Power cycling the Roku remote is also important to address the Roku audio out of sync issue as it resets the remote’s internal components, including its connection to the Roku device. This can resolve communication glitches and synchronization problems between the remote and the Roku, ultimately helping to restore proper audio-video alignment for a better viewing experience.
You can power cycle the Roku remote by following these steps:
- Open the battery compartment on the back of the remote and take out the batteries.
- Wait for about 10-15 seconds.
- Reinsert the batteries into the remote, making sure they are placed correctly.
- Press any button on the remote to see if it responds and connects to your Roku.
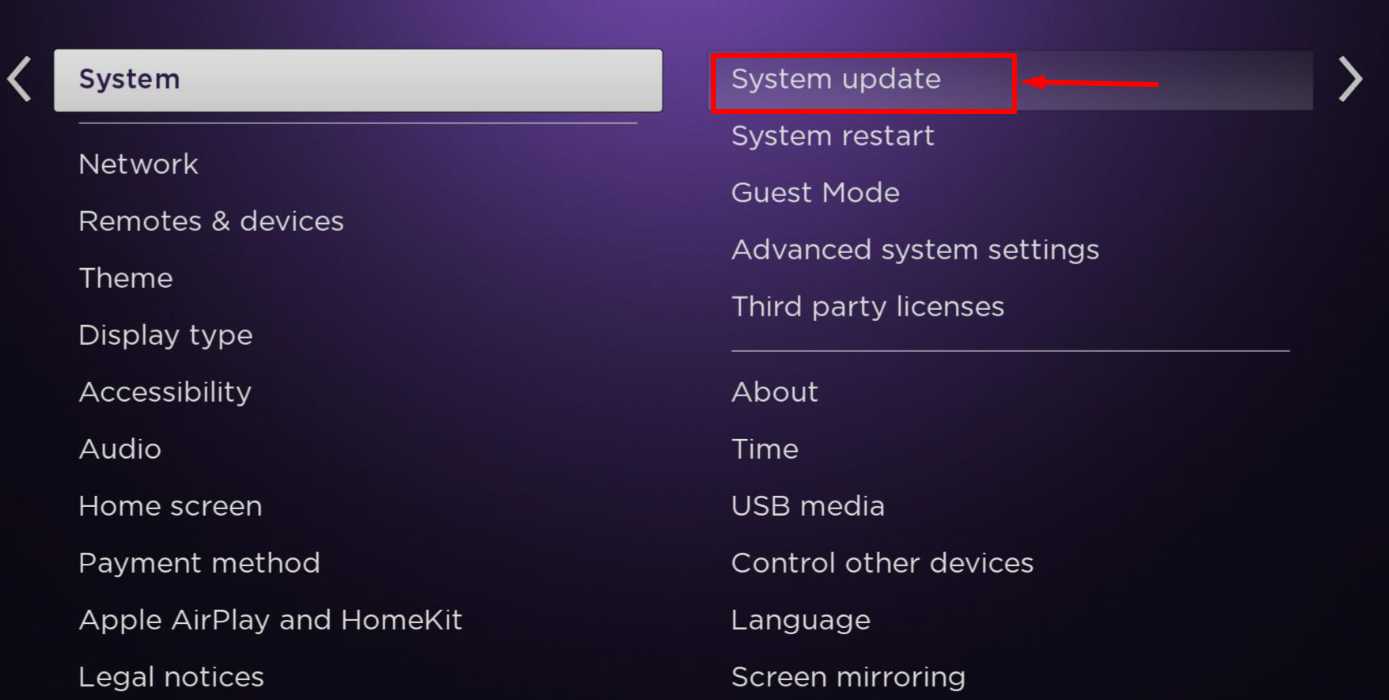
Check for Software Update
Another reason for audio or picture problems on Roku might be software that has become outdated. So, updating your Roku software may fix the Roku audio delay or picture delay.
In software updates, there are usually bug fixes and optimizations that can address various issues, including audio synchronization problems. A device update may also include tweaks to the internal workings of the device, which can have a positive impact on how audio and video are processed and synced.
- Press the Home button on your Roku remote.
- Choose Settings
- After that go to System then System Update.

- Click on Check Now to check for updates.
- If there’s an update, your Roku device will download and install it automatically. It will then restart once it’s done.
Keep in mind: Your Roku device needs to be connected to the internet in order to complete the update download and installation process. If not, you can try the manual update method.
Factory Reset
If your Roku TV’s audio remains out of sync, there is only one solution left: factory reset.
By doing a factory reset, you’ll erase all data from your Roku, wiping out potential bugs that might be causing the issue.
However, remember that this will also remove all user data and linked accounts, so you’ll need to set up everything again.
Before you proceed, ensure you’ve backed up your data. A factory reset will revert your Roku to its original state, just like when you first got it.
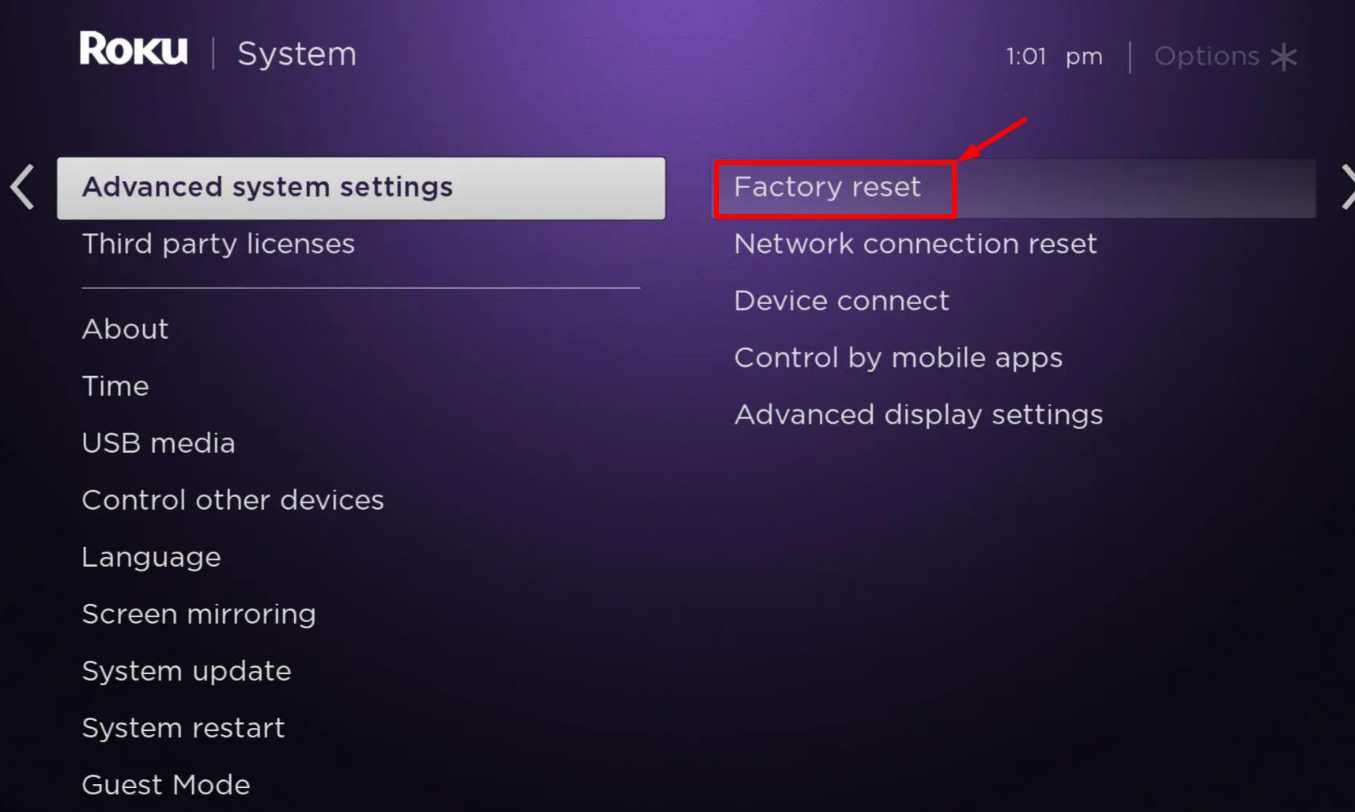
To perform a factory reset on your Roku device, follow these steps:
- Go to the Roku Home menu.
- Click on Settings.
- Choose Advanced System Settings.
- Select Factory Reset.

- Confirm by clicking Factory Reset Everything.
- This process will restore your Roku device to its original state as if you had just purchased it.
Contact Roku Support
Contacting Roku support can indeed be useful none of the above methods helped you to resolve the Roku Audio Out of Sync issue. With Roku’s dedicated support team, you can get professional assistance troubleshooting Roku-related problems, including audio synchronization.
They can provide personalized guidance, step-by-step instructions, and advanced solutions tailored to your specific Roku model and setup.
Furthermore, Roku support can offer insights into any known issues or updates that might be impacting audio synchronization. Their expertise in diagnosing both common and uncommon problems can save you time and frustration, as they can quickly identify if the issue is rooted in hardware, software, or network-related factors.
RELATED GUIDES: –
- Roku TV Blinking Red Light: Common Causes and Quick Fixes
- Roku Blinking Blue Light? Here’s How to Troubleshoot & Fix It
- How to Fix Roku Remote Blinking Green Light (8 Ways)
- Roku Blinking Purple Light? Try These 6 Simple Solutions Now
- Why is My Roku Blinking White? Fix Roku Blinking White Light Easily
- Best Roku Web Browsers
To sum up, solving Roku’s audio and video out of sync issue is simple with these solutions. Test the methods shared and do drop a comment on what worked for you. Share this article with your friends to help them too. If you’ve found success with other methods, let us know – together, we can enjoy seamless streaming!
Frequently Asked Questions (FAQs)
How do I fix the audio delay on my Roku?
If you have the Roku audio out of sync issue on your device, here are some things to try: turn off Volume Mode and Audio Leveling, restart your TV without touching the Roku, check your TV’s Auto Sync Setting, and consider changing the Audio Format or using Stereo Sound. Additionally, the article has more suggestions to fix the issue.
What is audio leveling on Roku?
Audio leveling on Roku is a feature that makes sure the sound stays the same even when you switch between channels or when ads play. This way, you don’t have to keep changing the volume. It keeps things even and comfortable for your ears.
Why is my Roku audio guide off but still talking?
If your Roku keeps talking even after turning off the Audio Guide/Screen Reader, it might be due to descriptive audio being enabled on a streaming service. To stop this, disable descriptive audio within the settings of that specific streaming service.

