Have you ever encountered common issues or bugs while streaming music on the Amazon Music app? If you have, you might have been able to resolve them based on your past experience. However, recently, many users have been reporting a playback error when using the Amazon Music app.
They’re experiencing problems such as the app not working or failing to play music, accompanied by an error message that reads, “Playback error – There was a problem playing this song. If the problem persists, contact Amazon customer service. Exception #180.” This raises the question: What exactly is Exception #180 on Amazon Music?
What is Exception 180 on Amazon Music?
To put it simply, Amazon Music exception 180 is an error code specific to Amazon Music that refers to a problem with playing a particular song. Whenever this error occurs, it indicates that the app encountered a technical issue or a hiccup while attempting to play the requested track.
What Causes the Exception #180 on Amazon Music
According to information provided by Amazon Forum, the “Exception 180 Amazon Music” error typically indicates a licensing issue, suggesting that the digital license for Prime Music has expired and needs to be renewed.
However, it’s important to note that the occurrence of the “Amazon Music Exception 180” error seems rather random. In many cases, this error may not be related to a licensing issue at all. It can occur in both online and offline modes of Amazon Music.
Sometimes, a song or album may stream correctly initially, but then the “Exception 180 Amazon Music” error suddenly appears and persists seemingly indefinitely.
If you encounter Exception #180 on Amazon Music, there are a few troubleshooting steps you can try to resolve the issue. Now let’s find them out one by one.
How to Fix Amazon Music Exception 180
Check Your Amazon Music Subscription
To begin troubleshooting this issue, you can start by checking your Amazon Music Settings to verify whether your Amazon Music subscription plan is still active or if it has been canceled or expired.
Make sure your device is connected to the internet, and then try using the Prime Music app to renew the license automatically. This process should resolve the “Exception 180” error and allow you to continue enjoying your music.
To check the status of your Amazon Music service and renew your subscription, you can follow these steps:
- Open a web browser on your device.
- Visit the Amazon Music website.
- Sign in to your Amazon account associated with your Amazon Music subscription.
- Once signed in, navigate to the settings or account section of Amazon Music.
- Look for the option labeled “Your Amazon Music Settings” or something similar.
- Click on it to access detailed information about your Amazon Music subscription.
- In this section, you should be able to view your current subscription status and the expiration date of your subscription.
- If your subscription has expired or is nearing expiration, you can proceed to renew it from this page.
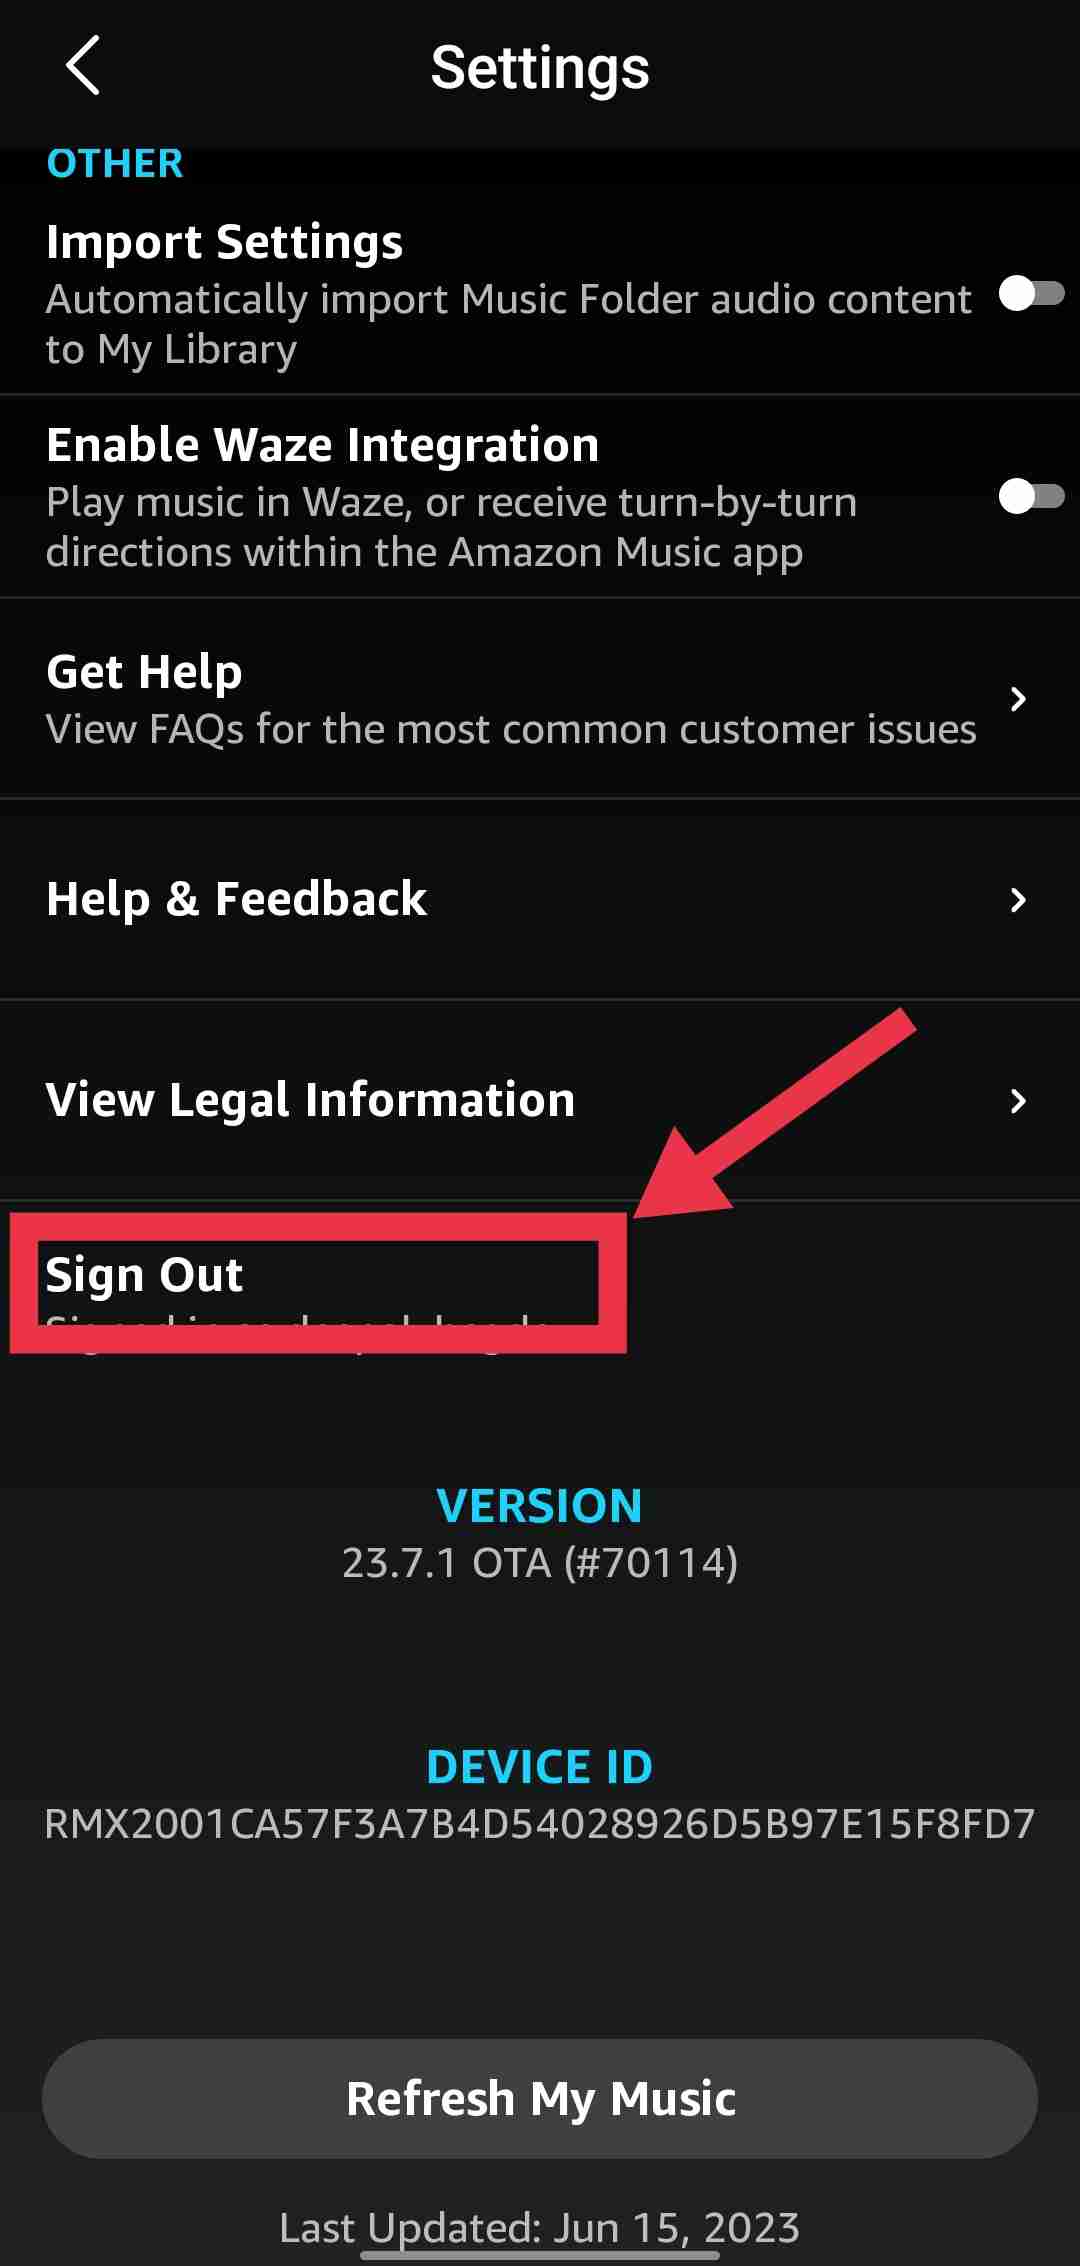
Sign Out and Sign Back in Amazon Music Account
By signing out and signing back in, the app will be able to reestablish a stable connection and resolve any temporary issues that may have caused the “Exception 180” error.
To do this, follow these steps:
- Open the Amazon Music app on your device.
- Locate the account section within the app.
- Scroll down to find the Sign out option and tap on it to sign out of your Amazon Music account.

- Once signed out, wait for a few moments.
- Now, sign back into your Amazon Music account by entering your credentials.
This will refresh your account settings and establish a fresh connection. After completing this process, you should be able to use Amazon Music without encountering the playback error.
Force Stop the Amazon Music App
If you’re encountering issues with the Amazon Music app, another troubleshooting step you can try is to force stop the app. It can help resolve temporary performance issues or glitches.
Here’s how you can force stop the Amazon Music app:
On Android
- Open the Settings app on your Android device.
- Navigate to the “Apps” or “Applications” section.
- Look for “Amazon Music” in the list of installed apps and tap on it.
- On the app info page, you will find the option “Force Stop” Tap on it.

- A confirmation prompt may appear, asking if you want to force stop the app. Confirm the action.
On iOS
- Open the Amazon Music app on your iOS device.
- Swipe up from the Home Screen to access the app switcher or multitasking view.
- Locate the preview of the Amazon Music app.
- Swipe up on the preview to force close the app.
By force stopping the Amazon Music app, you essentially terminate its processes and clear any temporary data that might be causing issues. This action can provide a fresh start when you relaunch the app, potentially resolving the “Exception 180” error or other performance-related problems.
After force stopping the app, wait for a few seconds, and then relaunch it to see if the error persists. If the issue persists, head over to our next troubleshooting method.
Update the Amazon Music App
If none of the above methods worked, you should make sure your Amazon Music app is up to date. There may be errors, bugs, or technical vulnerabilities in older versions of the app. Thus, it’s recommended you always use the latest version of the Amazon Music app.
To update the Amazon Music app, follow these steps:
On Android devices
- Open the Google Play Store on your Android device
- Tap on the menu icon (usually three horizontal lines) in the top-left corner of the screen.
- From the menu, select “My apps & games.”
- You will see a list of installed apps with available updates. Find “Amazon Music” or use the search bar to locate it.
- If there is an update available, you will see an “Update” button next to the app.
- Install the latest version of Amazon Music by tapping the “Update” button.
On iOS devices
- Open the App Store on your iPhone or iPad.
- Tap on the “Updates” tab located at the bottom right corner of the screen.
- Scroll through the list of available updates or search for “Amazon Music.”
- If an update is available for the Amazon Music app, you will see an “Update” button next to it.
- Tap on the “Update” button to download and install the latest version of Amazon Music.
Keep in mind that the availability of updates may vary based on your device, operating system version, and region. If you don’t see an update option, you may already have the most recent version installed.
Remove and Re-add or Re-download Songs
Another method that users have found helpful is removing and re-adding or re-downloading the songs in your library. This process can help refresh the song files and resolve any issues that may be causing the error.
Here’s how you can remove and re-add or re-download songs on Amazon Music:
- Open the Amazon Music app and navigate to your Library section.
- Locate the songs that you want to remove from your library.
- For each song, look for the three dots icon next to it and tap on it.
- From the options that appear, select “Delete” or “Remove from Library” to remove the song.
- Once you have deleted the songs, use the app’s search function to find them again.
- When you find the songs, tap on the three dots button next to each song to open the menu.
- From the menu options, choose “Add to My Music” to add the songs back to your library for online streaming or “Download” to download them for offline listening.
- After re-adding or re-downloading the songs, go back to your Library and check if the “Exception 180” error persists.
This method has been reported to be effective by some users in resolving the “Amazon Music Exception 180” error on Amazon Music.
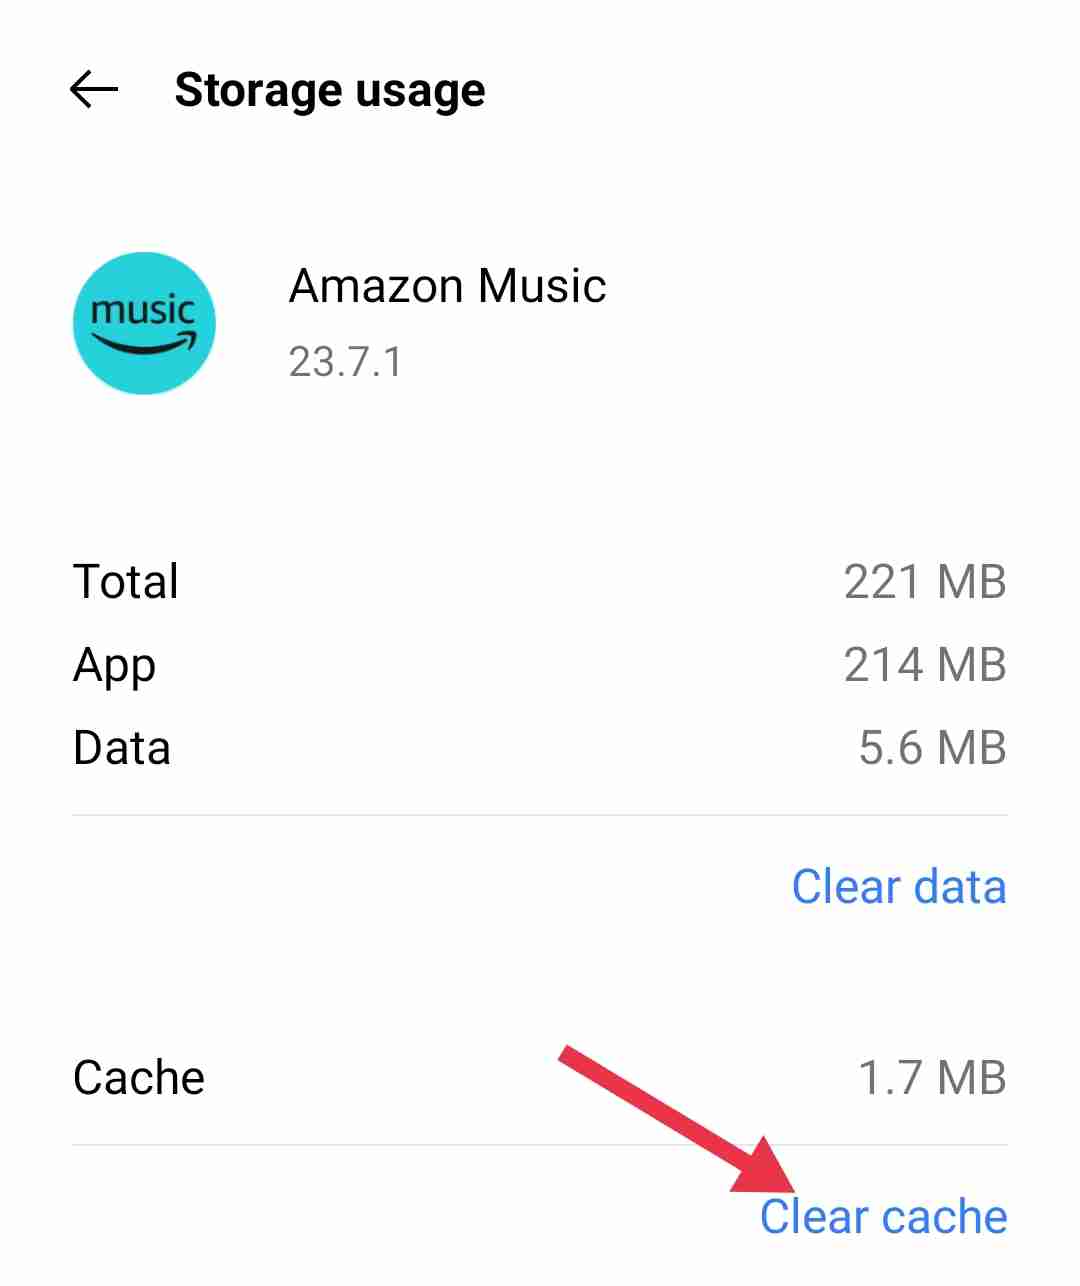
Clear the cache of the app
Sometimes, the Amazon Music app Exception 180 can occur due to corrupt cache files stored on your device. When these cache files fail to function properly, it can lead to issues like this.
In order to resolve this, a recommended solution is to clear the app cache of Amazon Music and check if the problem persists.
You can follow these steps to clear the app cache:
On Android
- Open the “Settings” on your Android phone.
- Look for “Apps” or “Application Manager” and tap on it.
- From the list of all apps, select the Amazon Music app.
- In the “Storage” section, you will find the option “Clear Cache“. Tap on it.

On iOS
- On your iPhone or iPad, go to “Settings“.
- Look for the “General” section and tap on it.
- Find and select “iPhone Storage“.
- Scroll down to locate the Amazon Music app and tap on it.
- You will see the option “Offload App” which helps free up storage space and clear the cache. Tap on it.
After clearing the cache, it’s a good idea to restart your device and then relaunch the Amazon Music app. This process helps ensure that any temporary cache-related issues are resolved. By doing so, you can check if the Exception 180 error still persists.
Uninstall and Reinstall Amazon Music App
If the previous solutions haven’t resolved the Amazon Music Exception 180 error, another option to consider is uninstalling and reinstalling the app. This process provides a clean start by removing the app and its associated data, including any potential factors causing the malfunction.
Uninstalling the Amazon Music app
- On your Android/iOS device’s home screen, find the Amazon Music app icon.
- Tap and hold the app icon for a moment until a menu or options appear.
- On Android, select the “Uninstall” option to delete the app from your device.
- On iOS, select the “Delete App” option that appears on the menu. Confirm the uninstallation when prompted.
Reinstalling the Amazon Music app
- Open the App Store on iOS or the Google Play Store on Android.
- In the search bar, type “Amazon Music” to find the app.
- Locate the Amazon Music app from the search results and tap on it.
- On the app page, select the “Install” or “Get” button to download and reinstall the app on your device.
- Wait for the installation process to complete.
- Once the Amazon Music app is reinstalled, open it and log back into your account to see if the Exception 180 error persists.
ALSO READ: – Amazon App CS11 Error (Fix Easily in 2023)
In conclusion, encountering the Amazon Music Exception 180 error can be frustrating, but with the methods discussed in this article, you can troubleshoot and resolve the issue effectively. Don’t forget to mention which method worked for you in the comments section below.


