After recent Windows updates, many users have encountered an issue where the Print Screen (PrtScn) key defaults to launching the Snipping Tool in Windows 11 instead of their preferred screenshot tool, Lightshot. This change has frustrated users who miss the convenient features of Lightshot.
Lightshot is a popular lightweight and user-friendly screenshot tool available for Windows and Mac that allows users to capture and share screenshots quickly and easily. It also works as a browser extension for popular browsers like Google Chrome, Mozilla Firefox, and others.
However, recent Windows updates made the Print Screen key default to the Snipping Tool instead of Lightshot in Windows 11.
This change is causing frustration among users who miss the easy-to-use features of Lightshot. If you’re dealing with this issue and want to keep using Lightshot with the Print Screen key, we’ll guide you on how to set up your system so that pressing the Print screen key automatically opens the Lightshot screen capture app on your Windows 11 or Windows 10 computer. This will help you regain the ease and functionality you enjoyed before the recent Windows update.
How to Use the Print Screen Key to Start LightShot Screen Capture App on Windows?
Disable Print Screen Key From Starting Snipping Tool
By default, when you hit the print screen key in Windows 11, it launches the Snipping Tool. If you prefer to use a different app, like Lightshot, for taking screenshots with the print screen key, you’ll need to change some settings in Windows 11.
Unless you want to use a different key or combination to open Lightshot, adjusting these settings will help you make the print screen key work with your preferred screen capture application.
To make sure the Windows Print Screen shortcut doesn’t interfere with your use of the Lightshot app, you can follow these steps:
For Windows 11
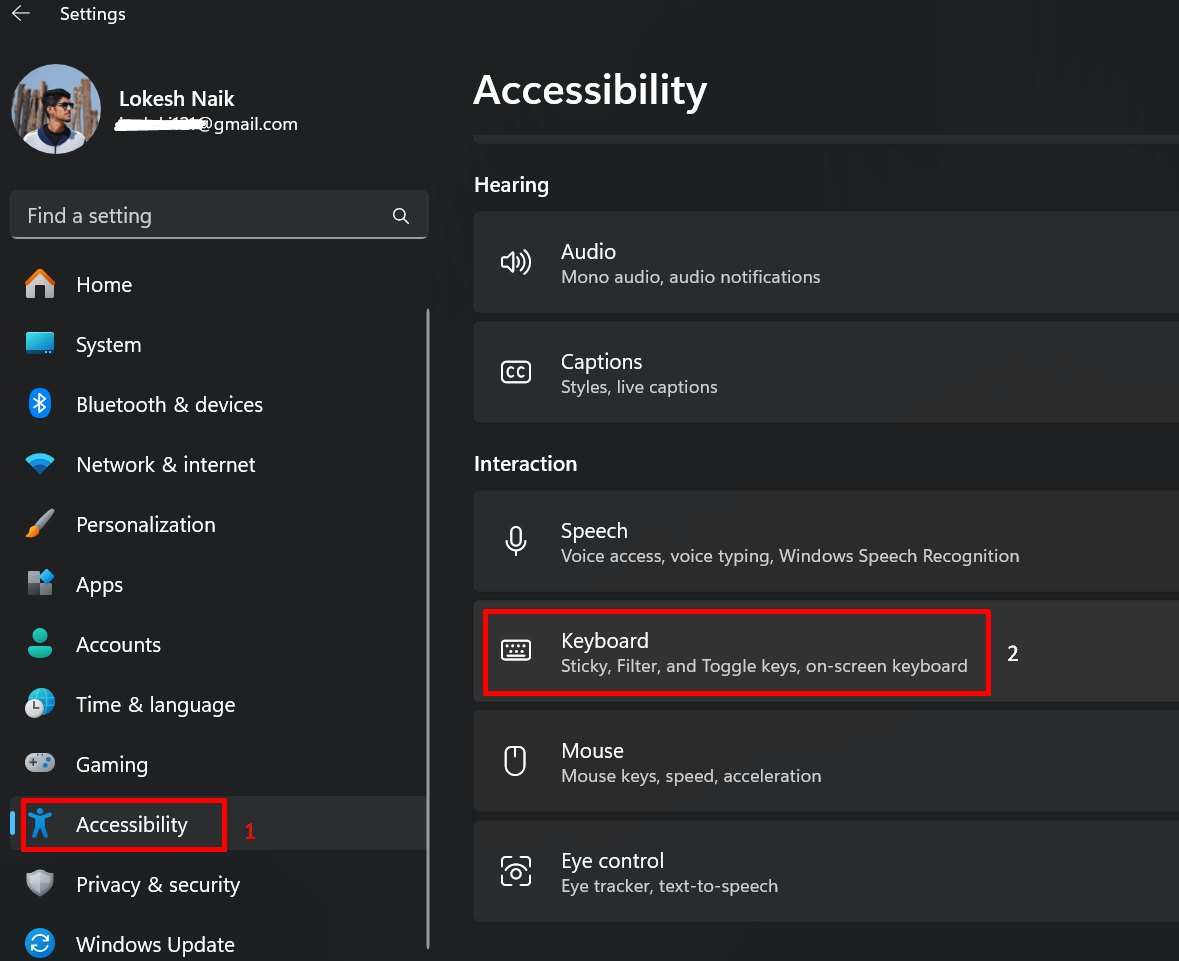
- Open the Settings on your computer.
- Click on Accessibility.
- Navigate to the Keyboard section.

- Turn off the option that says “Use the Print screen to open Snipping Tool.”

For Windows 10
- Open Settings on your Windows OS.
- Select on Ease of Access.
- Go to the left sidebar and select Keyboard.
- Uncheck “Print Screen shortcut” under the Print Screen section.
By doing this, you ensure that the Print Screen key won’t automatically open the Snipping Tool, allowing you to use Lightshot automatically for capturing your screen.
Choose a Different Lightshot Hotkey to Make it the Default
To set Lightshot as the default screenshot tool, you don’t need to do much after installing it – the software automatically becomes the default. By default, it assigns the Print Screen (Prt Scr) button as the General hotkey and Shift + Print Screen (Shift + Prt Scr) as an instant save for screenshots.
If you want to customize the hotkeys in Lightshot, follow these steps:
- Open Lightshot.
- Click on the small arrow and right-click the Lightshot icon.
- Choose Options from the menu that appears.
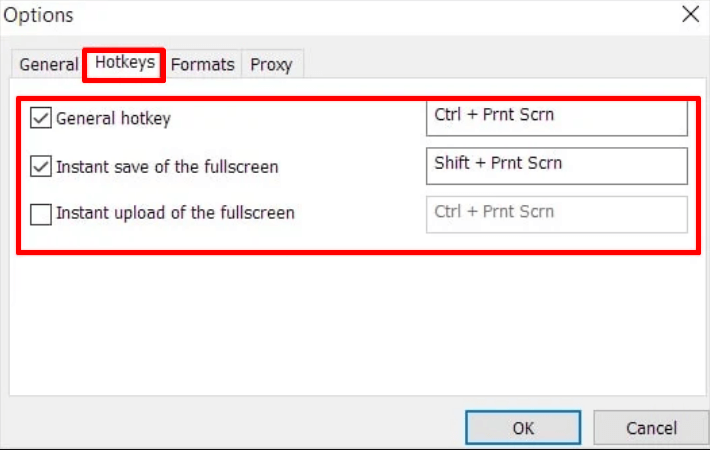
- In the menu, select the Hotkeys tab.

- There you’ll find three options with checkboxes: ‘General Hotkey’ associated with the Prnt Scrn (Print Screen) button, ‘Instant Save of the Full Screen’ linked to Shift + Prnt Scrn and ‘Instant Upload of the Full Screen’ using Ctrl (Control/Command) + Prnt Scrn.
- Now, assign any combination with Fn (Function), Ctrl, or Shift keys according to your convenience.
Run Lightshot as Administrator
If you’re experiencing issues with Lightshot and the standard solutions don’t seem to work, some users have found success by running Lightshot as an Administrator. Follow these steps:
- Go to the location where Lightshot is installed, typically found at C:\Program Files (x86)\Skillbrains\lightshot.
- Find the file named Lightshot.
- Right-click on Lightshot.exe.
- Select Properties from the menu that appears.
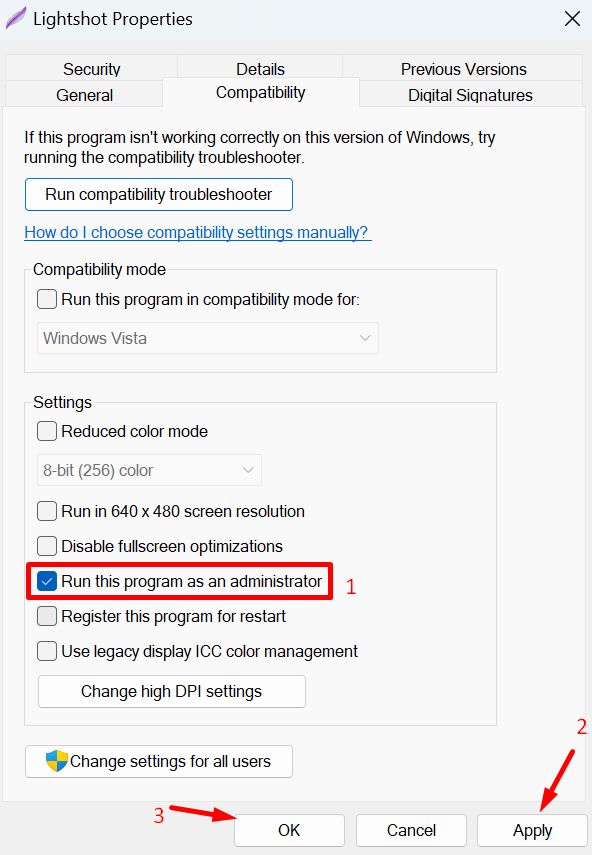
- In the Properties window, go to the Compatibility tab.
- Look for the option that says “Run this program as an administrator.”
- Check the box next to “Run this program as an administrator.”

- Click ‘Apply’ then ‘OK’.
By doing this, you’re instructing Lightshot to run with elevated privileges, potentially allowing it to overcome any limitations imposed by the Windows operating system. This might help in resolving the issues you’re facing with Lightshot.
Disable the Screenshots Option on OneDrive
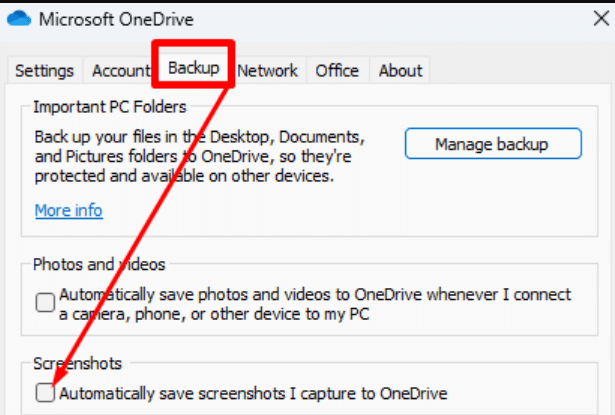
If you’re using OneDrive and you find that your screenshots are causing issues or conflicts with other screenshot tools like Lightshot, you can adjust the settings. Follow these steps:
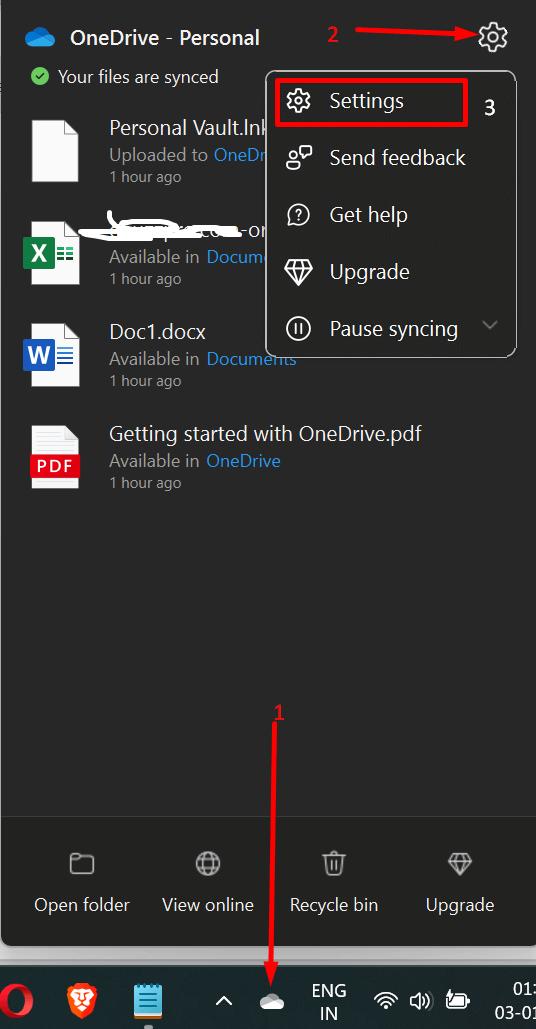
- Locate the OneDrive icon on your taskbar.
- Right-click on the OneDrive icon.
- Select “Settings” from the menu that appears.

- In the OneDrive Settings window, go to the “Backup” tab.
- Look for an option related to “Screenshots.”
- Uncheck the box next to the “Automatically save screenshots I capture to OneDrive” option.

By unchecking this box, you are telling OneDrive not to automatically back up or sync your screenshots. This can be useful if you prefer managing your screenshots with a different tool, such as Lightshot, and want to avoid any conflicts or interference with OneDrive’s screenshot handling.
Disable/Uninstall Other Screenshot Software or Extensions
If you’re still facing issues with Lightshot not registering a key despite the previous solutions, consider turning off or uninstalling other screenshot software or extensions on your system. Some programs, like Windows Snipping Tool, Greenshot, Snip & Sketch, OneDrive, or GPU software such as Nvidia GeForce Experience, might be conflicting with Lightshot.
In such cases, either terminate the conflicting processes while Lightshot is active or uninstall the conflicting software from your computer.
Additionally, for browser extensions, either disable all other extensions temporarily or remove them permanently from your browser to ensure they don’t interfere with Lightshot’s functionality.
Uninstall and Reinstall Lightshot
If you find that pressing the usual key combination for taking screenshots triggers another software instead of Lightshot, it’s likely that you installed those conflicting programs after Lightshot.
To resolve this, consider uninstalling Lightshot, and then downloading and reinstalling it. This action will set Lightshot as the priority over other programs, making it respond first when the designated key or combination is pressed.
I hope this guide helped you set the Lightshot as the default screenshot tool. With the methods, we’d mentioned you can easily use the print screen key to start the Lightshot screen capture app in Windows.
If you have any further questions or encounter challenges, feel free to explore the options outlined in this guide to enhance your Lightshot usage on Windows.

