Windows has been around for a long time, and it is still what many people choose for their daily computer use. From saving photos to moving files and folders, most of us expect these basic tasks to work without any trouble. But every now and then, Windows error codes are a common sight for many users.
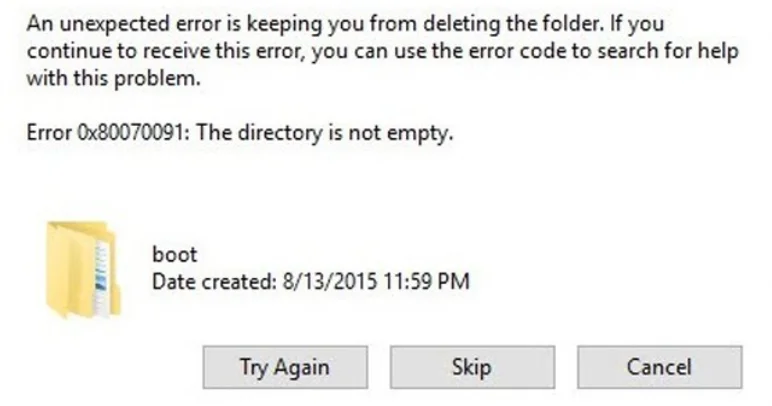
One error that many readers ask about is 0x80070091 with the message “Directory is not empty.” You may see this even when the folder looks empty on your screen. Before trying any fixes, it is a good idea to first understand what this error is really about. Here, we will explain what the error means, why it shows up, and what you can do to resolve it the right way.
What Does 0x80070091 “The Directory Is Not Empty” Error Mean and What Causes It?
You will usually see the 0x80070091 error when Windows does not allow you to delete a folder, most often from an external hard drive, pen drive, or SD card. It can also appear on the main system drive. This error shows up on many Windows versions, from Windows 7 right up to Windows 11. In some cases, the same code appears during System Restore, where Windows fails to roll back to a saved restore point and stops the process midway.
This error points to a deeper issue rather than just an empty folder warning. It often means Windows cannot fully read or control the folder. Common reasons include damaged system files, drive errors or bad sectors, too many leftover temporary files, missing access rights, or unwanted software interfering in the background. All of these can bring up the directory is not empty message on Windows, even when nothing seems to be inside the folder.
How to Fix 0x80070091 “Directory is Not Empty” Error in Windows
Try Deleting the Folder Using the Command Prompt
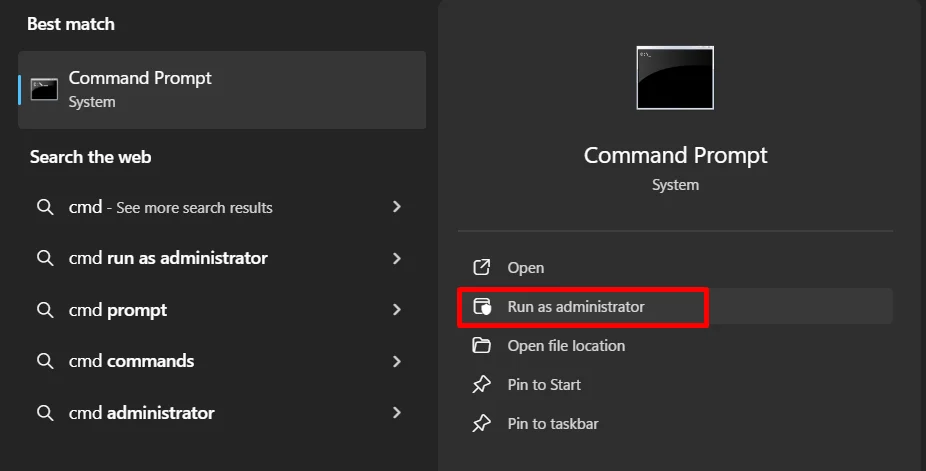
If File Explorer is unable to delete the folder, Command Prompt gives you another option. This method uses a direct command, so Windows usually does not block it the same way it does in normal view. It may feel a bit technical, but it is quite simple once you try it.
- First, open Command Prompt with admin rights. This is important; otherwise, the command may fail. After the Command Prompt opens, type rmdir /s “folder path” and press Enter.

- Now replace the folder path with the exact location of the folder you want to remove. Make sure the path includes the drive letter and the full folder name. For example, if the folder is inside your Users folder, the command would look like this: rmdir /s “C:\Users\New folder”

- Once you press Enter, Windows will remove the folder along with any files inside it. If the command runs without an error, the folder should be gone right away.


Restart Windows File Explorer
At times, File Explorer itself can be the reason you cannot delete a folder. It may still be holding on to the folder in the background, even though it looks normal on the screen. Restarting File Explorer reloads it and often clears this type of issue. Just closing the window will not help in this case.
- Press Ctrl + Shift + Esc together on your keyboard to open Task Manager.
- When Task Manager opens, stay on the Processes tab where all running items are shown.
- Scroll down and click on the File Explorer once.
- Click the Restart button that appears for File Explorer.
- Wait a few seconds for it to reload, then try deleting the folder again.
Check your Drive for Disk Errors
In many cases, the folder is not the real cause at all. The problem can come from the drive where the folder is saved. When a drive has file errors or damaged areas, Windows may not let you delete or move files. A disk scan allows Windows to identify errors and correct them. You can do this in two easy ways.
Using Command Prompt
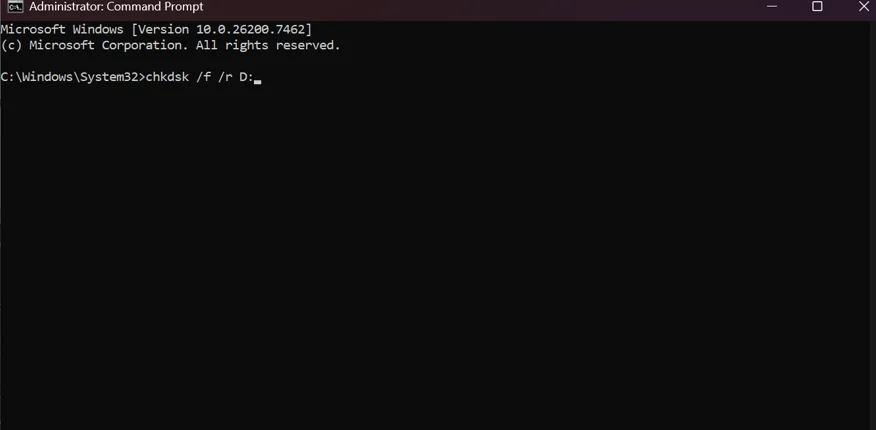
- Open Command Prompt with admin rights.

- When the black window opens, type the command chkdsk /f /r D: and press Enter (Replace D with the letter of the drive you want to scan.)

- You need to wait for the scan to finish, as it takes some time, depending on the drive size.
- Once done, close the Command Prompt screen and restart your PC.
Using the Error Checking tool
- Press Windows + E to open File Explorer.
- Right-click on the drive you want to check and choose Properties.

- Open the Tools tab and navigate to the Error Checking section.
- Click Check, then choose Scan drive when asked.
- If Windows finds and shows any issues, apply the suggested fixes.
- Close all windows and restart your system to finish the process.
Change the Folder Permission Settings
At times, Windows blocks a folder because it does not allow full access to your user account. When this happens, deleting or editing the folder becomes impossible. Once full permission is given, Windows can handle the folder without limits.
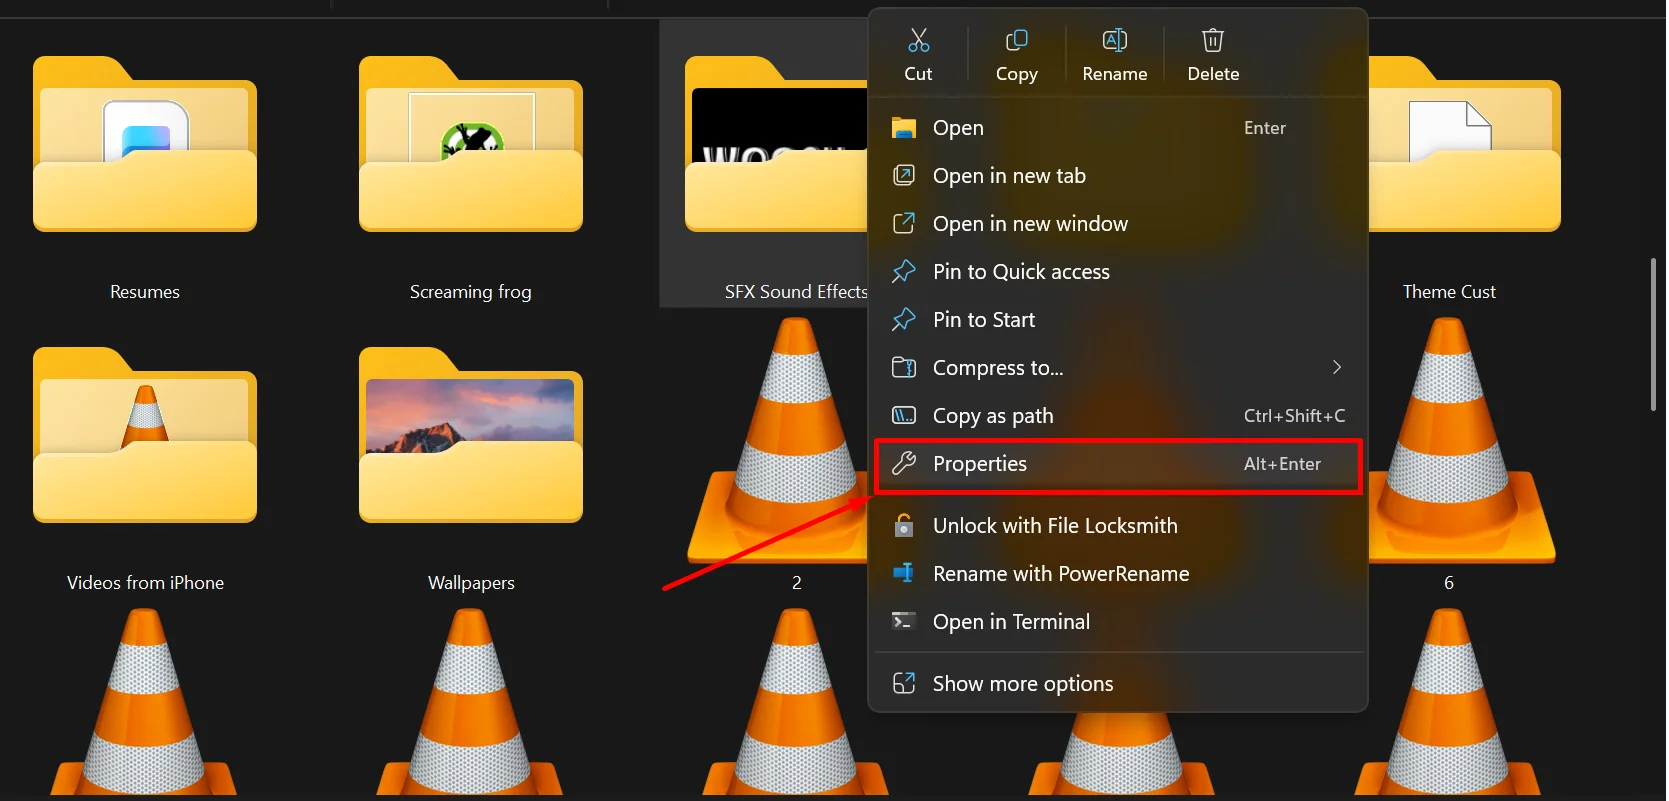
- Open File Explorer and right-click on the folder that is causing trouble, then choose Properties.
- In the Properties window, open the Security tab.
- Click the Advanced button to open advanced permission settings.

- In the new window, click Change next to the owner’s name shown at the top.

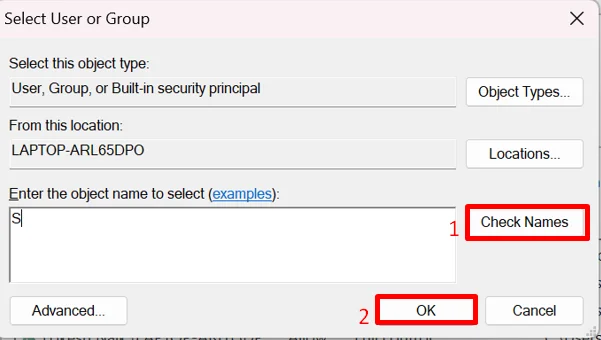
- Type your Windows user account name in the box provided.
- Click Check Names, then click OK to confirm.

- Select the option that says Replace owner on subcontainers and objects.
- Click Apply, then click OK to save the changes.


Give Full Permission to the Folder
There are cases where Windows blocks a folder because your user account does not have full access to it. When this happens, actions like delete or edit may fail and show the directory is not empty message. Giving full permission to the folder can clear this restriction.
- Right-click on the folder causing trouble, and choose Properties.
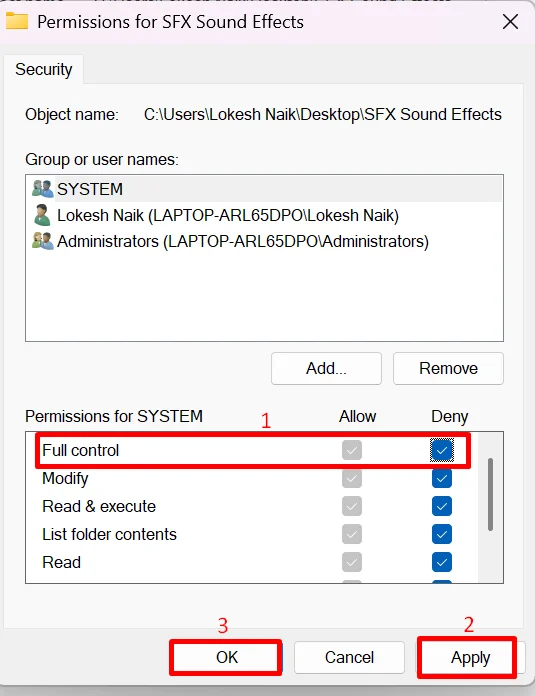
- Open the Security tab and select the user account you are currently using.
- Click Edit to change the permission settings for that account.
- Make sure Full Control and the other available options are checked.

- Click Advanced to open detailed permission settings.
- Under the Permission section, review the entries listed.
- If you want to update ownership, click Change next to the Owner option at the top.
- Type the name of the user you want to assign access to and click OK to confirm.
Run an Antivirus Scan
At times, unwanted software can sit quietly in the background and interfere with how folders behave. Running a full scan helps Windows find and remove anything that should not be there.
- Open Windows settings and head over to Privacy & security
- Click Virus and threat protection, then open Scan options to see all available scan choices.

- Select Full scan since it checks every part of your system. This scan can take quite a while, so be patient.
- Click Scan now to begin the scan.

- Wait for the scan to finish and see if Windows finds any threats.
- If anything is found, choose Remove and click Start actions to apply the changes.


Did any of the methods above help you fix the 0x80070091 error on Windows and remove the folder from your PC? If they worked for you, consider sharing them with others who might be stuck with the same error. And if you know another way that fixed it for you, feel free to share that too, so it can help more readers.


