Clipchamp became widely known after its launch as a simple video editor connected to the Microsoft ecosystem. From the beginning, it focused on making video editing easy for everyday users. Many traditional editors come with complex tools that take time to learn, but Clipchamp keeps the workspace clear and easy to understand. Because of this, many people choose it when they want to edit videos without dealing with complicated software.
Over time, Clipchamp has been used for many types of projects like social media videos, school presentations, tutorials, and personal content using its templates, effects, and quick editing tools. Since it works as both a browser editor and a Windows app, it fits well for users who want a simple way to edit and export videos without installing heavy programs.
Even with these advantages, many users begin to notice issues while working in Clipchamp. You may open the editor and see it stuck on the loading screen with messages like “Loading projects” or “Ready in a moment” that never move forward. In other cases, the effects panel doesn’t even load, the preview window stops playing the video, or the editor closes suddenly while you are editing.
There are also times when a project opens, but the audio cannot be heard at all, even though the sound is present on the timeline. When problems like these appear, the editing experience quickly becomes difficult since you cannot preview your work or continue editing with confidence.
Below are several methods that have helped many users deal with Clipchamp when it does not open projects, load the editor, play the preview, etc.
How to Fix Clipchamp Not Working: Projects Not Loading, No Sound, Crashes, and More
Repair Clipchamp from Windows Settings
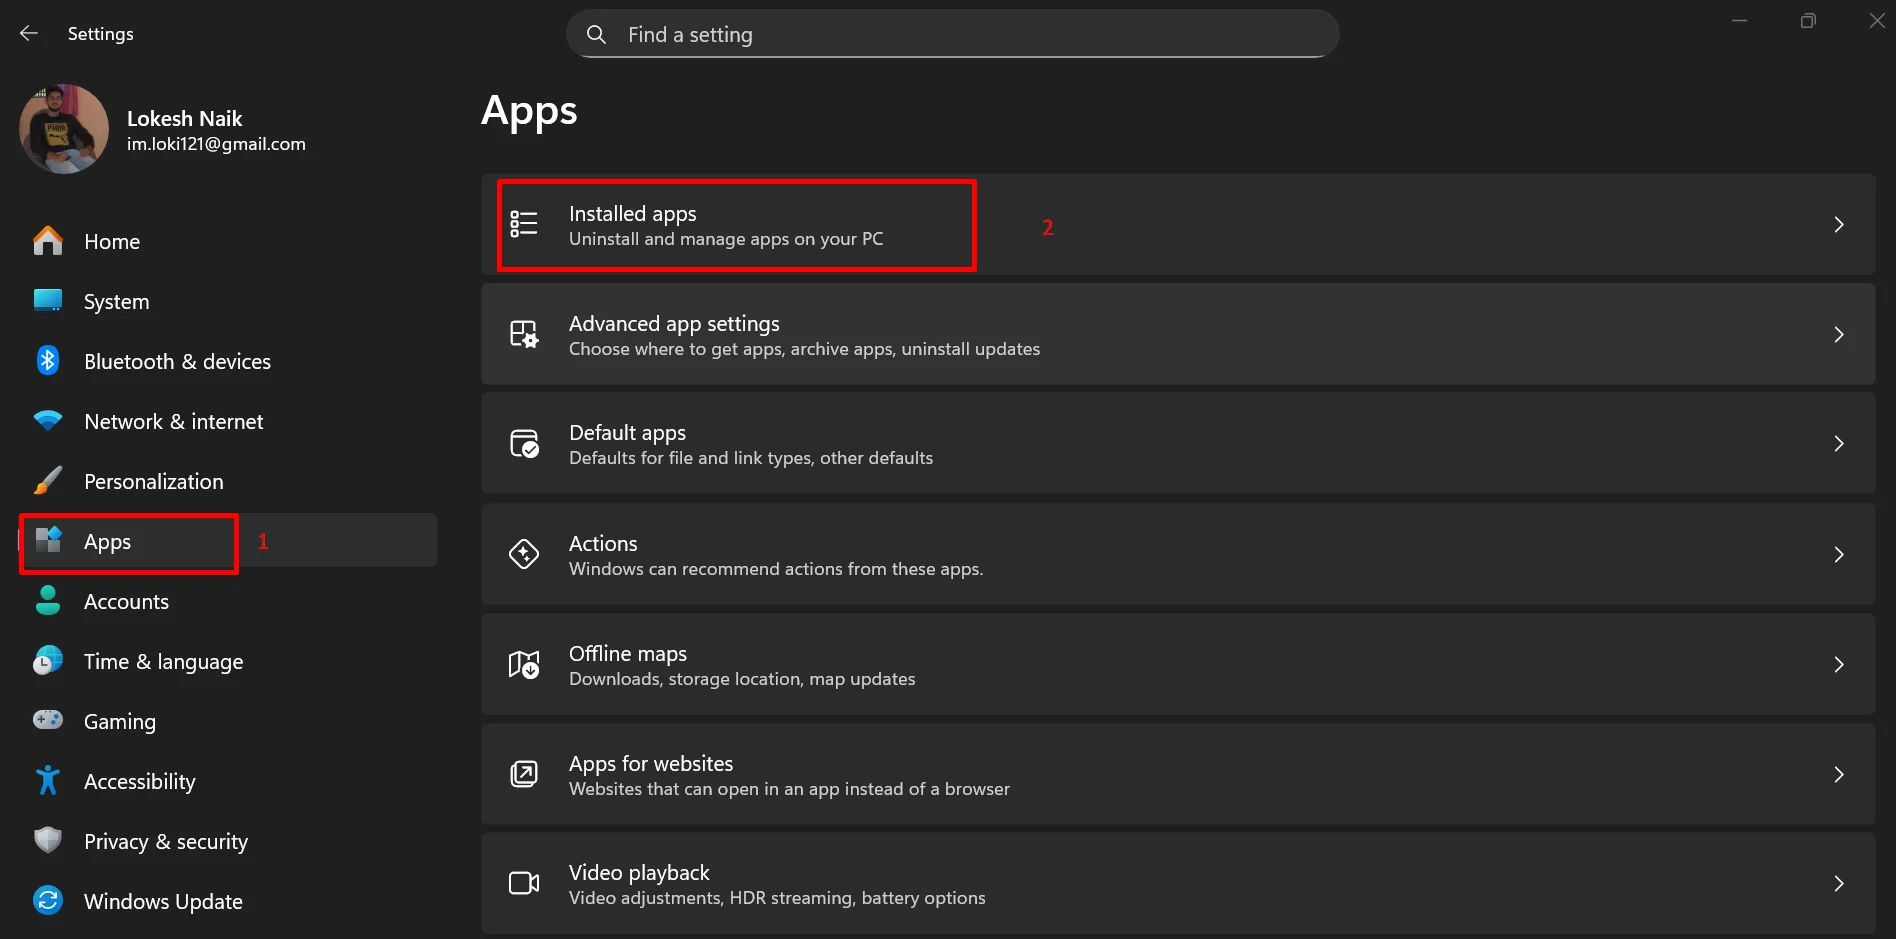
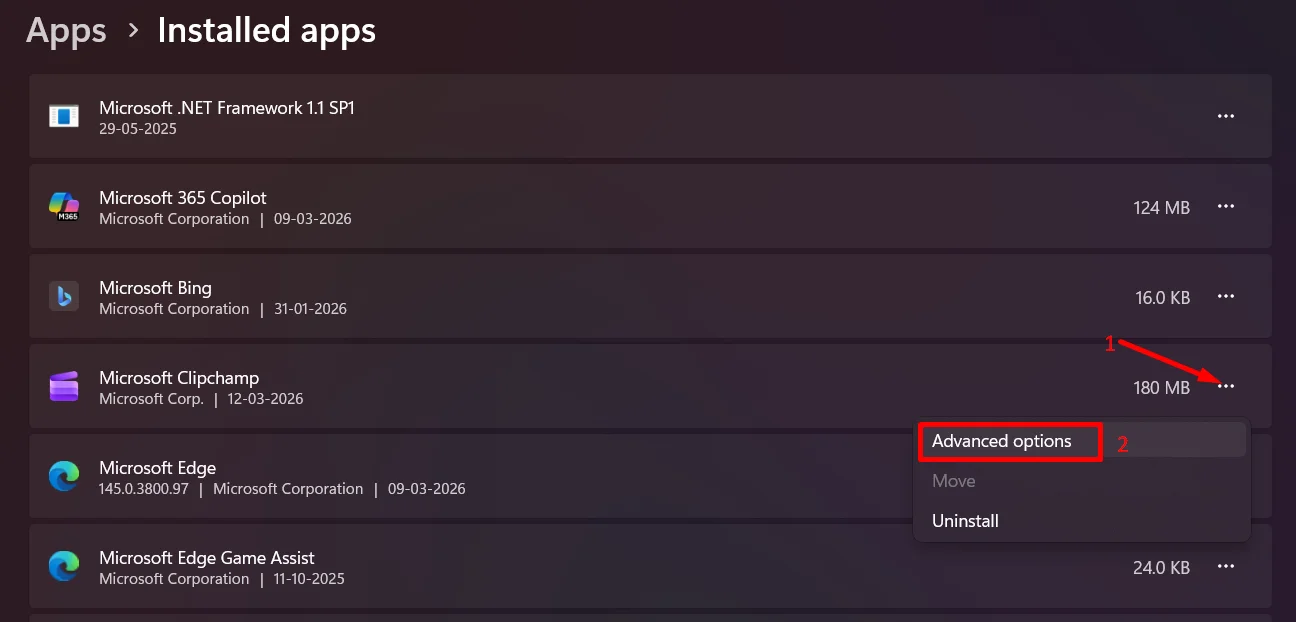
- Open Windows Settings and head to the Installed Apps section

- Scroll through the list until you find Clipchamp.
- Click the small menu next to it and choose Advanced options.

- On the next page, click on Terminate first to close Clipchamp completely if it is still active in the background.
- After that, click Repair. Windows will then scan the app and fix any issues it finds.


Run Clipchamp as Administrator
- Close Clipchamp if it is already open.
- Click the Start menu on your Windows computer.
- Type Clipchamp in the search bar.
- When Clipchamp appears in the search results, right-click on it.
- From the menu, choose Run as administrator.

- A permission window may appear on the screen. Click Yes to allow it.

Open the Project File Manually
If Clipchamp keeps showing the loading screen and your project never appears, you can try opening the project file directly from your computer. This method helps the desktop app locate the project and connect all the media files again.
- Open the Clipchamp desktop app on your computer.
- At the top of the window, click the gear icon to open Settings.
- From the menu that appears, click Settings again.
- In the list on the left, choose Import Project.
- Click the Locate Project button.
- Now you need to find the project folder on your computer.
- Open the Videos folder on your PC. Clipchamp usually saves projects there.
- Inside the Videos folder, open the Clipchamp folder. You will see several folders. Each one represents a project created in Clipchamp.
- Open the folder that matches the video project you want to recover.
- Inside that folder, find the file that ends with .clipchamp. The file name will usually match your project name.
- Select that file and click Select at the bottom of the window.
After you choose the file, Clipchamp should load the project into the desktop editor and reconnect the media used in the timeline. If you try this method in the browser version, you may need to reconnect the video or image files yourself. In some older projects, a version compatibility message may appear.
Turn Off Hardware Acceleration in Clipchamp
- Open Clipchamp on your computer.
- Click the Settings icon inside the editor.

- Go to the Export section in the settings panel.
- Now, turn off the Hardware Acceleration.

- After that, close the settings panel and return to your project.


Open the Project in the Web Version First
If your Clipchamp project loads but there is no sound during playback, one method that has helped a few users is opening the project in the browser version first. After that, opening the same project again in the desktop app can restore the audio.
- Open your web browser and go to the Clipchamp website.
- Sign in with the same account you use in the desktop app.
- Open the project that has no audio.
- Let the project load fully and play the timeline for a moment to check the sound.
- Close the browser tab once the project opens.
- Now return to the Clipchamp desktop app.
- Open the same project again in the desktop version.
- Play the timeline to see if the audio is heard.
Check Clipchamp in the Windows Volume Mixer
If your Clipchamp project plays but you cannot hear any audio, the app may be muted in the Windows volume mixer.
- Open Windows settings
- Navigate to System > Sound > Volume Mixer

- Check if the speaker icon under Clipchamp shows a mute symbol
- If it is muted, click the speaker icon to unmute it and raise the volume slider.

Reset the Clipchamp App from Windows Settings
Note: Resetting the app will remove the app data stored on your device. Projects saved inside the app may be cleared. Make sure you save or export any important projects before using this option.
- Open Windows Settings on your computer.
- Go to the Installed Apps section
- Click the three-dot menu next to Clipchamp.
- Select Advanced options from the menu.
- On the page that opens, click Reset to restore the app to its default state.


Update Clipchamp from the Microsoft Store
If Clipchamp refuses to work after a recent change or the app has not been updated in a while, installing the newest version may fix the issue.
- Open the Microsoft Store on your Windows computer.
- Use the search bar at the top and type “Clipchamp,” then hit the enter button
- Open the Clipchamp page from the search results.
- If an update is available, you will see an Update button.
- Click the Update option and allow the store to install the newest version.
Install an Older Version of Clipchamp
If the problem began right after a recent update, the new version of Clipchamp may be the reason. In that case, using an earlier version of the app can help. A previous release may work without the issue you are facing.
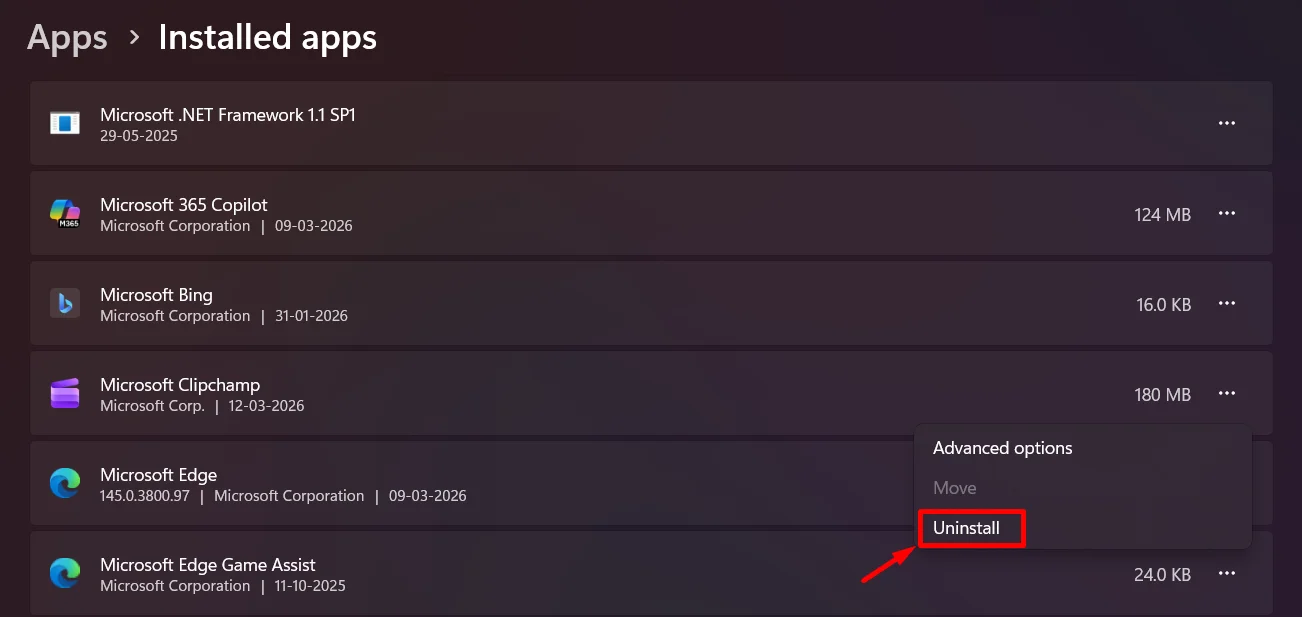
- First of all, remove the currently installed version of Microsoft Clipchamp from your computer.
- Open Windows Settings.
- Go to Installed Apps.
- Click the three-dot menu next to the Microsoft Clipchamp
- Tap on the Uninstall button.

After removing the app, download an earlier version of Clipchamp from a trusted site that keeps older app releases. One example is the Clipchamp versions page on Uptodown, where you can download previous versions of the app.
Once the file is downloaded, run the installer and install that version on your computer. After installation, open Clipchamp to check if the editor works without the issue.
- ALSO READ: Clipchamp Keeps Looping on Login [QUICK FIX]


