In this user-friendly guide, we walk you through the simple steps to print your Venmo statement. By following these straightforward instructions, you can create a physical record of your financial transactions, making it easy to track your spending, verify payments, and maintain an organized record of your monetary activity.
In today’s digital age, managing personal finances and tracking financial transactions has become more convenient than ever, thanks to popular mobile payment platforms like Venmo.
Venmo allows users to seamlessly send and receive money, split bills, and make various financial transactions at their fingertips. However, it’s equally important to maintain a comprehensive record of these transactions for a multitude of reasons, such as budgeting, tax reporting, and dispute resolution.
This article provides an overview of how to print a Venmo statement, guiding users through the steps to create a tangible record of their financial activities within the app. With the help of these statements, users can gain greater control over their finances and ensure transparency and accountability in their monetary transactions.
Printing transaction statements in apps like Venmo is essential to help users track their financial activities and maintain a record of transactions. These statements serve as proof of payments, support dispute resolution, and are often required for tax reporting and regulatory compliance. They also enhance user confidence, security, and financial transparency, making them a crucial feature in financial apps.
How to Get Venmo Statements
On App
To get a statement from the Venmo app, start by opening the app on your mobile device. Next, tap on the Profile icon, which is usually your picture or profile symbol.
Once you’ve done that, select the “You” tab. Within this section, you’ll find the option to access your Venmo statement. This statement provides a summary of your transactions and financial activity in the app.
If you want to check particular transactions, you can do that too. Just tap on the magnifying glass icon. This will let you start a search and find the specific transactions you’re interested in. So, if you’re looking for something specific in your Venmo history, this Venmo search tool can help you find it easily.
On Website
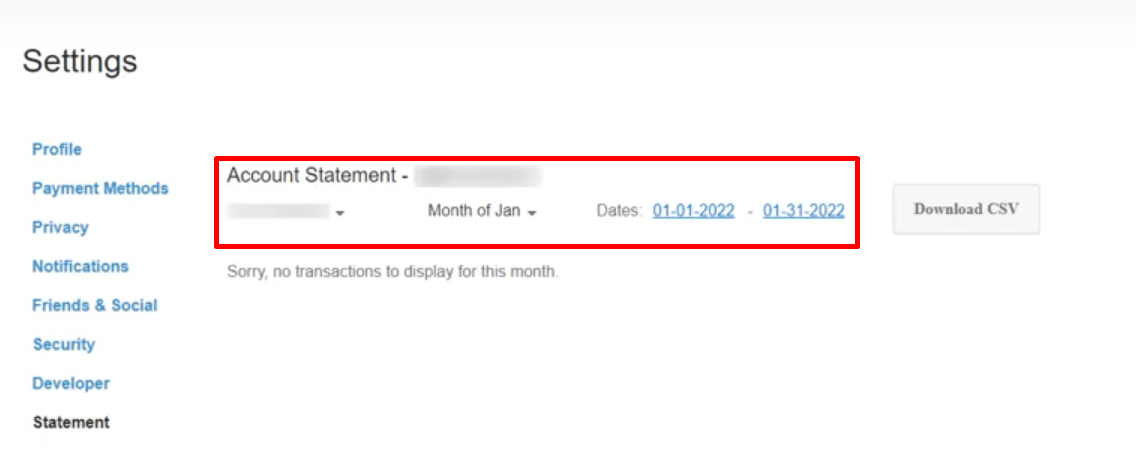
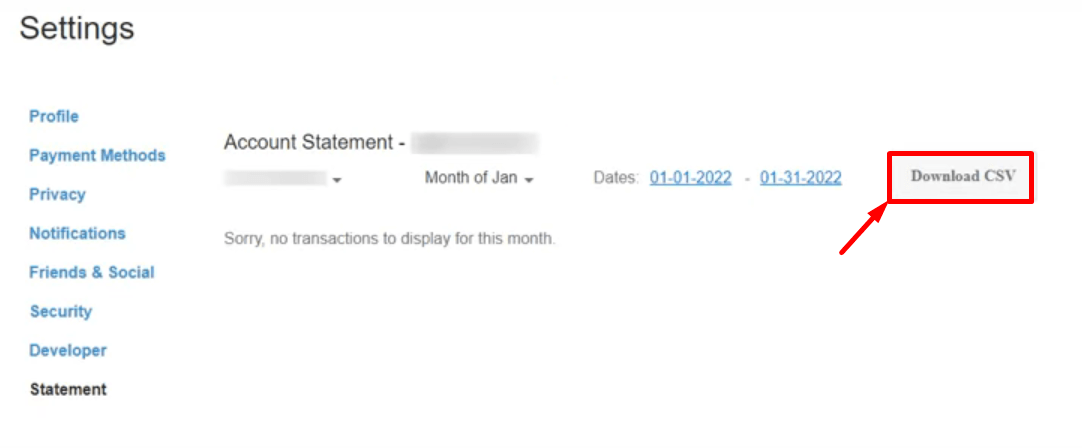
If you prefer to check your transaction history on the Venmo website, you can do that too. On the website, there’s an option to view your transaction history. Additionally, if you’d like to keep a record of your history, you can download it as a CSV file. Just click on the “Download CSV” button, which you’ll find next to the “View” button. You can download your transaction history in chunks of one month at a time, and you can go back up to three years.
- To view your transaction history on the Venmo website, first, log in to your Venmo account.
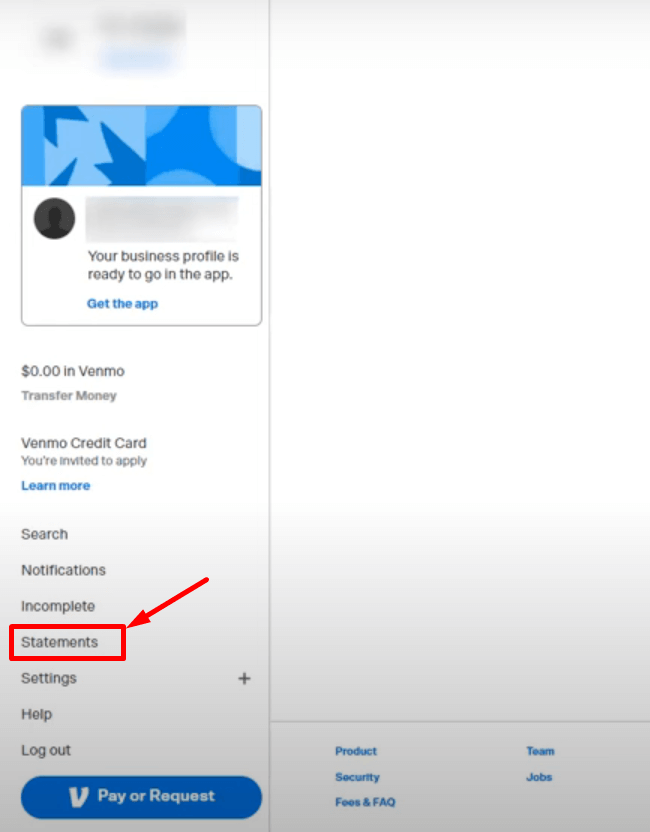
- Once logged in, navigate to the Statements section where you can check your transaction history.

- Now, select the date range.

- After that look for the “Download CSV” button. It’s typically located next to the “View” button.

- Click on the “Download CSV” button.
How to Print Venmo Statement
For people who actively use Venmo to send or receive money, make purchases, or handle refunds, Venmo provides a useful service. At the start of each new month, they receive an email from Venmo. This email contains a statement summarizing all the transactions they made during the previous month. In this statement, you can find details about who paid you, who you paid, what you bought, and any refunds or credits you received.
The statement serves as a digital record of your financial activities on Venmo. If you prefer to have a physical copy for your records, you can easily print this email.
If you are not an active user of Venmo or didn’t receive a statement email from Venmo, follow the steps below to print your Venmo statement.
- Begin by downloading your Venmo transaction history as a CSV file. You can do this by following the steps in your Venmo app (Android/iOS) or website, as mentioned earlier.
- Locate the downloaded CSV file on your computer.
- Depending on your preference, choose whether you want to use a text editor (like Notepad or Sublime Text) or spreadsheet software (such as Microsoft Excel or Google Sheets) to view and print the file.
- Using your chosen software, open the downloaded CSV file.
- Once you’ve reviewed and prepared the data (if necessary), use the print functionality provided by the software to print the file. The specific steps for printing may vary depending on the software you’re using.
- In the print dialog, you can select printing options like the number of copies, page orientation, and paper size.
- Click the “Print” button to begin printing your Venmo statement. If you’re using spreadsheet software, it will preserve the tabular structure of the CSV, providing a well-organized printout.
- By following these steps, you can easily print your Venmo statement.
Frequently Asked Questions (FAQs)
How does Venmo send statements?
Venmo sends statements to its active users by sending them an email at the beginning of each new month. This email contains a statement summarizing all the transactions made during the previous month.
Can you download Venmo statements as PDF?
Yes, it’s possible to download your Venmo statements as PDF files, and you can do this using a handy trick we recently outlined in our guide.
Can people see all my Venmo transactions?
By default, Venmo’s payments are public, so any Venmo user can see them. However, you can adjust your privacy settings to make your Venmo transactions private.


