Experiencing problems with your NVIDIA Shield remote? Dive into our comprehensive guide on how to fix the Nvidia shield remote not working.
If you’re like me, you’ve probably had some movie nights ruined by a malfunctioning NVIDIA Shield Remote. Trust me, I’ve been there too. Don’t worry, because, in this article, we dive into the topic of resolving the Nvidia shield remote not working.
Shield TV remotes have changed significantly over the years, adapting to users’ needs and preferences, making it easier to navigate various apps, games, and entertainment options.
I know how frustrating it can be when all I want to do is binge-watch my favorite shows, and the remote’s acting like it’s out of control. From unresponsive buttons to strangely disconnected signals, we’ll explore common issues and arm you with the solutions we’ve gathered from forums and personal experiences.
How to Fix NVIDIA Shield Remote Not Working (9 Methods)
Check the Batteries of the Shield TV
An insufficient battery charge can lead to poor performance and connectivity issues with your remote. It’s the first step to take when dealing with device problems.
If you want to check your battery’s charge level, follow these easy steps:
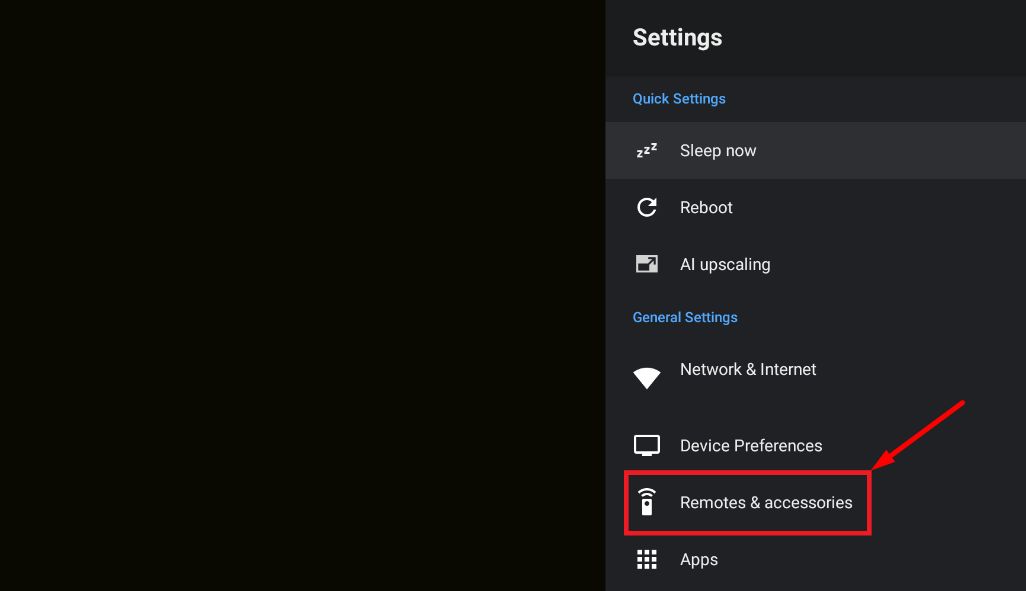
- Navigate to Settings of your TV
- Go to Remote & Accessories.

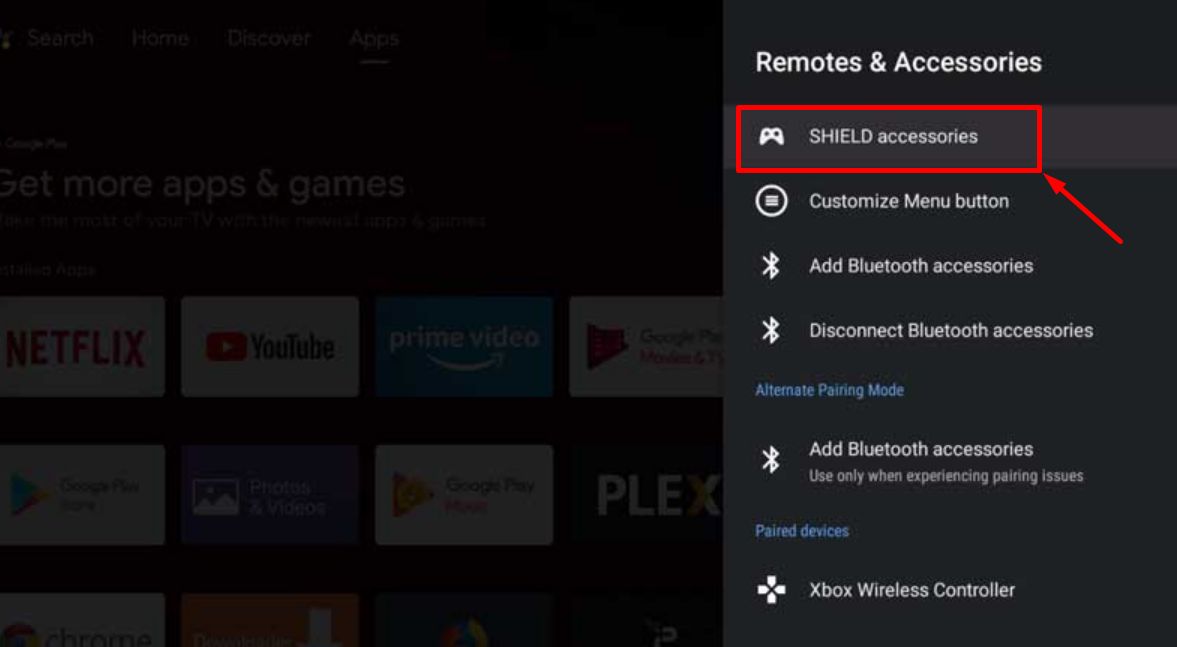
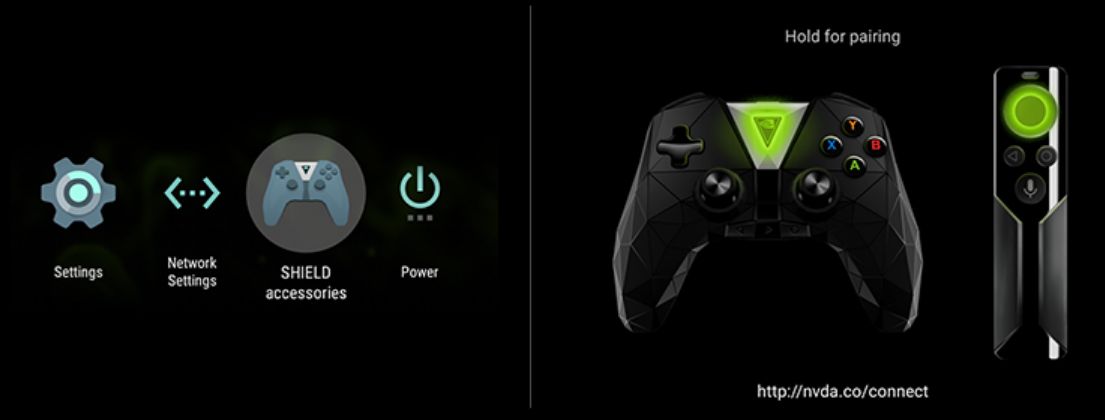
- Now, head over to SHIELD accessories.

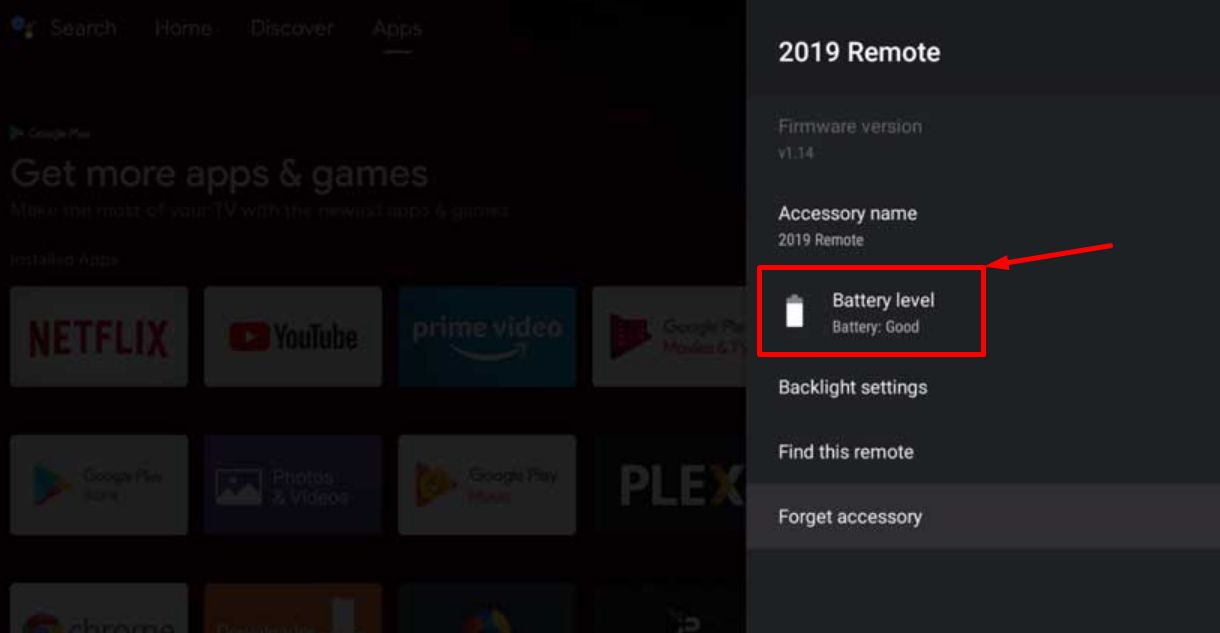
- On this menu, you’ll be able to view the battery level of your remote.

If the batteries of the NVIDIA Shield Remote run out of power or showing low, it’s time to replace them. However, the method for replacing or recharging batteries does have some differences depending on the remote’s generation.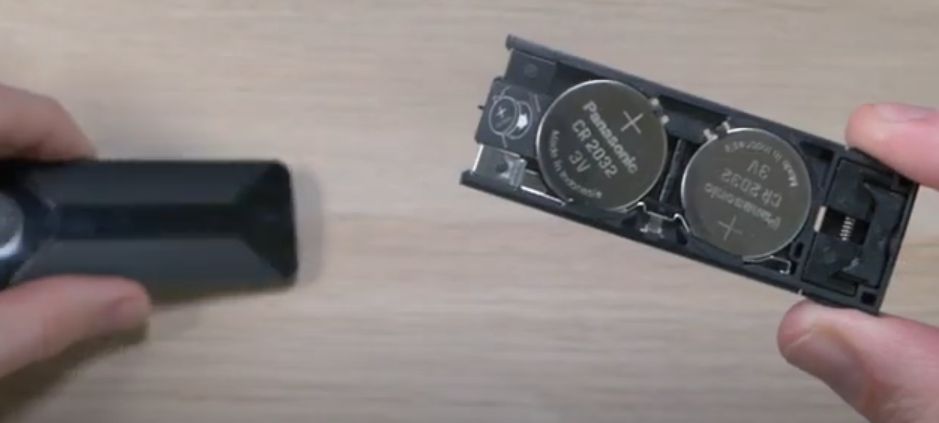
For those using the first-generation remotes, their batteries are fixed, meaning you’ll need to consider charging them up via the supplied USB cable. If your remote has a headphone jack, it is powered by non-removable rechargeable batteries.
If you’re using the CR2032 battery type, often seen in earlier models, press into the circular slot on the back using a pointy tool. Once you do this, the tray pops out, and you can swap the batteries. After that, push the tray back into place.
As for the latest models, they are powered by AAA batteries, which are widely available. By gently pulling back the triangular section, you can uncover it. Now, replace them with new batteries and then close the cover.
Install Shield TV Updates
NVIDIA regularly releases updates to keep your Shield TV running smoothly and free from annoying bugs. If you intentionally disabled the automatic update feature or, by mistake, it was disabled, the operating system might lack the latest updates.
One problem with outdated operating system versions is that they may be incompatible with the newer apps you install on your Shield TV. In this case, potential glitches might affect your device, leading to a variety of bugs.
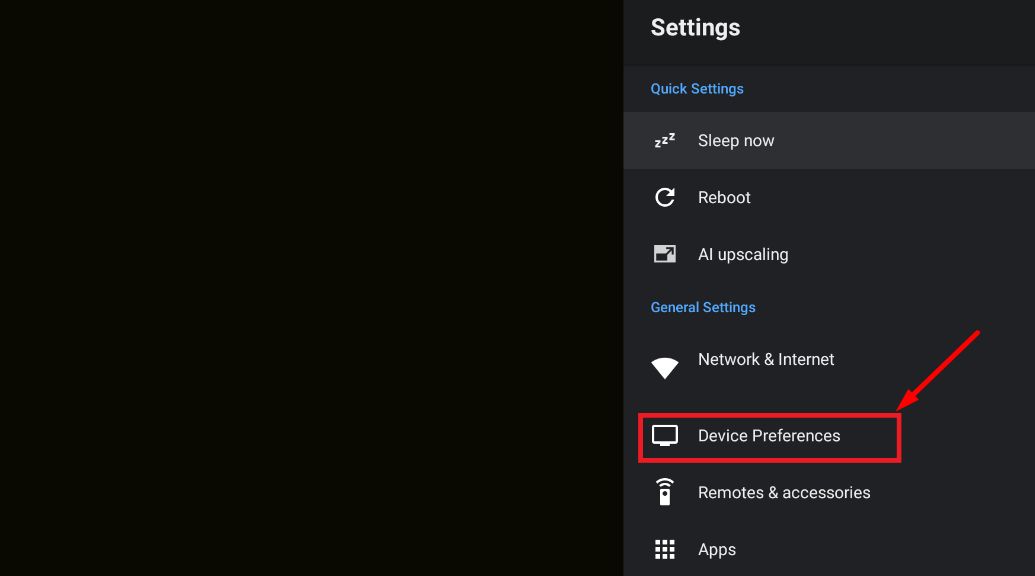
- Open the Settings of your TV
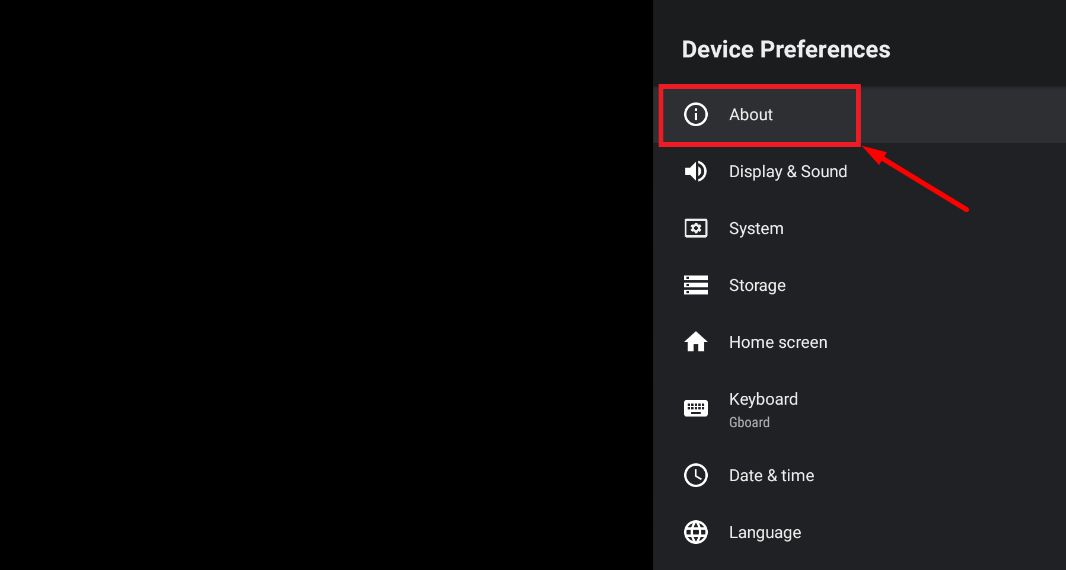
- Now, go to the Device Preferences section

- Select About.

- Then, simply select System Upgrade to initiate a manual update.

Update the Shield TV Remote
NVIDIA keeps releasing regular updates to the remote control firmware. If you want to update the firmware, just do the following:
Updating the Shield TV Remote can actually help fix issues with the NVIDIA Shield Remote not working. When you update the remote’s firmware, you’re essentially installing the latest software version, which often includes bug fixes, improvements, and compatibility updates. If your remote is experiencing problems, it might be due to a software glitch or an outdated firmware version.
The latest remote update can resolve issues like unresponsive buttons, connectivity problems, or other unexpected responses.
- Navigate to the Settings
- Select Remote & Accessories.

- After that, tap SHIELD accessories.

- Choose the SHIELD remote.
- Click on the Update firmware option to download the latest firmware.
- After that, restart your device to see if it resolves the remote issues.
Unpair and Re-pair Remote
When you update to the latest version, you’ll likely get rid of most of the bugs and glitches from the old versions. That does not mean that all the problems will be solved.
Sometimes, new updates can actually introduce new issues. They might even bring back the connection issues you were dealing with before.
However, these new problems can usually be fixed by quickly refreshing the connection. Just unpair the remote from the Shield TV and then pair them up again. Hopefully, this will resolve any new issues.
Here’s how you can unpair your remote:
- Go to Settings
- Select Remote & Accessories.
- Choose SHIELD accessories.
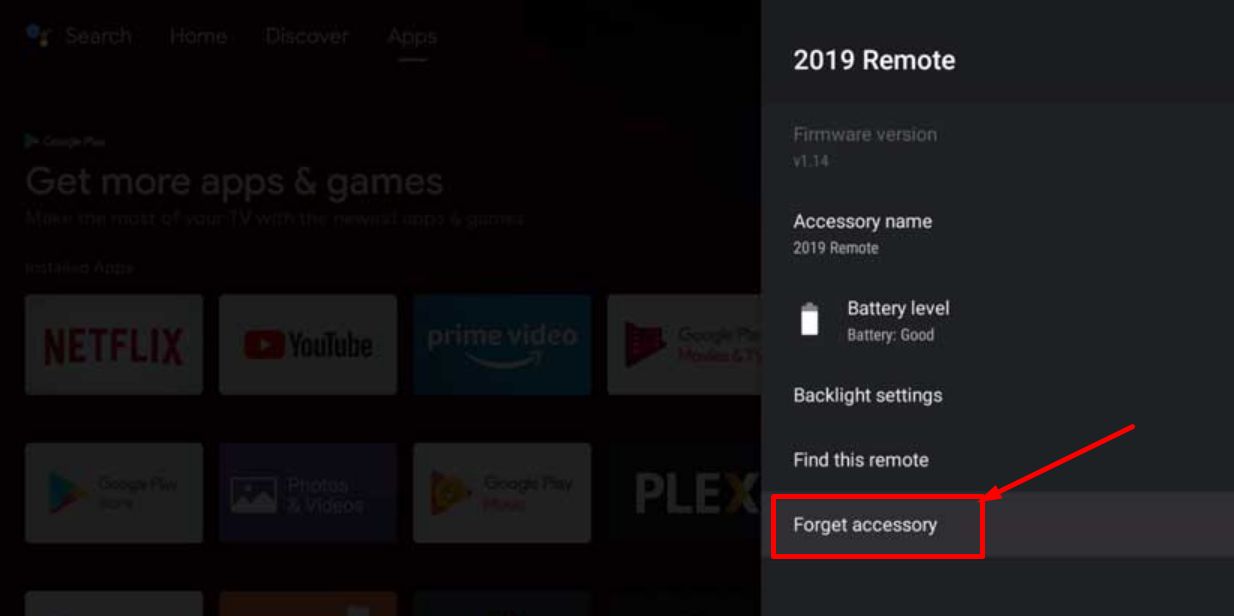
- Now, select your Shield Remote from the list.
- Click on Forget accessory option

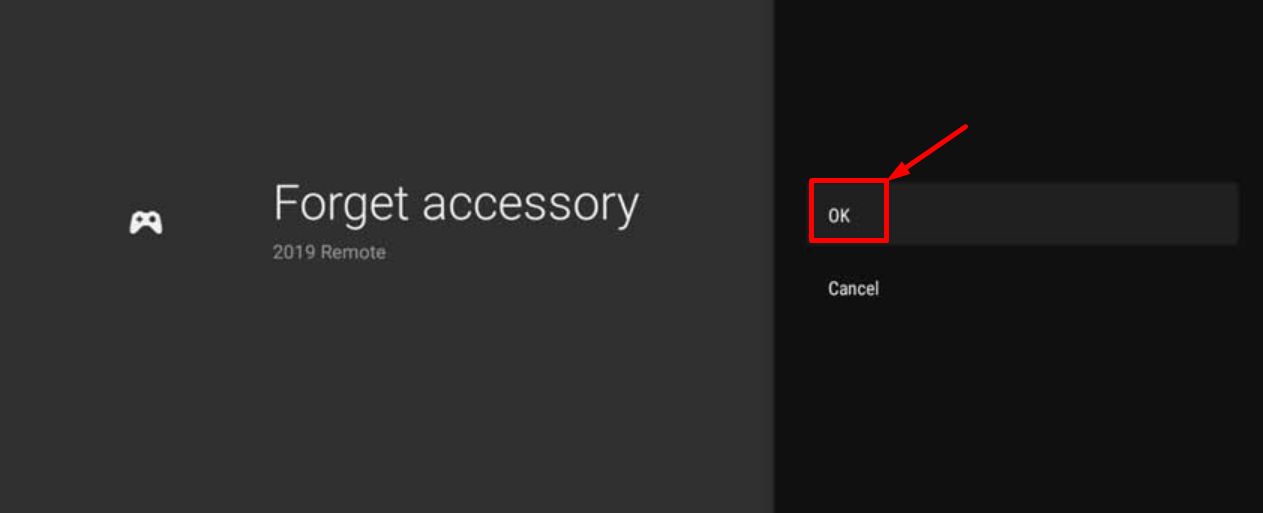
- Press OK to confirm the unpairing of the remote.

- Once you’ve successfully unpaired the remote, hold down the Select button (that’s the one in the middle of the D-pad) to pair the device again.

- If you see a blinking green light (or blue light for newer models), that means your remote is ready to pair up.
- After the screen refreshes, it will show the pairing screen for the remote.
- You will need to follow the instructions to connect your device.
Another option is to use a controller or the Shield TV remote app. In this case, navigate to Shield Accessories and select “Pair an accessory” to manually establish a connection with your remote. After completing the pairing process, check that your remote is working properly.
Reset the Remote
The best thing about the Shield TV remote is that it can reset itself without you needing to mess around with batteries or other technical stuff.
To do the reset, just hold down the Back button and the Select button at the same time for about 15 seconds, or until the light goes off. That’s the signal that your remote has done a reset.
The next step is to turn off the Shield TV by unplugging it. Wait a few seconds, then plug it back in. Once the device starts up, hold down the Select button until you see the light flash – either a bright green or a cool blue, depending on your model. Follow the on-screen instructions to pair the device again.
Clear the Cache of Bluetooth
Over time, a bunch of memory gets accumulated as a cache on the device which can lead your device to slow down and get all unresponsive. It may even affect your Bluetooth connection and make your remote act sluggish.
Therefore, clearing out the cache regularly will help your device perform better. Follow these steps to clear out the Bluetooth app cache:
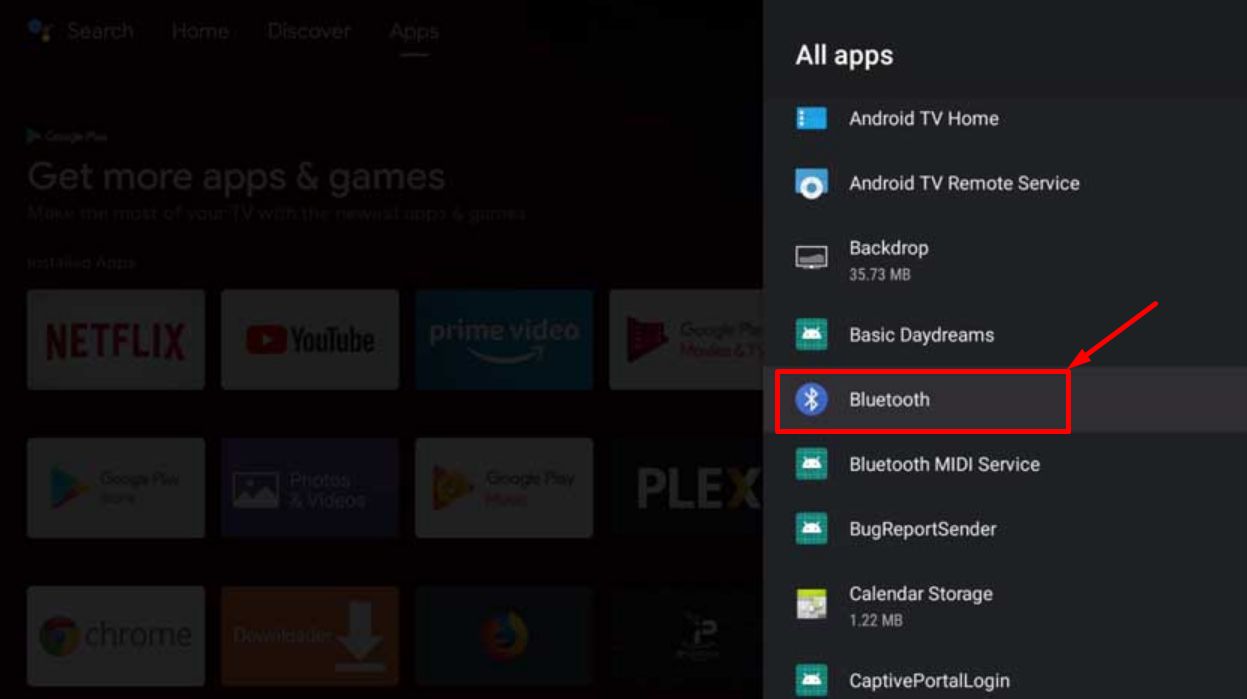
- Click on Settings and then Apps.
- Select the System Apps.
- Choose Bluetooth app

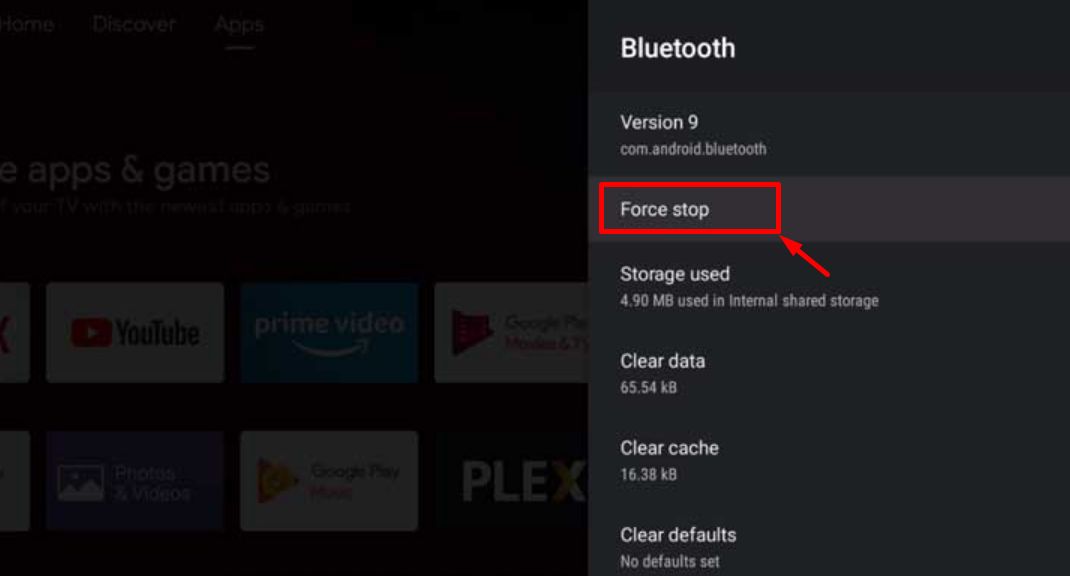
- Now, press Force Stop

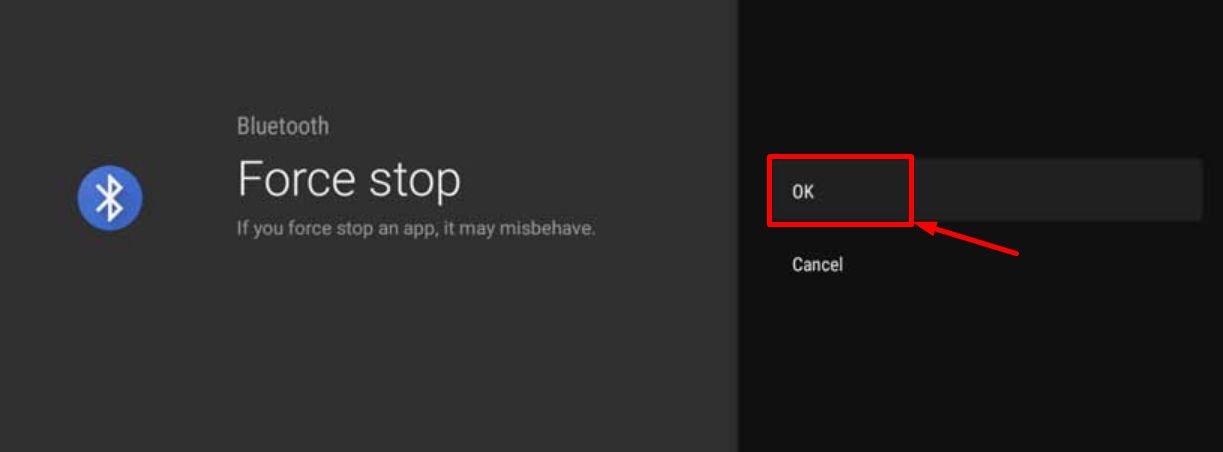
- Confirm the force stop by pressing OK

- After that, click on Clear Cache

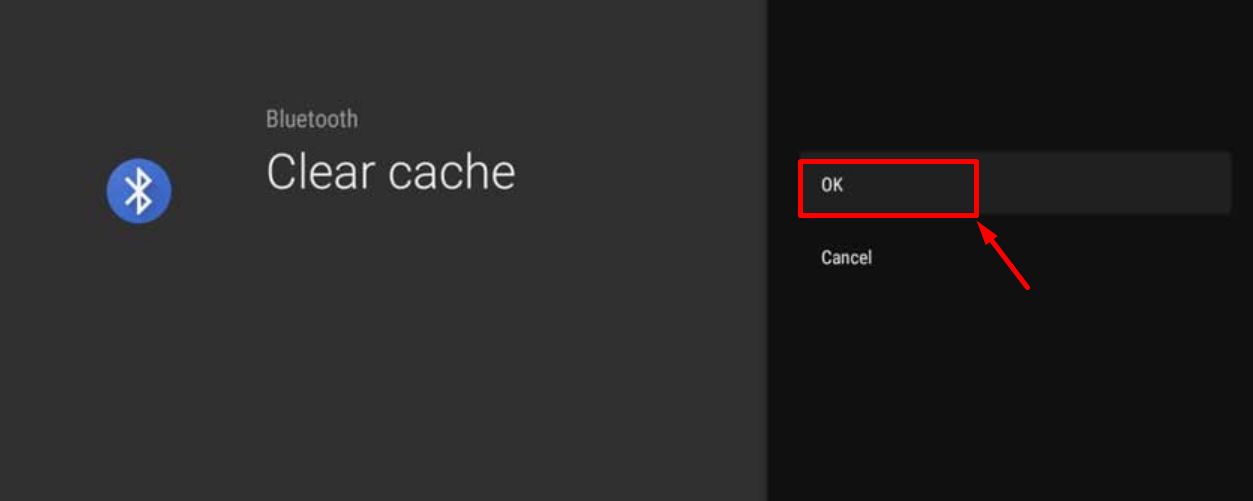
- Confirm clear cache by pressing OK

- Now, restart your device and try pairing again.
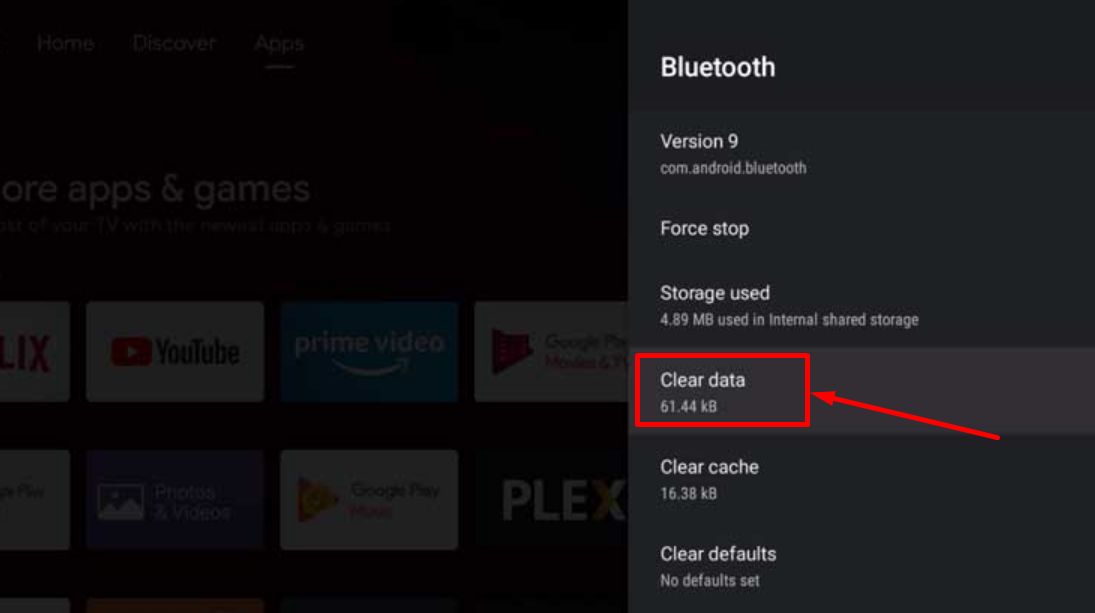
Clear the data of Bluetooth
Clearing the data of the Bluetooth app can actually help resolve issues with the NVIDIA Shield Remote not working properly. During use, the Bluetooth app accumulates data, which can include temporary files and settings. Sometimes, this data can become corrupted or misconfigured, causing communication issues between your remote and the Shield TV.
- Navigate to the “Settings” menu.
- Within the Settings menu, look for an option called “Apps“
- Once you’re in the Apps section, find and select “System Apps”.
- Scroll through the list of system apps until you find “Bluetooth.” Click on it to access the app’s settings.

- Within the Bluetooth app settings, you’ll find an option that says “Clear Data“. Select this option.

- The TV might show a warning that clearing data will reset the app to its default settings. Confirm your choice by pressing OK.

- After clearing the data, go back to the home screen and restart your TV.
- Once the TV restarts, try pairing your remote or any other Bluetooth devices again to see if it resolves the NVIDIA Shield remote not working issue.
Factory Reset NVIDIA Shield TV
When you’ve tried everything and nothing seems to work, a factory reset may be the only solution.
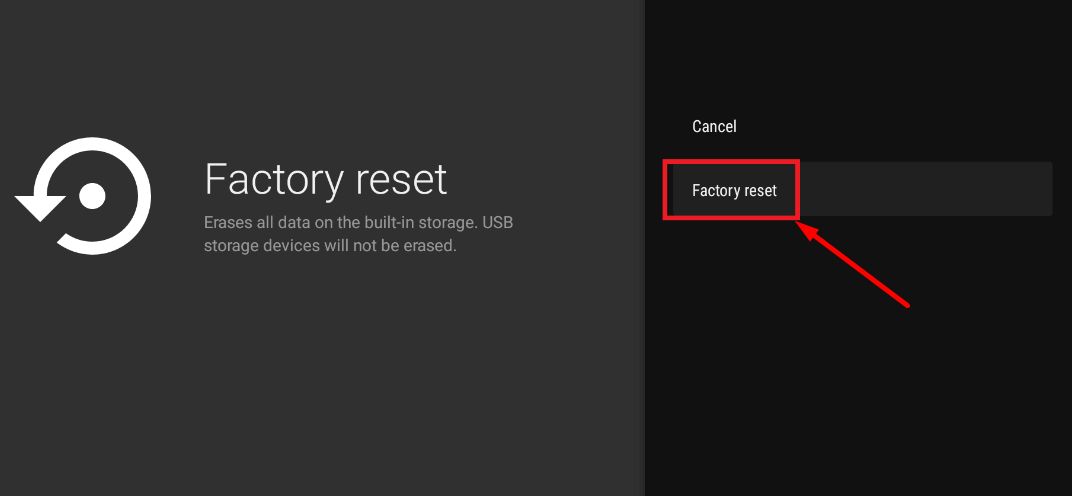
Doing a factory reset can kick out those annoying glitches that mess things up. It’s important to note that this isn’t a gentle reset. As the factory reset deletes all the apps and personalized settings, you’ll have to start over from scratch. Your device will be back to the way it was when you first got it.
So, if you’re ready for it, follow the below steps to factory reset the TV.
- First up, go to the Settings menu
- Look for Device preferences and select it.
- Now, find Storage and Reset and tap on it
- You’ll see the Factory data reset option. Click on it.

- A confirmation pops up. So, you have to hit that Factory data reset button once again.
- The final step is to hit Erase Everything option.

- As the reset takes time, sit back and relax.
- Once it’s done, you’re ready to set up your Shield TV just the way you like it.
- Now, try to pair the remote and see if it works.
Use your Smartphone as Nvidia Shield TV Remote
If the solutions mentioned earlier don’t quite do the trick for your Nvidia Shield remote, consider another option: using your smartphone as a remote control. We’ll show you how to make this to control your TV with your smartphone.
- Open up the Google Play Store or iOS App Store.
- Search for “Nvidia Shield TV“ in the search bar. Simply click the “Install” button. (You can directly install the Nvidia Shield TV app from here on Android/iOS)
- Once the app is installed, tap “Open.”
- Now, make sure your smartphone and your Nvidia Shield TV are on the same WiFi network.
- The app will show you the version of your Nvidia Shield TV. Give that a tap
- A code will pop up on your TV screen.
- Type in the code on your Android device and hit “enter.” It will confirm that you’re connected.
- Now you’re all set to control your Nvidia Shield TV from the palm of your hand!
In many instances, simply unpairing and then pairing your NVIDIA Shield remote again can do the trick to restore its functionality and solve the Nvidia Shield remote not working issue. If that doesn’t solve the issue, trying other methods mentioned in this article might help.
ALSO READ: –
- [Fixed] Nvidia Shield Not Turning On
- How to Reset Nvidia Shield Remote (3 Working Methods)
- Toshiba Fire TV Remote Not Working? (How to Fix Guide)
- How to Reset JVC TV Without Remote Easily (5 Methods)
- How to Fix Roku Remote Blinking Green Light (8 Ways)
Frequently Asked Questions (FAQs)
Why is my Shield remote not working?
Your Shield TV remote might not be working due to several possible reasons. The first thing to do is to check and replace the batteries if they are running low. Also, ensure that both your Shield TV and remote are updated. Also, it could be due to the Bluetooth app’s temporary cache or data, so clear them. If the problem persists, try unpairing and re-pairing the remote, or even performing a reset. If these steps don’t resolve the issue, a factory reset of your Shield TV might be required. If the problem still persists, it could indicate a need to replace the remote itself.
How do I reset my Nvidia Shield remote?
To reset your Nvidia Shield remote, hold the Back and Select buttons together for around 15 seconds until the light turns off. Then unplug your Shield TV, wait a moment, and plug it back in. When it starts up, hold the Select button until you see a flashing light (green or blue). Follow the on-screen instructions to pair the remote again.

