Starlink is a great solution for people in areas with slow or no internet options. It’s currently the best choice for satellite internet, giving many users access to faster speeds than other providers. However, Starlink is still new, and since it relies on signals from small satellites high in space, it can have occasional problems.
One of the main issues is when Starlink’s internet stops working and shows a ‘Router Unreachable’ error. This can be frustrating, especially if you’re in the middle of something important or have a deadline coming up. If you see that dreaded “Starlink internet not working” message, there’s no need to panic. In this guide, we’ll cover the most common Starlink problems and how to fix them.

Why is My Starlink Internet Not Working?
The “Router unreachable” message in the Starlink app means your dish is connected to the internet, but it can’t communicate with the Starlink router. As a result, you won’t be able to connect to your Wi-Fi and will have no internet access. Often, this happens because of server issues.
Another thing is if your plan has expired, you won’t be able to use the internet. There can also be other reasons for the problem, like obstructions blocking your Starlink signal or bad weather, such as rain or snow. Whatever the issue is, this guide will show you some quick fixes to try.
9 Ways to Fix Starlink Internet Not Working Problem
Set It Up Correctly
Make sure you follow the setup instructions from the official Starlink guide. A common mistake is placing the dish in a spot where it can’t see the satellite network. You need to make sure that your dish has a clear, unobstructed view and that you’re in an area covered by Starlink.
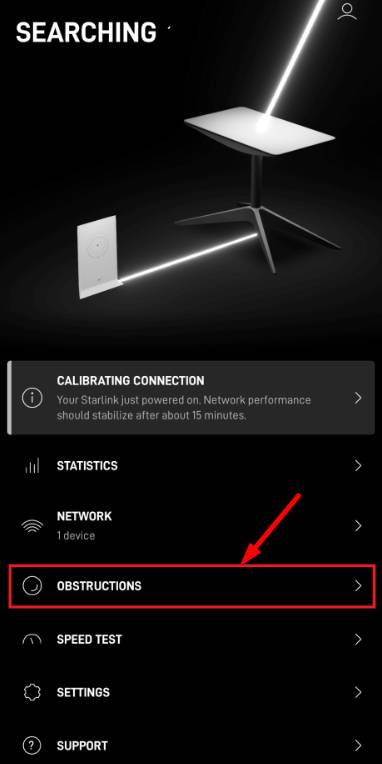
You can use the Starlink app’s “Obstructions” option. Also, check the cable—make sure it isn’t bent or damaged in any way. 
Check the Starlink Router
Place your Starlink router in a central location to get good Wi-Fi coverage where you use the internet the most. If you’re too far from the Wi-Fi hotspot, you might experience internet issues.
Remember, the 2.4 GHz Wi-Fi network has a longer range than the 5 GHz network.
To get the best signal, try to minimize obstacles like walls and windows, and avoid interference from other devices such as microwaves, refrigerators, or nearby Wi-Fi networks.
Check the Wi-Fi Settings on Your Phone
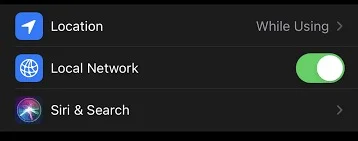
Sometimes, your phone’s settings can cause the Starlink router unreachable message to appear. If your phone is blocking the Starlink app from accessing the Wi-Fi network, you won’t be able to see the router.
To fix this, open your phone’s settings. Scroll down and find the Starlink app settings. Make sure the “Local Network” option is turned on. 
Reboot Your Starlink System
Next, try rebooting your Starlink system. Unplug the power cord from the router, wait for a few seconds, then plug it back in.
Give it about 15 minutes to fully restart. After waiting, check if you can connect to the Starlink Wi-Fi network. Look at the app dashboard to see if the error message is gone. If it’s still there, move on to the next solution.
Perform Router Factory Reset
If rebooting didn’t work, try a factory reset of the Starlink router. This will erase all Wi-Fi settings and restore the Starlink router to its default settings. To do a factory reset, use a paperclip to press the reset button on the back of the router.
If your router doesn’t have a reset button, power cycle the router 6 times in a row to reset it. You can also check my guide on how to factory reset the Starlink router for more help.
Wait about 5 minutes for the router to restart. You should see a new Wi-Fi network called “STARLINK.” Connect to it and see if the error message is gone.
Check the Starlink Outage Map
If you’ve been using Starlink for a while, you may know that they offer an interactive outage map. This map shows where Starlink is working well and where it’s not. You can easily check the outage map on the official Starlink app:
- Open the Starlink app on your phone.
- Tap on “Outage Map.”
- You’ll see a list of obstructions and areas with no signal.

If there’s no message showing, everything is fine, and you just need to reboot your Starlink.
Update the Firmware
Like other online services, Starlink provides firmware and software updates for its devices. If your Starlink internet isn’t working, it might be because your firmware is outdated.
Normally, the Starlink firmware updates automatically, but there’s a way to force an update by rebooting your Starlink. You can also check when your firmware was last updated and make sure you received the latest update.
Check Weather-Related Issues
Weather can sometimes affect your Starlink internet connection. While Starlink is less sensitive to weather than traditional satellite services, heavy rain or snow can cause problems. Starlink typically handles light rain or mist well, but snow can interfere with the signal. The built-in heater on the Starlink dish may struggle in extremely cold temperatures, causing snow buildup that blocks the signal.
If it’s snowing and you can safely reach your dish, gently remove the snow with a broom to temporarily restore the signal. In the case of heavy rain, there’s not much you can do except wait for the weather to clear.
Contact Starlink Support
If none of the previous solutions worked, it’s time to contact Starlink Customer Support for help. To contact them, go to the Starlink Support page and create a support request.
When you’re able to create a support ticket, make sure you’re logged in and follow the instructions in the support guide. Keep in mind that Starlink support can be busy, so it may take 4-5 days to get a response.
If nothing works, you may be able to request a replacement for your equipment if it is under warranty, but that’s a separate process.
- RELATED: – How to Fix Starlink No Signal Received Error


