Starlink, SpaceX’s satellite internet service, has changed the way many people, especially those in remote areas, connect to the internet. However, users sometimes face a common problem: the “No Signal Received” error. This issue can interrupt your internet connection and be quite frustrating.
The “No Signal Received” error happens when your Starlink dish can’t properly communicate with the satellites in orbit. Several things can cause this problem, such as bad weather, objects blocking the dish’s view, or issues with your location or equipment. To fix the problem, it’s important to understand what’s causing it.
Although Starlink has been around for a while, users still run into this error from time to time. Often, the problem fixes itself quickly. But sometimes, you might need to take action to get your internet working again.
In this guide, we’ll explain what the “Starlink No Signal Received” error means, look at the most common reasons it happens, and give you clear, step-by-step instructions to fix it.
What Causes No Signal Received on Starlink?
The Starlink “No Signal Received” error occurs when your Starlink dish, often called “Dishy,” can’t connect to any of the 3,000+ satellites in orbit. This error means your internet connection is down because the dish isn’t receiving a signal from space.
Several factors can cause this error. Bad weather, like heavy rain or snow, can interfere with the signal. Objects blocking the dish’s view of the sky, such as trees or buildings, can also cause problems. Sometimes, the issue might be on Starlink’s end, like a network outage or server problem. A dirty dish can also lead to connection issues.
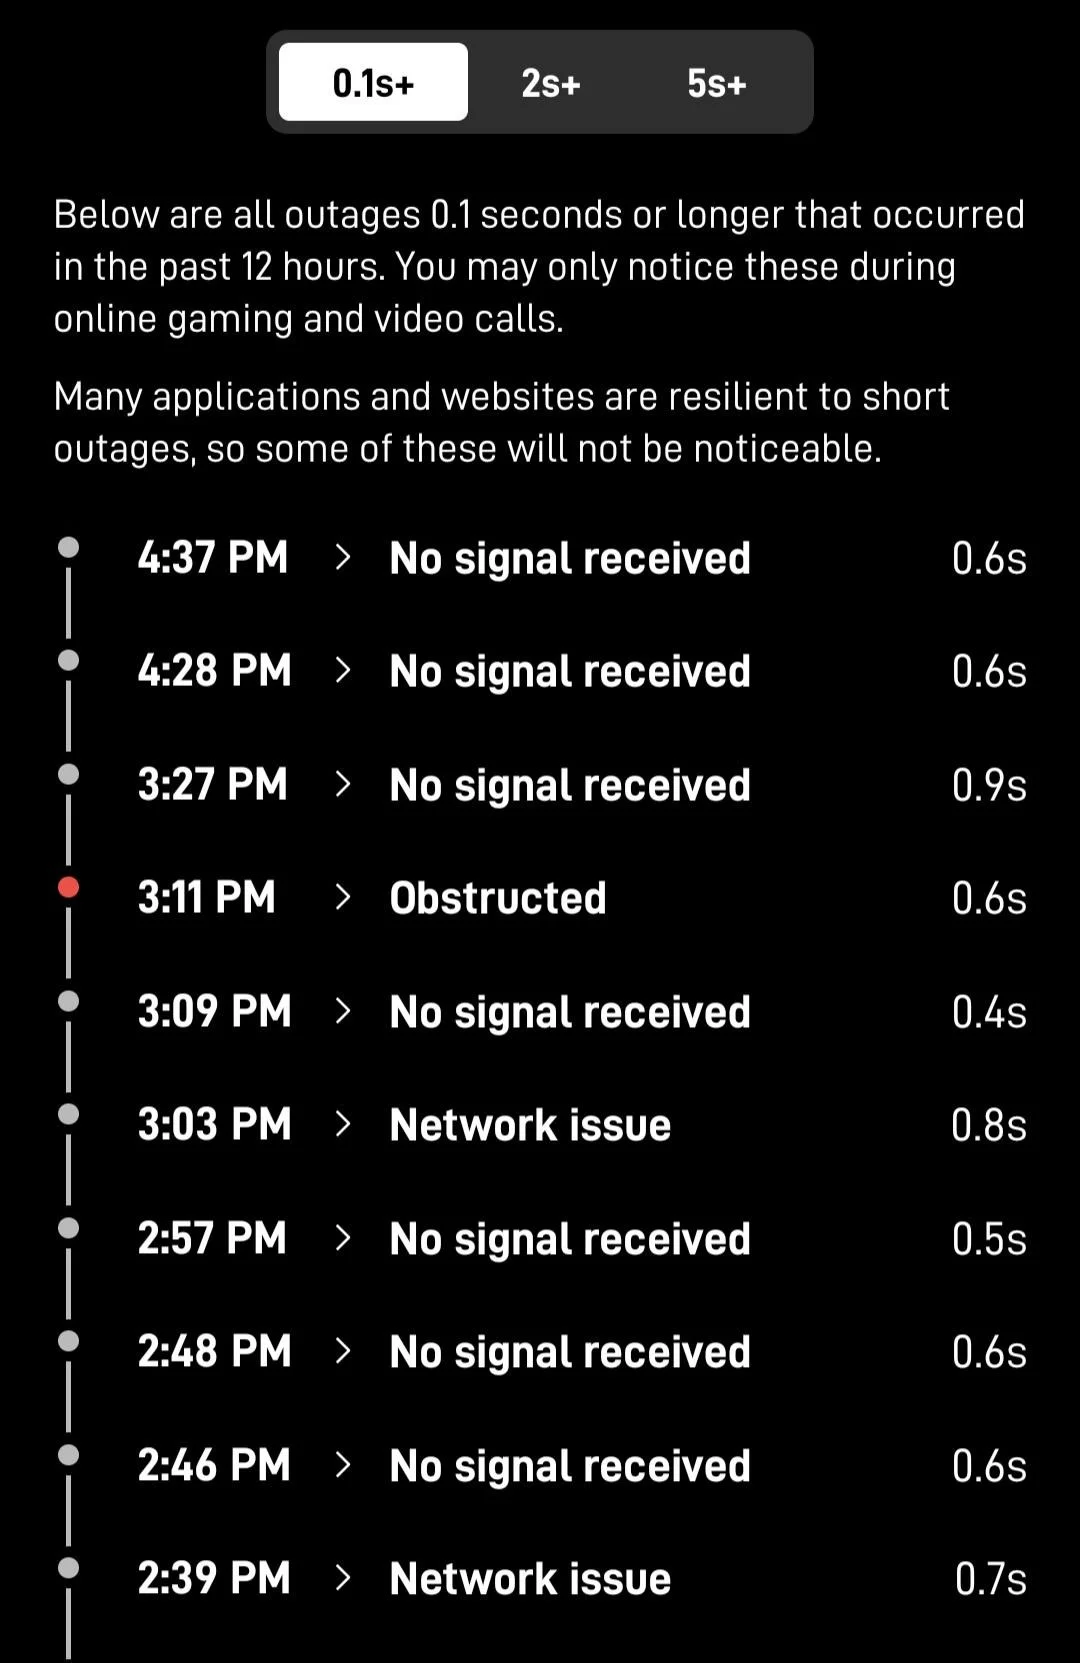
Most of the time, these signal problems are brief, lasting only a few seconds or minutes. Your dish often fixes itself by reconnecting to a different satellite.
6 Ways to Fix Starlink No Signal Received Error
Reboot
Rebooting your Starlink system is a simple yet effective way to fix the “No Signal Received” error. The easiest method is to unplug the main power cord, wait for about five minutes, and then plug it back in. This gives the system time to fully reset and clear any temporary issues. Alternatively, you can use the Starlink app to reboot by going to Settings and tapping the Reboot option.
While rebooting often solves many problems, it’s not always a permanent fix. If you find yourself needing to reboot frequently, or if the issue persists after rebooting, you may need to try other solutions listed below.
Power Cycle
Another simple but effective way to resolve Starlink offline no signal received error is Power cycling. This can often fix temporary issues caused by power-related problems.
- Unplug your Starlink router and wait for one minute.
- Plug the router back in.
- Quickly unplug and replug the router three times, waiting 3 seconds between each plug-in.
- Leave the router plugged in and wait for another minute.
- Check if the connection issue is resolved.
For best results, you might want to repeat this power cycling process a few times.
No Satellite Coverage
If you’re experiencing a “No Signal Received” error due to a lack of satellite coverage, don’t worry. Starlink is still expanding its network, and sometimes there might not be enough satellites in view of your dish. This situation is temporary and will improve as SpaceX launches more satellites into orbit.
For now, the best solution is to be patient. Check your Starlink app regularly for updates on satellite coverage in your area. If the problem persists for an extended period, you can contact Starlink support for more information. Remember, as Starlink continues to grow, these coverage issues will become less frequent, leading to more stable and reliable internet service.
Check for Obstructions to the Dish
One of the most common causes of the “No Signal Received” error is obstructions. These are physical objects that block the signal between your Starlink dish and the satellites. Trees, buildings, and even transparent roof covers can interfere with your connection.
To fix this, you need to find a clear spot for your Starlink dish. Use the Starlink app to check the obstruction map. Look for a location with as few red dots as possible. This might mean installing your dish on your roof or using a pole mount to raise it higher. 
If you live in an area with lots of trees, you’ll need to be extra careful about placement. So, try to mount the dish higher than the surrounding trees. You can use different types of mounts, like J mounts, to help position your dish correctly. 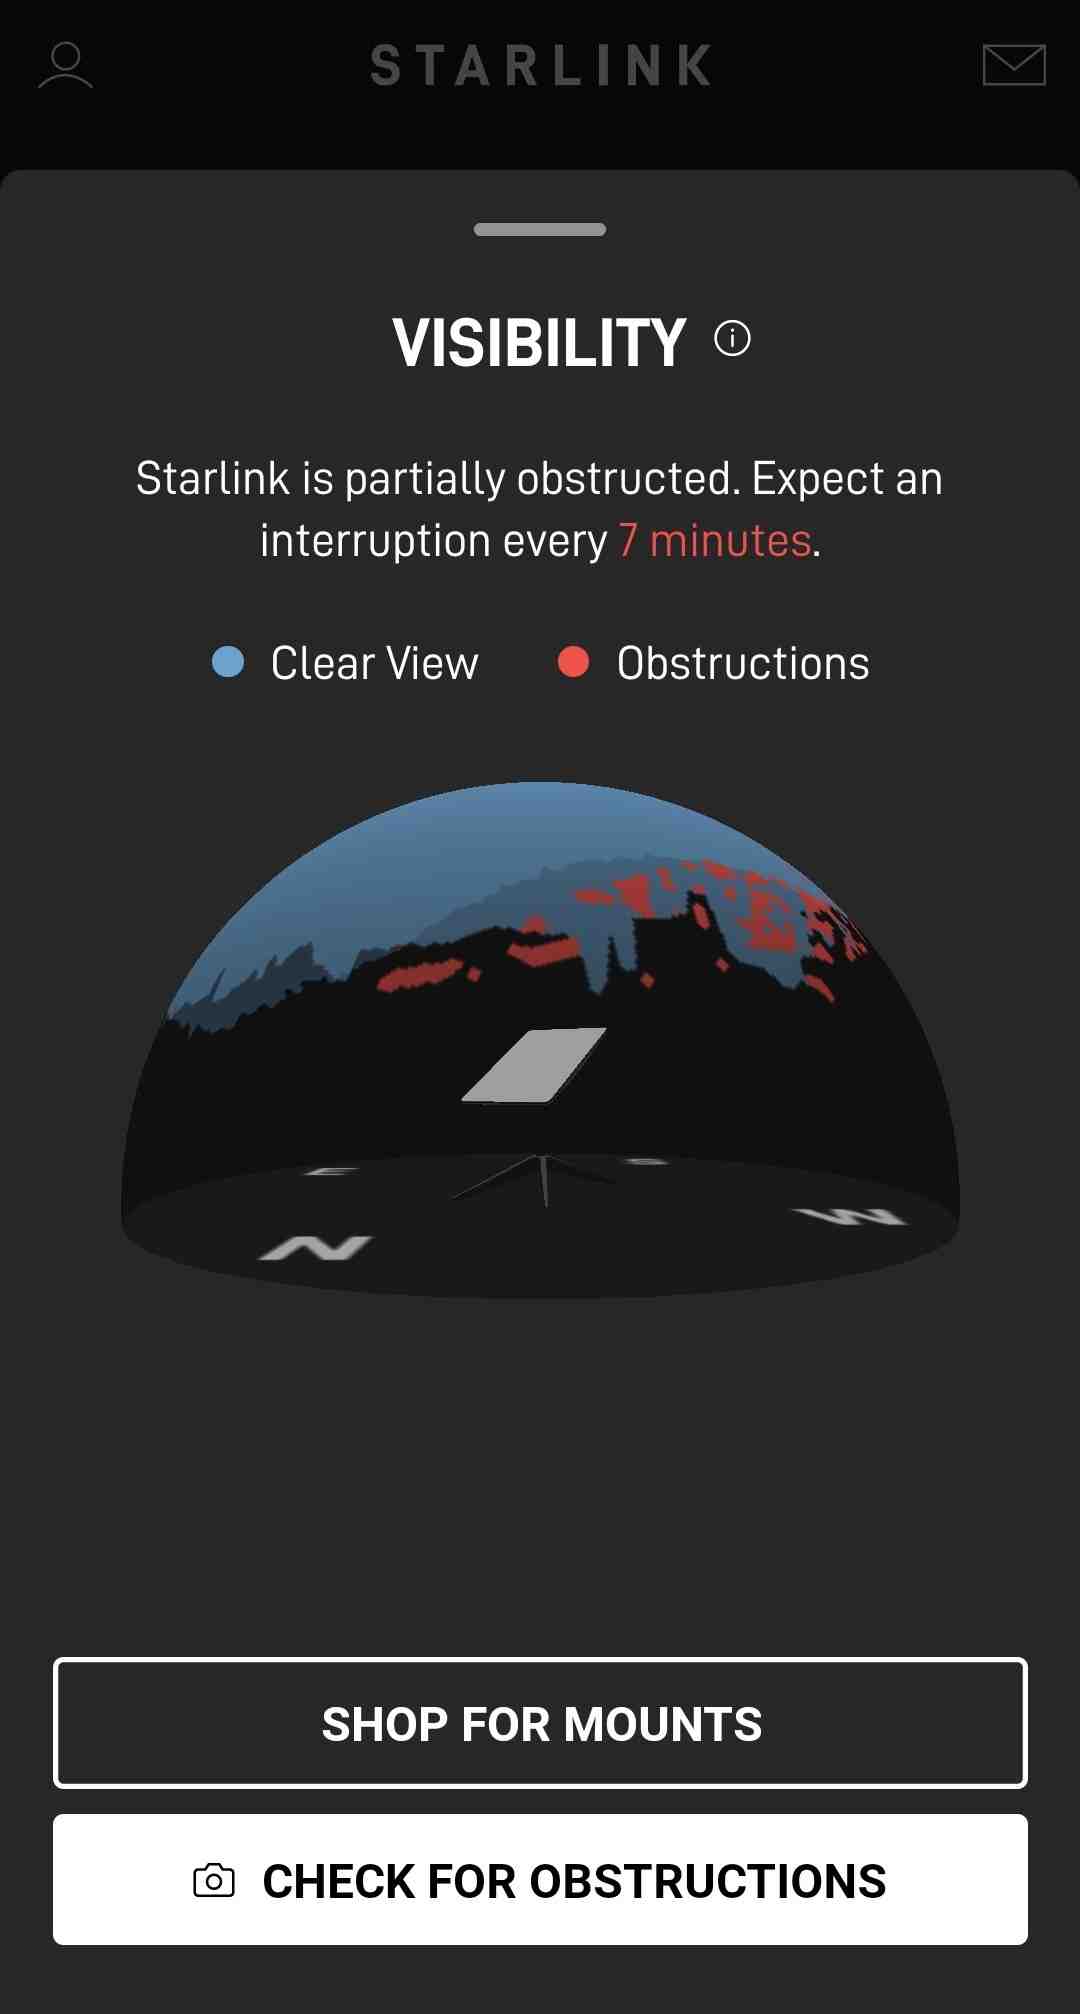
While Starlink dishes are built to withstand tough weather, they can still get dirty. Dust and debris can build up over time and affect your signal. Regularly check your dish and gently clean it if needed.
- ALSO READ: – Starlink Obstructed: How to Check and Fix it
Check Weather Conditions
Weather conditions can significantly impact your Starlink connection, and unfortunately, it’s not something we can control. While Starlink usually works fine in light rain or snow, heavy rain can cause slower speeds and even network drops.
During extreme weather, like heavy rainstorms or blizzards, you might lose your signal for extended periods. This happens because water molecules in the air can interfere with the signal, similar to how solid objects like buildings do. However, light drizzles or wind shouldn’t cause major issues with your connection.
If you’re experiencing weather-related connection problems, the best solution is often to wait it out. Once the weather improves, your connection should return to normal. In snowy conditions, you might need to remove snow from your Starlink dish if it accumulates. Fortunately, Starlink dishes have a built-in heating feature to help melt snow, which you can enable to prevent snow buildup.
Check For Software Issues
While your Starlink dish and router usually update themselves automatically, there are times when you might need to manually update the software.
If you suspect a software issue, start by resetting your router. Unplug it for a few minutes, then plug it back in. This simple thing can often trigger the router to check for and install any pending updates.
For your Starlink dish, do the same thing – unplug it for a few minutes, then reconnect it. This reboot can help the dish update to the latest firmware.
To check if your Starlink equipment is running the latest software;
- Open the Starlink app.
- Go to Advanced Settings.
- Find the Software Version under the Starlink section.
- Compare it to the latest version on Starlink’s website.
If you’ve tried all the suggested solutions and still face the “No Signal Received” error, don’t worry. In many cases, the problem resolves itself if you wait a bit. Bad weather, temporary obstructions, or even your location can cause short-term issues that often clear up on their own.
If the problem persists, it’s time to contact Starlink support. They can provide service and might check your hardware or the status of the service in your area.
- RELATED GUIDES: – How to Fix Starlink Disconnected Error (2024)
Frequently Asked Questions (FAQs)
How long does it take for Starlink to receive a signal?
Starlink usually receives a signal right away when you set it up for the first time. The dish will automatically locate satellites, and establish a connection, and your internet should start working within a few minutes.
Why does my Starlink say no connection?
If your Starlink shows “no connection,” it could be due to various factors, such as outdated software, interference, weather conditions, etc. Sometimes the process to receive a signal can take longer than usual, and it may seem unpredictable. If you’ve waited for a while and still see the error, it’s best to contact Starlink support.


