Encountering error 321 while trying to download a video on StreamFab can be quite frustrating, especially when you’re eager to save your favorite Netflix series or Prime Video movie. The good news is that this issue is common and can be resolved with a few simple steps.
StreamFab is a popular tool for downloading videos from streaming platforms like Netflix, Amazon Prime, Peacock, Crunchyroll, and Hulu, allowing you to watch your favorite content offline. Although it is free of bugs, it does have its quirks. Error 321 on StreamFab usually shows up when StreamFab struggles to connect to the streaming service, often due to a VPN or a blocked MAC address.
In this guide, we’ll walk you through the easiest ways to fix the StreamFab error code 321.

How to Fix StreamFab Error Code 321
Change Mac
If you’re facing StreamFab error 321, it’s likely because your device’s MAC address (network address) has been blocked. Changing your MAC address can resolve this issue. Here’s how you can do it:
Using Device Manager
- Press Windows + X and select Device Manager.
- Expand Network Adapters, right-click on your adapter, and select Properties.
- Go to the Advanced tab and select Network Address or Locally Administered Address.
- Enter the desired 12-character MAC address in the Value field (e.g., 3C7D9E4F8A2B without colons or dashes) and click OK.
- Restart your computer if necessary.
Using Control Panel
- Press Windows + R, type the control panel, and hit Enter.
- Navigate to Network and Internet > Network and Sharing Center > Change adapter settings.
- Right-click on your network adapter and select Properties.
- Click Configure, go to the Advanced tab, and choose Network Address.
- Enter the new MAC address and click OK.
Using the Windows Registry
- Press Windows + R, type regedit, and press Enter.
- Navigate to HKEY_LOCAL_MACHINE\SYSTEM\CurrentControlSet\Control\Class\{4D36E972-E325-11CE-BFC1-08002BE10318}
- Browse through the numbered keys (e.g., 0000, 0001) to find your network adapter.
- Right-click it, select New > String Value, and name it NetworkAddress.
- Double-click NetworkAddress, input the new MAC address (without colons or dashes), and click OK.
- Disable and re-enable your network adapter.
- Open Command Prompt and run ipconfig /all to verify the new MAC address.
Using Third-Party Software
- Download and install tools like Technitium MAC Address Changer.
- Open the app, select your network adapter, and enter the new MAC address.
- Click Change Now to apply.
Changing the MAC Address on macOS
- Turn off Wi-Fi from the menu bar or Control Center.
- Open Terminal using Spotlight Search.
- Generate a random MAC address by typing:
openssl rand -hex 6 | sed ‘s/\(..\)/\1:/g; s/.$//’
- Press Return and copy the generated MAC address.
- Change your MAC address by typing:
sudo ifconfig en0 ether [Your MAC Address]
- Replace [Your MAC Address] with the generated address.
- Enter your Mac password if prompted.
- Turn the Wi-Fi back on and reconnect.
Note: This change on macOS is temporary and will reset after restarting your device.
Using a VPN
If you’re struggling to log in to the streaming platform on StreamFab while using a VPN, go through these steps:
- Launch the StreamFab with your VPN turned off.
- Navigate to the streaming site’s login page and attempt to log in. The login may fail at this stage, which is expected.
- Without closing StreamFab, activate your VPN and connect to a server in the same region as your subscription. For example, if you are accessing Netflix Germany, connect to a German server.
- Return to StreamFab and try logging in again. The login should now be successful, allowing you to access and download content.
This method works because the streaming platform’s VPN detection can interfere with login attempts. Logging in without a VPN first and then enabling the VPN helps bypass this issue. This solution was tested successfully in Germany using NordVPN, though it may also work with other reliable VPN providers.
RELATED: –
Update the Software
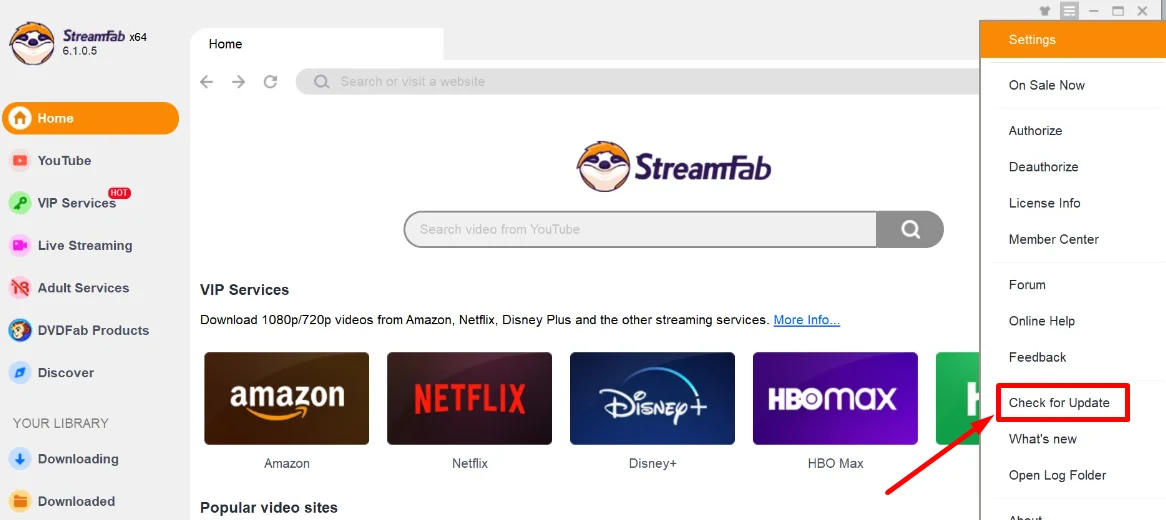
If the error still occurs, check for updates in StreamFab. Open the application, navigate to the drop-down menu, and select the Check for Update option. If an update is available, install it and see if the error is resolved. 
If none of the above solutions worked for you, try uninstalling StreamFab completely using software like Revo Uninstaller or deleting the entire StreamFab folder from your PC before reinstalling it. Additionally, consider installing an older version of StreamFab to see if that resolves the issue. If all else fails, contact their support team for further assistance.


