StreamFab is a powerful software designed to download videos from a wide range of streaming platforms, including Netflix, Amazon Prime Video, Disney+, Hulu, and more. Its versatility and ability to support multiple services in one tool make it a favorite among users and makes it a reliable choice for anyone looking to build an offline video library.
However, StreamFab users often run into error codes like 319, 314, 313, and 702 while trying to download content. These issues can be frustrating, especially when you’re in the middle of a task.
To help you resolve these StreamFab errors quickly, we’ve compiled a list of effective solutions. This guide explains each fix in detail along with the simple fixes. Let’s dive straight into the solutions.
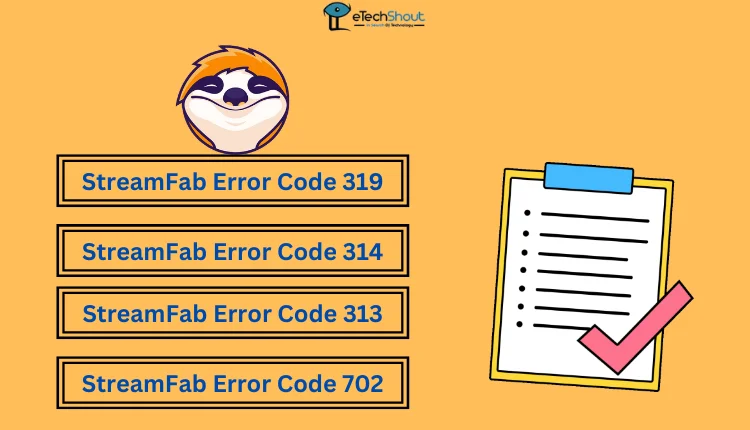
How to Fix StreamFab Error Codes 319, 314, 313, and 702
StreamFab Error Code 319
Change Your MAC Address
If you’re encountering StreamFab Error 319, it could be due to your device’s MAC address being blocked. Changing your MAC address can help resolve this issue. Here’s how to do it on both Windows and macOS:
On Windows
Using Technitium MAC Address Changer
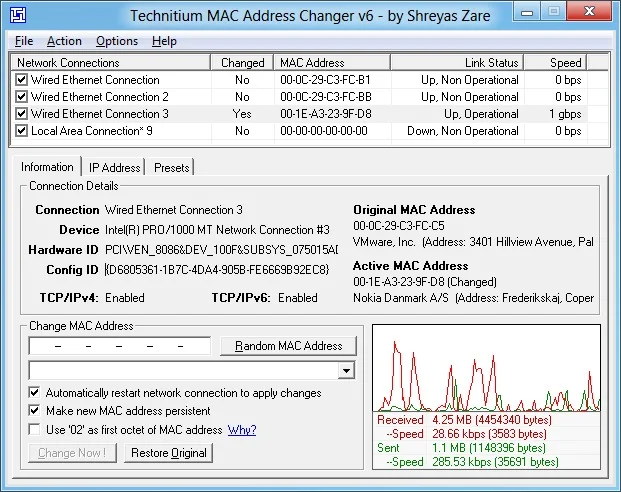
Technitium MAC Address Changer provides the easiest way to change the MAC address on your Windows PC without the need for complicated steps. This software is ideal for those who prefer a straightforward solution since you don’t have to worry about manual edits, making it an easy and effective solution for changing your MAC address.
- Download Technitium MAC Address Changer software by clicking here
- Open the Technitium MAC Address Changer and select your network adapter. You’ll see detailed information about your adapter at the bottom of the window.
- In the Change MAC Address field, enter a new MAC address. If you don’t have one, click Random MAC Address to generate a new address automatically.
- Once you’ve entered a new MAC address, click Change Now! to apply the changes. The button will become active once you’ve entered a valid address.
- If you want to revert to the original MAC address, simply click the Restore Original button.
Using Device Manager
- Press Windows + X and select Device Manager.
- Expand Network Adapters, right-click your network adapter, and choose Properties.
- Go to the Advanced tab and select Network Address or Locally Administered Address.
- Enter a new 12-character MAC address (e.g., 3C7D9E4F8A2B, no colons or dashes).
- Click OK and restart your computer.
Using Control Panel
- Press Windows + R, type control panel, and hit Enter.
- Navigate to Network and Internet > Network and Sharing Center > Change adapter settings.
- Right-click your network adapter and select Properties.
- Click Configure, go to the Advanced tab, and choose Network Address.
- Enter a new MAC address and click OK.
Using Windows Registry
- Press Windows + R, type regedit, and press Enter.
- Navigate to: HKEY_LOCAL_MACHINE\SYSTEM\CurrentControlSet\Control\Class\{4D36E972-E325-11CE-BFC1-08002BE10318}
- Browse through the numbered keys (e.g., 0000, 0001) to find your network adapter.
- Right-click on it, select New > String Value and name it NetworkAddress.
- Double-click NetworkAddress, enter the new MAC address (no colons or dashes), and click OK.
- Disable and re-enable your network adapter.
- Open Command Prompt and run ipconfig /all to confirm the new MAC address.
On macOS
- Turn off Wi-Fi from the menu bar or Control Center.
- Open Terminal using Spotlight Search.
- Generate a random MAC address by typing:
openssl rand -hex 6 | sed ‘s/\(..\)/\1:/g; s/.$//’
- Press Return to generate and copy the MAC address.
- Change the MAC address by typing:
sudo ifconfig en0 ether [Your MAC Address]
- Replace [Your MAC Address] with the generated address.
- Enter your Mac password if prompted.
- Turn your Wi-Fi back on and reconnect to your network.
Keep in mind that this change on macOS is temporary and will reset after restarting your device.
StreamFab Error Code 314
With ‘version.dll’ File
To resolve StreamFab error 314:
- Log in to StreamFab with your DVDfab ID.
- Close StreamFab temporarily.
- Download the ‘version.dll‘ file and copy it to the same folder where StreamFab is installed.
- After copying the file, restart StreamFab.
Once you restart, the error should be gone, and you’ll have your turbo speed bar back without encountering error 314. This method has been confirmed to work and is a quick fix for the issue.
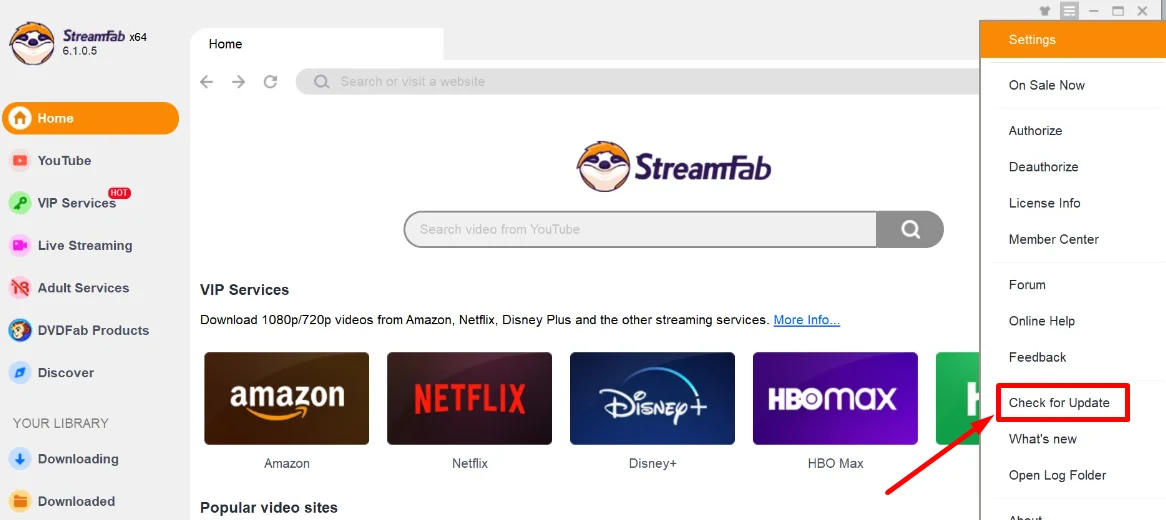
Update the StreamFab
If you’re still experiencing the error, try updating StreamFab to the latest version. Many users have reported that the issue was resolved after updating to version 6.1.5, so make sure your software is up to date.
- Open StreamFab and go to the drop-down menu.
- Select the Check for Update option.

- If an update is available, install it and restart the application.
StreamFab Error Code 313
Uninstall and Install the Official Offline Version
If the StreamFab error 313 occurs whenever you try to download a video, you can try uninstalling the current version of StreamFab and then installing the official offline version. Many users have found this method effective, as it ensures you’re using a stable, official version of StreamFab without any issues caused by the online installer or updates.
- Go to Control Panel > Programs and Features (or Apps & Features in Windows settings), find StreamFab in the list, and click Uninstall to remove the current version of the software.
- Visit the official StreamFab website to download the offline installer for the latest stable version. Make sure to download the version marked as “offline,” which doesn’t require an internet connection during installation.
- Once the offline version is downloaded, run the installer and follow the on-screen prompts to complete the installation.
- After installing the official offline version, restart the application and check if the error is resolved.
Install the Older Version
Many users have found that switching back to an earlier version resolved the StreamFab error code 313, as the latest update might have introduced a bug that wasn’t present before. So, consider reverting to a previous version of StreamFab:
- Uninstall the current version of StreamFab.
- Download an older version of the software from the internet
- Install it on your PC and check if that helps.
StreamFab Error Code 702
File Format Issue with MKVMerge
If you’re encountering error code 702 in StreamFab, it may be related to the file format and MKVMerge (MKVToolNix) compatibility. To resolve this issue, follow these steps:
- StreamFab uses MKVToolNix version 68, which may not be fully compatible with newer episodes. To avoid this issue, do not use the MKV format generated by MKVToolNix (also known as MKVMerge).
- Instead of using the default MKV format, switch to .MP4 for the output file or use .MKV in the FFmpeg version, which is compatible with StreamFab.
- Go to your VIP settings in StreamFab and choose FFmpeg-based MKV or select MP4 as the output format.


Install the Media Feature Pack for N Editions of Windows 11
If you’re experiencing StreamFab error 702 continuously, it may be due to missing media components in N editions of Windows 11. The N editions do not include certain media features by default, which can cause issues with StreamFab.
- Go to the official Microsoft website and download the Media Feature Pack for N editions of Windows 11.
- Once downloaded, run the installer and follow the on-screen instructions to complete the installation. This will add necessary media components like Windows Media Player, DirectShow, and other required features.
- After installation, restart your system to ensure all changes take effect.
- Once the Media Feature Pack is installed, restart StreamFab and the error should be resolved.
RELATED: –
We hope this curated list of common StreamFab errors and their solutions has helped you resolve the issue. If you found this helpful, please share it and continue visiting us for more tips. If you know of any other methods that can fix these issues, feel free to share them with us. If none of these solutions work, please contact StreamFab support.


