Twitch is one of the most popular video streaming services, especially for gamers. It allows people to live stream their gameplay, chat with viewers, and share their gaming experiences with a global audience. With over 15 million daily users and millions of broadcasters every month, Twitch continues to grow and become a major platform for content creators.
Now, if you’ve ever used Twitch, you probably know about Mods. They’re the folks who help keep the chat clean by getting rid of spam and anything rude or off topic. But every now and then, something weird happens — like the Twitch Mods Tab not loading. And yeah, that can be super annoying, especially if you’re trying to keep things on track during a stream.
If you’re stuck with this issue, you aren’t the only one. A lot of users have been seeing the same thing, especially after one of the recent Twitch updates. There could be a bunch of reasons why it’s acting up. Don’t worry, though — in this guide, we’ll walk you through a few easy steps to help fix it. Let’s get into it!

How to Fix Twitch Mods Tab Not Loading: Quick and Easy Solutions
Sign Out and Sign Back In to Your Twitch Account
Sometimes, the simplest fix is just logging out and logging back in. It might seem too easy, but it actually works more often than you’d think.
- First, open up the Twitch app on your computer.
- Look at the top left corner and click on the little menu icon.
- From there, go to File and then click on Logout.
Here’s another way you can try logging out of Twitch. Open the Twitch app > click your profile icon on the top right > choose Logout. Close the app, reopen it, and log back in.
Now, I’d suggest restarting your PC before logging back in. It’s not a must, but it can be a good option.
Once that’s done, open Twitch again, type in your login details, and see if the Mods tab shows up properly. This quick trick has worked for a bunch of users, so it’s definitely worth giving it a shot.
Try Running Twitch as an Administrator
Sometimes, apps need a little extra permission to work the right way. If Twitch isn’t loading things properly — like the Mods tab — it might help to run it as an administrator. It’s a simple trick and can make a difference.
Just go to your desktop, right-click on the Twitch app, and choose Run as Administrator. A box might pop up asking if you’re sure — just click Yes, and Twitch will launch with the extra permissions it needs.
If you want Twitch to always open this way, you can set it up. Go to the folder where Twitch is installed, find the file named Twitch.exe, right-click on it, and choose Properties. Then go to the Compatibility tab and check the box that says Run this program as an administrator. Click Apply and then OK.
Now Twitch will always run with admin access, and this might fix the Mods tab issue. If not, no worries. There are still more steps you can try.
Delete the AppData Folder
If the Twitch Mods tab still refuses to load, it could be because some of Twitch’s old files have gone bad in the background. Apps sometimes save stuff that helps them run faster, but if those files get messed up, it can cause all kinds of weird problems.
- Press the Windows key and type %appdata%, and hit Enter.

- Now, a new folder window will open. Look for the one called Twitch and open it.
- Go ahead and delete everything inside that Twitch folder. Do not worry, this will not delete your account or anything important.

After that, restart your computer just to be safe. Then open the Twitch app again and see if the Mods tab is finally working. Sometimes, clearing out junk files is all it takes.
Install the .NET Framework
Sometimes, Twitch needs a few extra tools to run properly, and one of them is the .NET Framework. If it is missing or not set up right, things like the Mods tab might not work the way they should.
- Go to the official Microsoft website and download the latest version of the .NET Framework.
- Once the file is downloaded, open it and follow the steps you see on the screen.
- It will guide you through the installation process, and it only takes a few minutes.
- After installing it, restart your computer and then launch Twitch again. This could help fix the issue.
Enable Software Rendering Mode
If you’re still having trouble with the Mods tab not loading, you can try turning on Software Rendering Mode. This can help take some pressure off your graphics card and might solve the problem.
- Open Twitch and click on the menu icon in the top left corner.
- Then, click on File and choose Settings.
- In the General tab, look for the option to turn on Software Rendering Mode and toggle it on.
- After that, give it a try and see if the Mods tab starts loading properly!
Delete Temporary Files
If Twitch is still giving you trouble, it could be caused by some outdated or corrupted files. A good way to fix this is by cleaning up the AppData folder.
- First, press the Windows key, type %appdata%, and hit Enter.
- In the window that pops up, find the Twitch folder, right-click it, and choose Delete.
- Next, press the Windows key again, type %localappdata%, and press Enter.

- Once you’re in that folder, look for the Twitch folder again and delete it just like you did before.
- Once you’ve done that, you’ve cleared out the old files. Now, try opening Twitch again and see if the Mods tab works!

Modify Windows Defender Firewall Settings
Windows Defender Firewall acts like a security guard for your computer, scanning incoming data to keep potentially harmful stuff from getting in. When you install a new program or app, Windows asks if it can access certain features. If you click Allow, the program can run without any issue, but if you click Deny, it might block important features.
If the firewall is blocking Twitch, it could be the reason why the Mods tab isn’t loading properly. To fix it, you can either add Twitch to the list of allowed apps or temporarily disable the firewall (though the latter isn’t recommended).
Add Twitch to the Firewall Exception List
- In the search bar, type Control Panel and open it.
- Set the view to Category, then click on System and Security.

- Select Windows Defender Firewall.

- Click on Allow an app or feature through Windows Defender Firewall.

- Hit Change settings, then check the box next to Twitch to allow it through.
- Click OK to save and restart your computer.
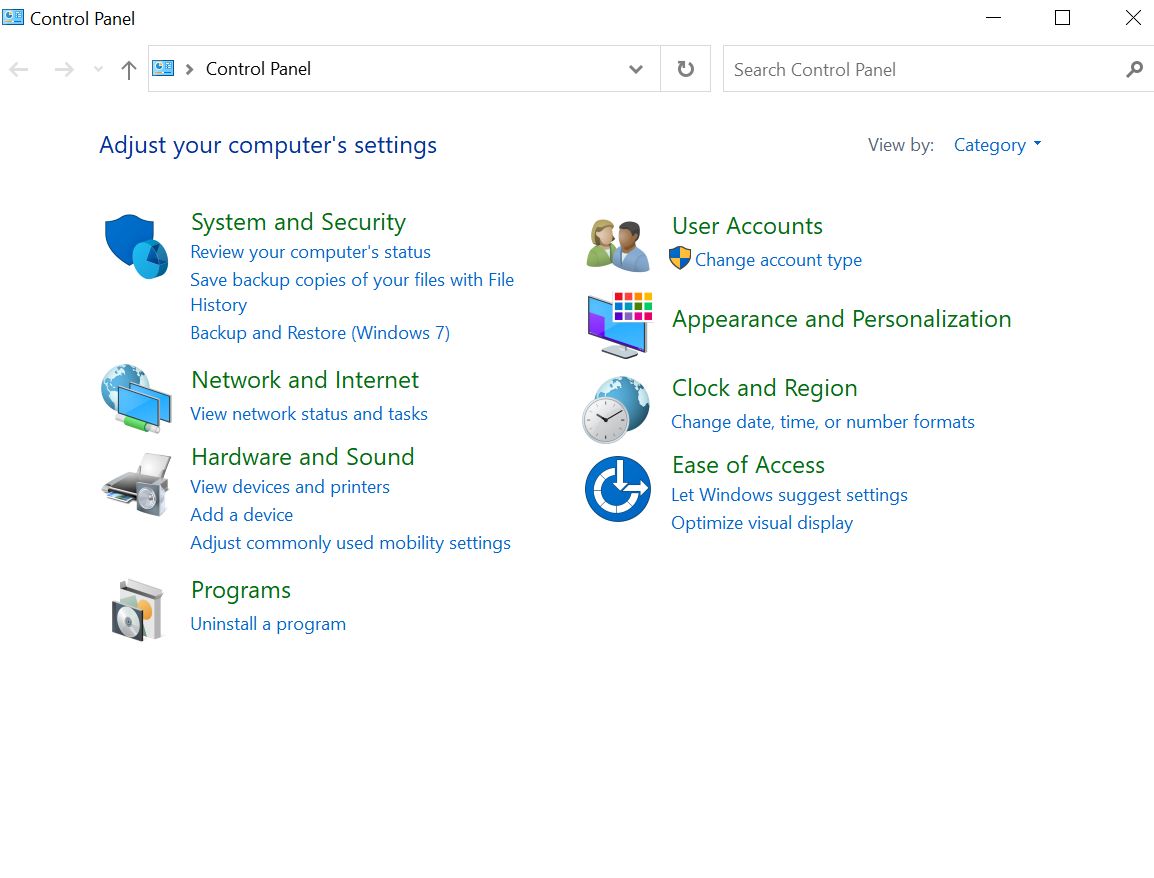


Note: If Twitch isn’t listed, click Allow another app… to find and add it.
Disable Windows Defender Firewall (Not Recommended)
If adding Twitch doesn’t work, you can try turning off the firewall, but keep in mind it’s not the best idea since it protects your computer from viruses and malware. Once you’ve done this, check if the Mods tab issue is fixed!
RELATED GUIDES: –
- How to Fix Twitch Network Error #2000 [100% QUICK FIX]
- Twitch Prime Sub Not Showing Up? Here’s the Fix!
Run Twitch in Windows Safe Mode
Safe mode is a great way to figure out what might be causing issues with your software. Sometimes, other programs or a recent driver update can mess with Twitch, making things not work right. Booting your PC into safe mode can help you identify the problem.
- Press the Windows key and R at the same time to open the Run dialog.
- Type MSConfig in the run dialog and hit Enter to open the System Configuration window.

- Under the Boot tab, check the box for Safe Boot, and select the Network option.

- Click Apply, then OK, then restart your computer into safe mode.


Modify the Minecraft.exe File
If you have Minecraft installed on your computer, it could be causing the Twitch Mods tab to not load. The good news is, you can fix this by modifying the Minecraft.exe file. Here’s how:
- Open Windows Explorer and navigate to C:\Users\Pro\Documents\Curse\Minecraft\Install
- Right-click on Minecraft.exe and select Create shortcut.
- Find the new shortcut, right-click on it, and go to Properties.
- In the Target tab, add this line before the target path: “C:\Users\Pro\Documents\Curse\Minecraft\Install\minecraft.exe” and hit Enter.
- When you’re done, go to your application, open the new Minecraft.exe shortcut from the dropdown menu, and select the Forge profile.
Reinstall Twitch
If none of the other methods have worked, reinstalling Twitch might do the trick.
- In the search bar, type App & Features and open it.
- Search for Twitch in the list and select it.
- Click Uninstall and confirm when prompted.
- After that, restart your PC.
- Head over to the Twitch download page and download the latest version of the app.
- Once the download is done, go to My Downloads in File Explorer.
- Double-click the downloaded file to open it.
- Click Install and follow the on-screen instructions to complete the installation.
- Now you’ve got a fresh install of Twitch! Check to see if the Mods tab loads properly.

