In this article, we will provide quick solutions for Blink Camera not detecting motion. Whether you have a Blink mini, indoor, outdoor, XT2, or XT camera, these fixes can be used on all of them.
Blink security cameras are wireless, easy to install, and affordable home security solutions. With motion detection, HD video quality, and cloud storage options, they offer reliable monitoring. Integration with Amazon devices adds convenience and versatility to the user experience, making Blink a popular choice for homeowners looking for effective and budget-friendly security.
Blink cameras excel in motion detection but may occasionally encounter bugs due to device configuration issues during use.
One such issue is, Blink camera motion detection not working. If basic troubleshooting does not resolve the issue, you can try the below-mentioned fixes to ensure your Blink Camera’s motion detection functions properly, providing reliable home security.
Why is My Blink Camera Not Detecting Motion?
Blink cameras may fail to detect motion for various reasons, but the most common issue is users accidentally turning off the motion detection feature. Another potential cause is the power-saving mode, which could disable motion detection.
In this article, you will find working solutions for the Blink camera motion detection not working.
How to Fix Blink Camera Not Detecting Motion
Enable Motion Detection
For a quick and basic solution, you can manually toggle motion detection on or off in Blink cameras. Simply go to Camera Settings > Motion Detection and toggle the “Enable” option based on your preference. By doing this, you can easily activate the motion detection feature.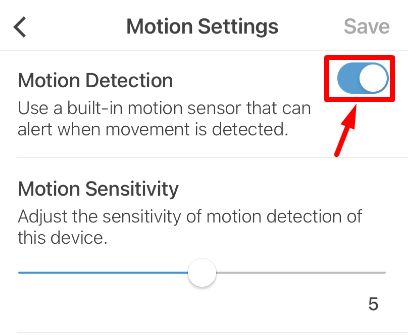
Check that the Blink Camera is Armed
When you first set up your Blink camera, the default state is disarmed. In Blink camera settings, “armed” means the camera detects motion events and starts recording, while “disarmed” means it does not detect motion, even if motion detection is enabled in the camera settings.
Therefore, to enable motion detection, make sure your Blink camera system is armed.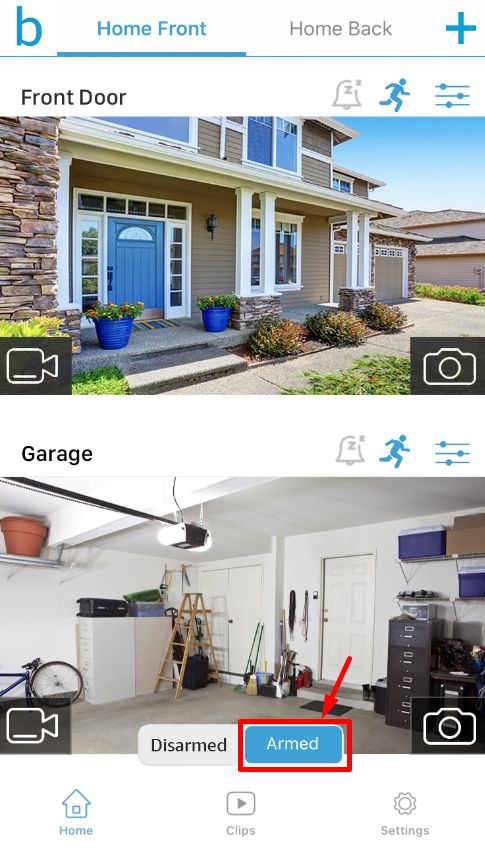
To arm your Blink camera, navigate to the camera view in the Blink app, and toggle from disarmed to armed at the bottom of the screen. Then, tap the running man icon to turn it blue, enabling motion detection. In the case of a gray running man icon, motion detection is off for that camera view.
Distance Between Sync Module from Camera
The Sync Module serves as the camera’s central hub, receiving information from the Blink servers via Wi-Fi and facilitating real-time communication with the camera. However, placing the Sync Module too far from the camera can result in issues with motion detection. Since motion detection relies on the sync module, a large distance between them can hinder the camera’s ability to process motion events effectively.
To resolve the motion detection issue caused by a large distance between the Sync Module and the camera, try reducing the gap between them to improve connectivity signals. It is important to get closer to one another in order to improve communication and enable proper motion detection.
For a single Blink device, consider attaching the sync module directly to the camera using various available methods.
Issues with Batteries
Blink security cameras frequently experience battery problems due to their high power requirements and the limited capacity to accommodate only two batteries at a time. Over time, users may experience battery-related problems.
One common issue that occurs from low or faulty batteries in Blink cameras is the disruption of motion detection settings. When the batteries are running low or malfunctioning, cameras may have difficulty detecting motion accurately.
In most cases, the best way to resolve battery issues with Blink cameras is to replace the existing batteries with new ones. These cameras typically use standard AA camera batteries, widely available at electronics or retail stores. In some cases, simply removing and re-inserting the batteries may correct the issue as well.
Regarding power issues, it is essential to check if the power-saving mode is enabled, as this setting can disable the motion detection system. To ensure proper motion detection functionality, it is recommended to verify and disable the power-saving mode if necessary.
Issues Related to Sensitivity
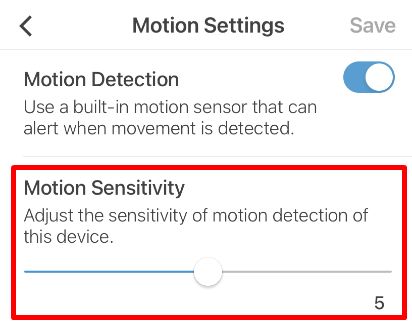
There can be issues with sensitivity when using Blink cameras when users are unfamiliar with configuring the motion detection settings. Sensitivity determines how much activity the camera needs to detect motion, and adjusting it correctly is crucial for its performance to be effective.
Especially for new users, it’s common to face challenges in finding the optimal sensitivity level.
Low sensitivity settings on Blink cameras may lead to motion detection issues, as the cameras might struggle to detect slower-moving objects, resulting in non-recording events.
To adjust sensitivity, users can access the Blink app’s motion detection section and make appropriate changes. By setting the sensitivity to the right level, users can ensure accurate motion detection and reliable recording of relevant events.
Issues with Firmware Updates
Firmware updates for Blink devices are regularly released to improve performance. However, these updates can occasionally reset device permissions and disable camera functionalities. Users must ensure that permissions are turned on after updates to ensure the camera functions correctly.
After a firmware update, if you notice permissions or camera functionalities turned off, you must manually enable them through the Blink app to ensure proper camera operation.
Additionally, remember to save any changes you make, as the app does not save them automatically.
Incorrectly Configured Blink Camera Settings
Blink camera settings can cause motion detection issues if incorrectly configured. To resolve this, users should verify and adjust the motion detection settings within the Blink app to ensure proper camera setup and reliable motion detection.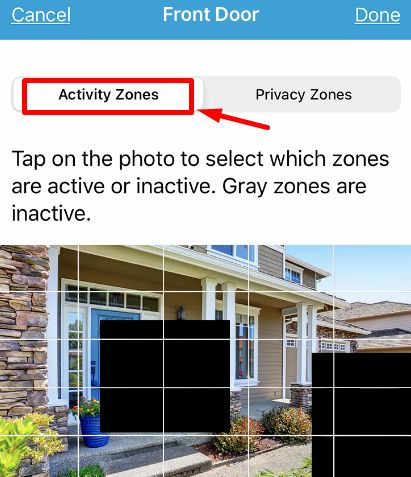
To resolve motion detection issues, users should adjust the camera’s sensitivity slider, set up activity zones, and verify the motion detection feature within the Blink app.
Moreover, ensure proper camera-to-sync module connection and a stable internet connection to maintain smooth camera operation.
Privacy zones are areas in your camera view that you wish to exclude from a recording or live streaming for privacy reasons. To ensure proper configuration, go to settings > privacy zones and tap “reset privacy zones.” This feature is available in Blink Video Doorbell, Indoor (gen 2), and Outdoor cameras, identifiable by the grey masking in the camera view.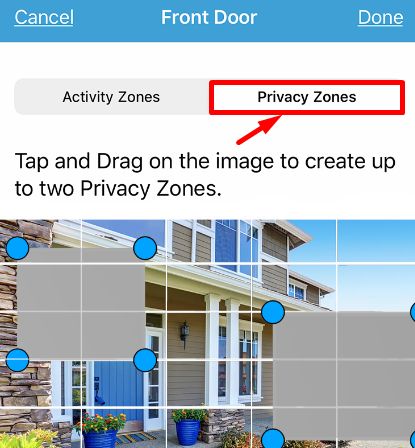
Improper Camera Placement
The wrong camera placement can lead to motion detection issues with Blink cameras. In order to avoid this problem, users should position their cameras in visible areas where they can effectively capture motion events.
Problems with WiFi
If you want to get the most out of Blink cameras, a strong WiFi signal is crucial, with a minimum of 3 bars at the camera location. Improving WiFi strength can be achieved by using a mesh WiFi system, which offers multiple hubs for better coverage.
Avoid WiFi extenders and opt for the 2.4 GHz frequency band, as cameras operate exclusively on this band and perform better over long distances.
IR Issues
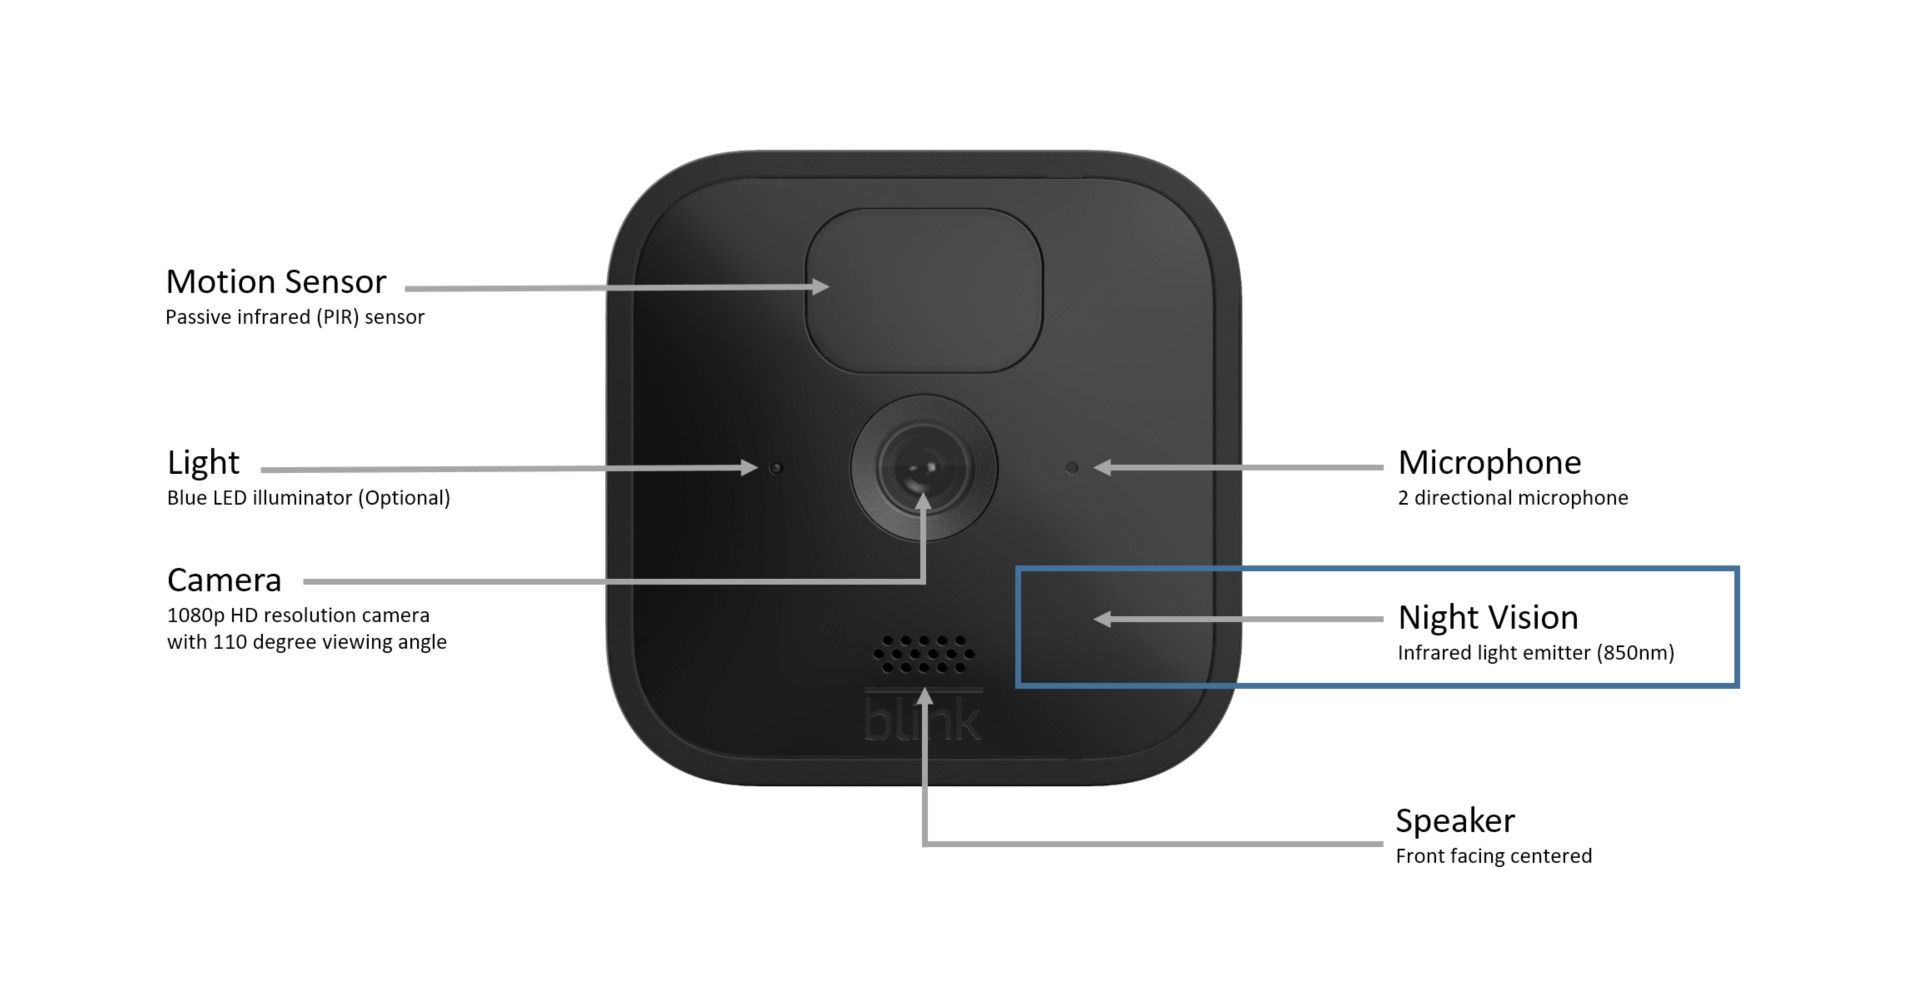
Blink cameras use Passive Infrared (PIR) technology to detect motion by sensing heat emitted by objects (humans, animals, cars, etc.). While PIR is a cost-effective sensor technology, it does have some limitations.
The primary limitation of PIR technology is that it doesn’t work through glass. Avoid placing a Blink indoor or Blink mini camera inside your home and pointing it outside through a window. Instead, invest in a Blink outdoor camera and position it outside your house for effective outdoor motion detection.
Also, make sure Blink cameras are not pointed directly at the sun, as excessive sunlight can interfere with their ability to detect motion. Tilt the cameras to detect the surroundings of your house effectively.
PIR-based cameras generally detect motion better from the sides than straight toward the camera. For effective motion detection when someone approaches the front door, avoid mounting the camera right above the door. Instead, position it to the side of the door for better results.
Before mounting your camera, ensure to remove the sticker on top of the sensor to avoid any impact on the motion sensing ability.
Motion Detection Issues at Night
If you experience motion detection issues at night, check the settings to confirm if the Infrared (IR) is turned on.
To resolve the issue, go to Camera Settings > Nightvision and toggle the control to either auto or on. Keep it at auto and set IR intensity to high. 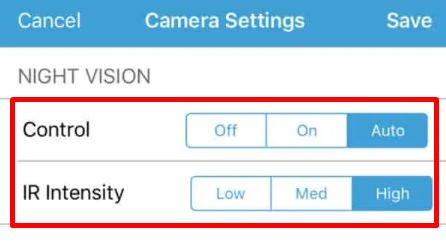
If the problem persists, consider using an IR flood light to provide additional IR illumination for better nighttime motion detection. IR flood lights are invisible to the human eye, enhancing the performance of your Blink camera in the dark.
Expired Subscription
If Blink is not recording events, it could be due to storage issues. All Blink devices offer a 30-day free trial of Blink Subscription Plus, which securely stores photos and videos from your camera in the Amazon cloud.

After the 30-day free trial, to continue storing data, you must either subscribe to Blink’s cloud storage plan or use a USB flash drive with sync module 2 (not available with the original sync module). Check if your subscription is active or if a USB flash drive is connected to your sync module if the camera isn’t recording events.
For multiple cameras, we recommend Blink Subscription Plus, which is $10/month.
Reset Blink Camera
In case your Blink camera not detecting motion even after trying all the above troubleshooting methods, a hard reset can often resolve problems with your Blink camera.
Reset On Blink Mini Camera
To perform a hard reset on a Blink Mini camera, locate the reset button on the bottom of the camera segment near the stand attachment. Press and hold the button with a narrow object (like the blunt end of a toothpick) for 5 seconds until the red light changes to green and blue lights. If the red light persists for more than 1-2 minutes during the reset, contact Blink support.
Reset On Blink Outdoor, Indoor, XT, or XT2
To reset Blink Outdoor, Indoor, XT, or XT2 cameras, open the back cover to access the reset button located between the batteries near the top-right of the device.
Use a blunt, thin object (like the back end of a toothpick) to press the button for at least 5 seconds until the camera lights start flashing, indicating a successful reset.
Reset On Blink Video Doorbell
To reset the Blink Video Doorbell, start with a soft reset by removing one battery for 5 seconds, then re-inserting it. For a factory reset, press the reset button above the battery compartment with a thin, blunt object for 5 seconds. The red LED will flash to confirm the successful reset.
ALSO READ: –
- Blink Armed vs Disarmed: All You Need To Know
- Tips for Purchasing Home Security Motion Detectors
- How to Solve Math Problems Using a Phone’s Camera
Blink cameras are vital for a secure smart home, seamlessly connecting to Alexa and other systems. Despite occasional motion detection and other minor issues, they rarely encounter problems, making them a top choice for reliable home security.
If your Blink camera is not detecting motion, consider the above possible issues before blaming it on the camera. If the camera is faulty and within one year of purchase, take advantage of the one-year warranty to get a replacement device.


