Instagram started as a simple photo sharing app and has grown into a space for moments, creativity, businesses, and stories. Photos are often edited before they are posted, and AI has now become part of that process. AI has made a lot of work easier, from cleaning up photos to creating new images in just a few clicks. At the same time, its growth has changed the way people work, and some jobs have also been affected.
AI is now everywhere, and Instagram has also started paying more attention to images that may have been created or edited with AI. This is where the AI Info label comes in. You may see it below a photo when Instagram detects signs that AI was used during the editing process. The label can make sense for an image created entirely with AI, but it can feel unnecessary when you only used AI for a small edit. For example, you might use an AI tool to clean up the background, remove an unwanted object, or upscale a photo. The original image can still be your own work, yet Instagram may still place an AI Info label on it. You may simply want your post to appear without that label, or you may worry that people will assume the whole image was made with AI.
I wasn’t trying to deceive anyone. I just didn’t want every post flagged when I had only used AI for small edits. Some of my images were entirely my own and still got tagged because I had run them through an upscaler. That was not what I expected. So I started looking for a way to deal with the AI Info label. A lot of the methods I found did not work for me, while other options required paid desktop software that I did not want to use. After trying different approaches, I found a few working ways to bypass the AI Info on Instagram, and I’ll share them below.
How to Remove AI Info From Instagram: Working Methods That Actually Help
Take a Screenshot After Editing
One simple method to bypass AI Info on Instagram post or story is to take a screenshot of the edited image and use that screenshot as the file you upload. Since the screenshot is a new image file, it does not carry the same editing information from the original file.
- Finish editing your image with the AI tool.
- Open the final image on your screen and make sure the full image is clearly visible.
- Take a screenshot of the image using your device.
- Now, crop the screenshot if needed so only the image remains.
- Save the screenshot and upload that new file to Instagram post or story or Facebook instead of the original AI edited image.
Use an AI Label Removal Website
When you edit an image with certain AI tools, the file can carry C2PA Content Credentials and other metadata that records information about how the image was created or edited. Instagram and other platforms can read this information and use it when deciding to show an AI Info or Made with AI label. But you need to remember that when you upload your photos to these third party websites, your images will be handled by an external service. So, avoid uploading private photos or images containing personal information if you are not comfortable sharing them. For a random photo that does not contain sensitive details, this may be less of a concern.
- On your phone or desktop, open a browser and visit a tool such as removeailabel.com or instalabelremover.com
- Tap the Upload button, choose the photo from your phone, and let the website process it.
- Once your image is uploaded, the tool removes the C2PA information and other supported metadata from the file.
- After that, download the cleaned photo to your phone. Then upload this new copy to Instagram, Facebook, Pinterest, or TikTok instead of the original file.
Add Music or Location After Posting
If you have already posted the image on Instagram and the AI Info label appears, you can try this method.
- Open Instagram and go to your profile. Open the post that has the “AI Info” label.
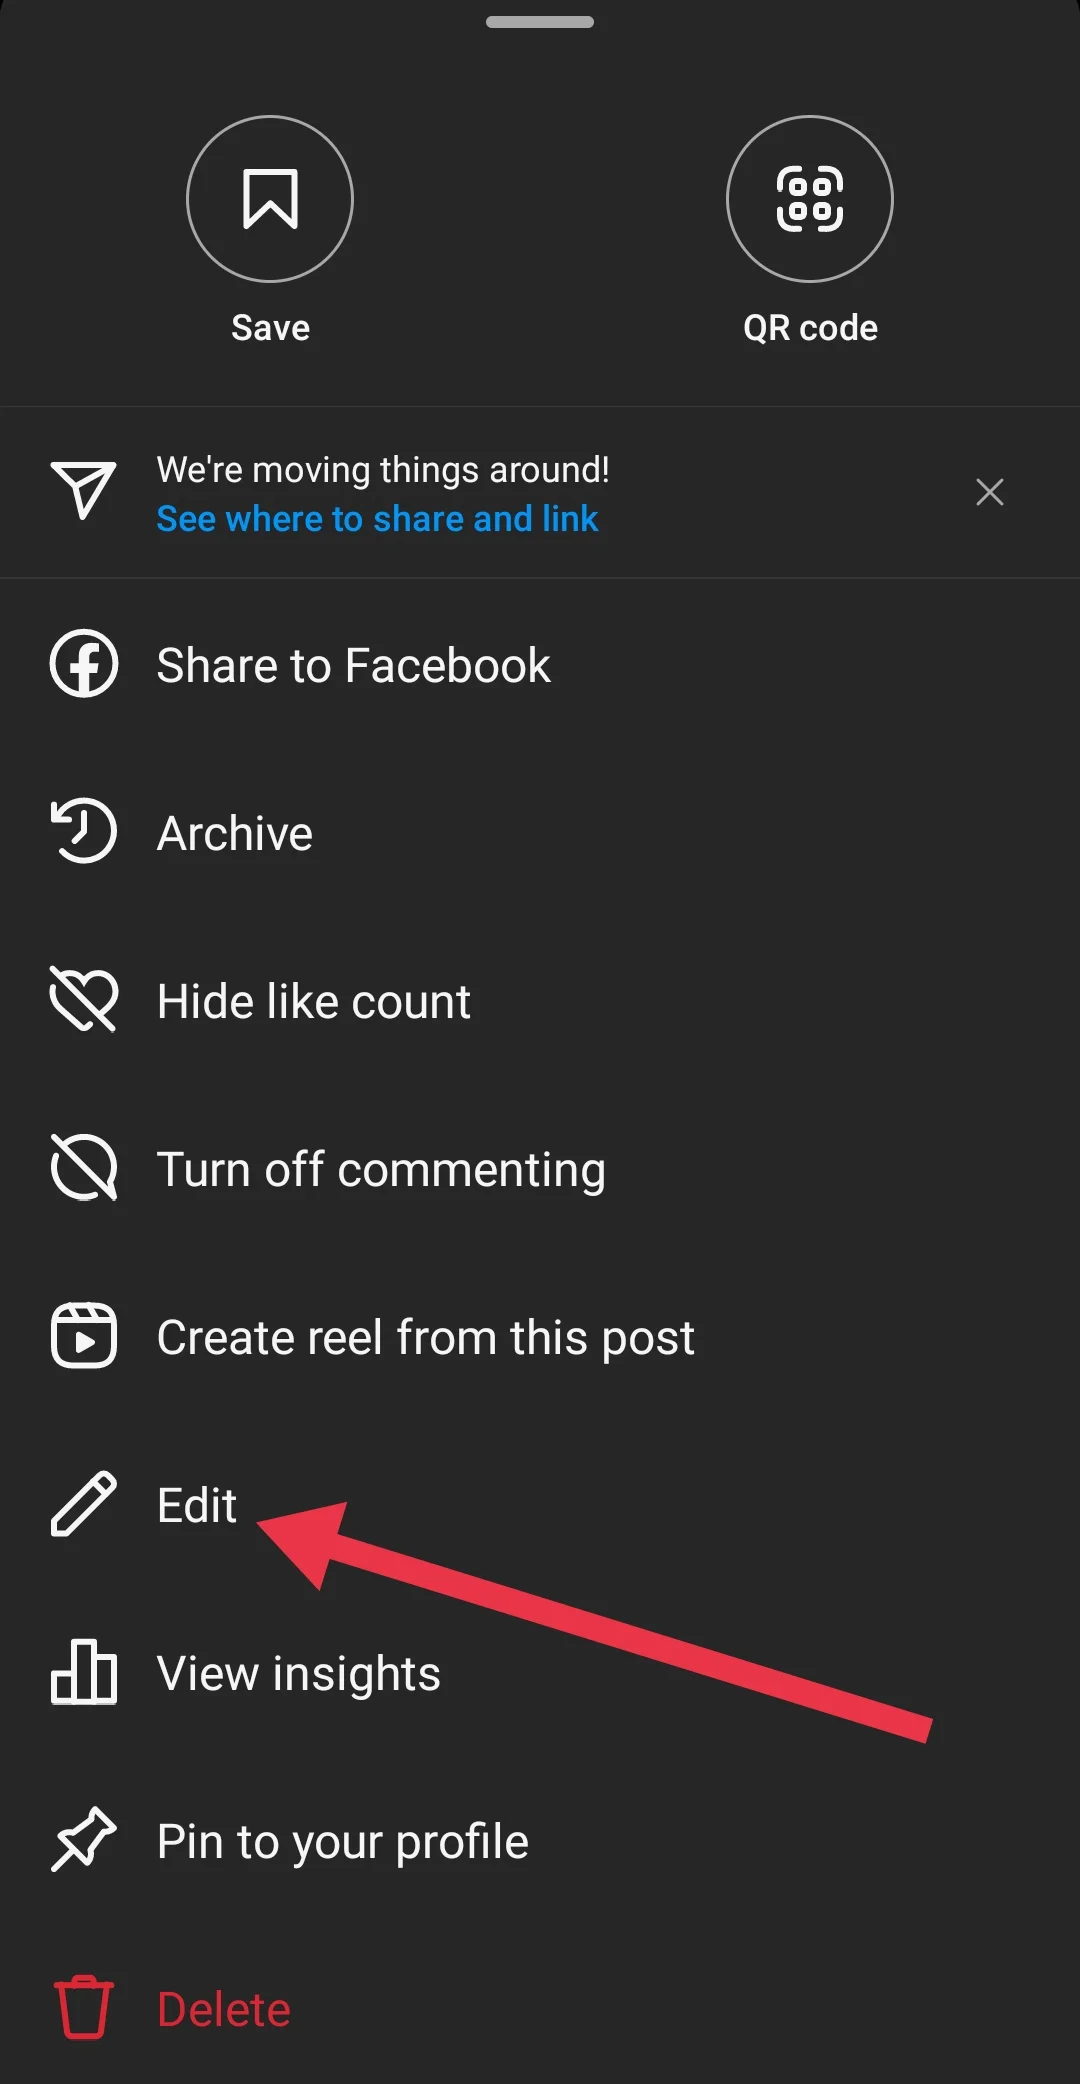
- Tap the three dot menu in the top right corner and select Edit.

- You should see options such as Add Paid Partnership, Add Music, Add AI Label, and Add Location, depending on your post.
- Tap Add Music or Add Location, choose your option, and save the changes.
- Check the post again to see if the AI Info label has disappeared. This method may not work for every account or post, as Instagram can change how these labels are handled.
Bonus tip: If you plan to try this method, consider leaving music and location empty when you first upload the post. You can then add one of them later through the Edit option if the “AI Info” label appears.
Try a Metadata Cleaner on Android
Android users can also use apps that remove metadata from photos before they are uploaded. These apps are useful when you want to clean the file directly on your phone instead of using a computer. Depending on the app, they can remove EXIF details and other metadata that may be attached to the image.
- First of all, install a metadata cleaning app such as Metadata Remover, Scrambled Exif, or Image Meta Cleaner from F Droid.
- Open the app and select the photo you want to clean from your phone.
- Use the app’s option to remove or clean the photo metadata.
- Save the cleaned copy to your phone.
- Upload the new copy to Instagram and check if the AI Info label still appears.
These apps can be useful if you want to handle the process entirely on your Android phone
Copy the Image Into a New Document
If you are using a PC, there is one more thing you can try. Instead of uploading the original file, make a completely new copy of the image by placing it into a fresh document. This can leave behind some of the metadata from the original file, including information linked to AI editing. It does not change how the photo looks. You are simply creating a new image file from the visible pixels.
- Open your finished photo in Photoshop, Paint, or another image editor on your PC.
- Press Ctrl + A to select the entire image, then press Ctrl + C to copy it.
- Press Ctrl + N to create a new document. Use the same image dimensions and create the new file.
- Press Ctrl + V to paste the copied image into the new document.
- Export or save the new image as a fresh file, then upload this new copy to Instagram.
- Before uploading, check the new file if your image editor provides an option to view its metadata. Some programs may add their own information when saving or exporting the image.
Copy the Edited Image Into a New Photoshop Document
If you have used an Adobe AI feature such as Generative Fill, Photoshop can add Content Credentials to the image. These credentials can then lead Instagram or Facebook to show the Made with AI label.
One method that can remove those credentials is to copy the edited image into a new Photoshop document and save it as a new file. Here is how to do it.
- Open your edited image in Photoshop and go to File → Export → Export As. Look at the bottom right corner for Content Credentials. If it says Not enabled for this document, Photoshop is not adding Content Credentials to the image. If it says a Content Credential will be applied because the image was made with Generative AI, the file contains AI related information that Instagram or Facebook may detect. Click Cancel to close the window.
- Finish all the AI based edits you want to make to the image. You can use features such as Generative Fill to remove an unwanted object, clean up an area, or make other small changes.
- Once your editing is finished, flatten the image by going to Layer → Flatten Image. You can also use Command + E on Mac or Ctrl + E on Windows. This combines the layers into a single image.
- Go to File → New to create a new Photoshop document. Enter the same width and height as your edited image. For example, if your image is 2568 × 1972 pixels, use those same dimensions for the new document. Then click Create.
- Go back to your edited image and press Command + A on Mac or Ctrl + A on Windows to select the image. Press Command + C or Ctrl + C to copy it.
- Now, switch to the new Photoshop document and press Command + V on Mac or Ctrl + V on Windows to paste the edited image into the new document.
- Go to File → Export → Export As again and check the Content Credentials section. If it now says Not enabled for this document, the new document does not have the same Content Credentials attached to it.
- Export the image from the new document and use this new file when posting to Instagram or Facebook. Keep in mind that social media platforms can change how their AI labels work, so this check cannot guarantee how every image will be labeled. It simply gives you a way to check the file before uploading it.
RELATED GUIDES:
- How to Fix Instagram Filters Not Working [Android & iPhone]
- How to Fix Instagram Story ‘Waiting for Connection’
So, those are the methods you can try when Instagram adds an AI Info label to your post or Story. I know it can be a little unexpected when a photo you edited with a small AI touch suddenly carries that label.
Hopefully, one of these methods works for you. If you have found another way that worked on your Instagram account, share it in the comments. I’d love to know what worked for you, and it could also help someone else looking for a way to deal with the same issue.